1. Introduction
This manual provides essential instructions for the proper installation, operation, and maintenance of your Rackchoice 2U Rackmount Case, model m236. Please read this manual thoroughly before proceeding with installation to ensure safe and efficient use of the product.
2. Safety Information
Always observe basic safety precautions when handling computer components. Disconnect power before installation or maintenance. Avoid exposing the chassis to moisture or extreme temperatures. Handle components with care to prevent damage. Wear appropriate protective gear if necessary.
3. Package Contents
Verify that all components are present before beginning installation. The package typically includes:
- Rackchoice 2U Rackmount Case (m236)
- Mounting screws and hardware
- Keys for the front panel door
- User Manual (this document)
Note: Motherboards, hard drives, and power supply units are not included with the chassis.

Figure 3.1: Interior layout of the 2U Rackmount Case. This image illustrates the internal compartments for two Mini-ITX motherboards, two 1U Flex PSUs, and four 3.5-inch hard drives. Note that these components are not included with the chassis.
4. Setup and Installation
4.1. Preparing the Chassis
Before installing components, ensure the chassis is placed on a stable, flat surface. Remove the top cover by unscrewing the retaining screws.

Figure 4.1: Internal view of the chassis, highlighting the layout for component installation and potential cable management routes.
4.2. Motherboard Installation
The chassis supports two Mini-ITX motherboards. Carefully align each motherboard with the standoffs inside the chassis and secure them with the provided screws. Ensure all necessary cables (power, data, front panel connectors) are routed appropriately.
4.3. Power Supply Unit (PSU) Installation
This chassis is designed for two 1U Flex PSUs. Install each PSU into its designated bay and secure it with screws. Connect the necessary power cables to your motherboards and other components.
4.4. Hard Drive Installation
The chassis features four internal 3.5-inch drive bays. Mount your 3.5-inch hard drives into these bays and secure them. Connect SATA data and power cables to each drive.
4.5. PCI/PCIe Card Installation
The chassis provides two PCI slots. To install PCI/PCIe cards, a riser card is required (not included). Install the riser card first, then mount your PCI/PCIe expansion card onto the riser card and secure it.

Figure 4.2: Chassis dimensions and highlighted areas for PCI/PCIe riser card installation. Riser cards are necessary for using expansion cards.
4.6. Front Panel Connections
The front panel includes four USB 3.0 ports (compatible with USB 2.0). Connect the internal USB 3.0 header cables from the front panel to your motherboards.
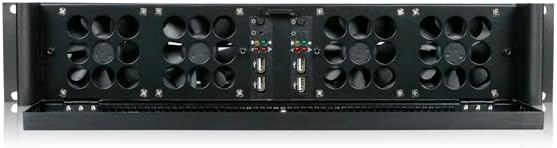
Figure 4.3: Front panel with security door open, showing the four 80mm cooling fans and front USB 3.0 ports.
4.7. Optional Sliding Rail Installation
The chassis supports optional 20-inch sliding rails for easy rack mounting and access. Follow the instructions provided with the rail kit for proper installation. A demonstration of rail installation is available in the video below.
Video 4.1: This video demonstrates the installation process for the optional 20-inch sliding rails onto the Rackchoice 2U Rackmount Case and into a server rack. This allows the chassis to slide in and out for maintenance.
5. Operating Instructions
5.1. Powering On/Off
After all components are installed and connected, close the top cover and secure it with screws. Connect the power cables from the PSUs to a power source. Press the power button on the front panel to turn on the system. To power off, use the operating system's shutdown procedure or press and hold the power button.
5.2. Front Panel Features
- Power Button: Initiates system power on/off.
- Reset Button: Restarts the system.
- USB 3.0 Ports: Four front-access ports for connecting USB devices.
- Keylock Door: Provides security for the front panel buttons and ports. Use the provided keys to lock or unlock the door.

Figure 5.1: Front view of the chassis with the security door closed, illustrating the keylock mechanism.
6. Maintenance
6.1. Cleaning Dust Filters
The chassis includes four 80mm cooling fans with dust filters. Regularly inspect and clean the dust filters to maintain optimal airflow and cooling performance. Gently remove the filters and clean them with compressed air or a soft brush. Reinstall the filters securely.
6.2. Fan Replacement
The chassis is equipped with four 80mm cooling fans. If a fan malfunctions, it can be replaced. Disconnect power, remove the top cover, and carefully detach the faulty fan. Install a new 80mm fan, ensuring correct orientation for airflow, and reconnect its power cable.
7. Troubleshooting
- System not powering on: Check all power connections, including the PSU to the wall outlet and internal PSU cables to motherboards. Ensure the power button is functioning correctly.
- Overheating: Verify that all cooling fans are operating. Clean dust filters if they are obstructed. Ensure adequate ventilation around the chassis.
- USB ports not working: Check the internal USB 3.0 header cable connection to the motherboard. Ensure motherboard drivers are installed.
- PCI/PCIe card not detected: Confirm the riser card is correctly installed and the expansion card is seated properly. Check for necessary drivers.
8. Specifications
| Feature | Specification |
|---|---|
| Model Name | m236 |
| Brand | rackchoice |
| Form Factor | 2U Rackmount |
| Motherboard Compatibility | Dual Mini-ITX |
| Internal Drive Bays | 4 x 3.5 inches |
| Front USB Ports | 4 x USB 3.0 (compatible with USB 2.0) |
| Cooling Fans | 4 x 80mm with dust filter |
| Expansion Slots | 2 (requires riser card for PCI/PCIe) |
| Power Supply Support | 2 x 1U Flex PSU |
| Dimensions (D x W x H) | 14.17"D x 19"W x 3.5"H |
| Item Weight | 14 Pounds |
| Security Features | Keylock door |
9. Warranty and Support
This Rackchoice 2U Rackmount Case (model m236) comes with a 1-year manufacturer's warranty. For technical support, warranty claims, or further assistance, please contact Rackchoice customer service through their official website or the retailer where the product was purchased. Please have your model number (m236) and proof of purchase ready when contacting support.