SilverStone Technology SST-FA512Z-BG
SilverStone Technology FARA 512Z User Manual
Model: SST-FA512Z-BG | Brand: SilverStone Technology
1. Product Overview
The SilverStone FARA 512Z is a high-airflow ATX mid-tower chassis designed for optimal cooling performance and aesthetic appeal. It features a full mesh front bezel for maximum air intake and comes equipped with a tempered glass side panel to showcase your internal components. This chassis supports extensive liquid cooling options and offers versatile component installation.

Figure 1.1: Front view of the FARA 512Z chassis with illuminated ARGB fans.
2. Key Features
- High Airflow Design: Features an all-mesh front bezel with ARGB lighting for vibrant aesthetics and unobstructed airflow.
- Radiator Support: Capable of supporting up to 360mm liquid cooling radiators at the front and up to 280mm at the top for efficient heat dissipation.
- Vertical GPU Mounting: Supports vertical mounting of graphics cards, allowing users to showcase their GPU.
- Comprehensive Front I/O: Includes 1x USB Type-C, 2x USB 3.0, 1x Audio, and 1x Mic ports for convenient connectivity.
- Pre-installed ARGB Fans: Comes with three 120mm ARGB fans pre-installed for immediate cooling and lighting effects.
- Tempered Glass Side Panel: A clear tempered glass side panel provides a full view of your internal components.
- Cable Management: Strategically placed routing holes facilitate clean and efficient cable management.
- Magnetic Dust Filters: Includes magnetic dust filters to help prevent dust accumulation and maintain hardware longevity.
3. Specifications
| Category | Specification |
|---|---|
| Brand | SilverStone Technology |
| Model Name | FARA 512Z (SST-FA512Z-BG) |
| Case Type | ATX Mid-Tower |
| Motherboard Compatibility | ATX, Micro-ATX, Mini-ITX |
| Dimensions (LxWxH) | 16.8 x 8.27 x 19.02 inches (426.77 x 210 x 483.2 mm) |
| Item Weight | 17.61 pounds |
| Material | Steel, Tempered Glass |
| Front I/O Ports | 1x USB Type-C, 2x USB 3.0, 1x Audio, 1x Mic |
| Expansion Slots | 7 (Standard) |
| Drive Bays | 2x 3.5" (internal), 2x 2.5" (internal) |
| Cooling Method | Air, Water |
| Pre-installed Fans | 3x 120mm ARGB fans (front) |
| Max CPU Cooler Height | 162mm (from video) |
| Max GPU Length | 360mm (from video, with 120mm front fans) |
| Max PSU Length | 190mm (drive cage front), 160mm (drive cage rear) (from video) |
4. Setup and Installation
4.1 Safety Precautions
- Always disconnect the power supply from the wall outlet before installing or removing any components.
- Wear an anti-static wrist strap to prevent electrostatic discharge (ESD) damage to components.
- Handle components carefully, especially the tempered glass panel.
4.2 Preparing the Chassis
Remove the tempered glass side panel by unscrewing the thumbscrews at the rear of the case and carefully pulling the panel away. Place it on a soft, flat surface to prevent scratches.

Figure 4.1: Internal layout of the FARA 512Z chassis, showing motherboard tray and drive bays.
4.3 Motherboard Installation
- Install the I/O shield into the rear opening of the chassis.
- Align your ATX, Micro-ATX, or Mini-ITX motherboard with the standoffs inside the chassis. Ensure all screw holes align.
- Secure the motherboard using the provided screws.
4.4 Power Supply Unit (PSU) Installation
The PSU mounts at the bottom rear of the chassis. Slide the PSU into the dedicated compartment from the side and secure it with screws from the rear of the case.
Note the maximum PSU length: 190mm if the drive cage is in the front position, or 160mm if the drive cage is in the rear position.
4.5 Storage Drive Installation
The FARA 512Z supports 2x 3.5" drives in the removable drive cage and 2x 2.5" drives mounted behind the motherboard tray.

Figure 4.2: Locations for 2.5" SSDs (behind motherboard tray) and 3.5" HDDs (in drive cage).

Figure 4.3: The 3.5" drive cage located at the bottom front of the chassis.
4.6 Graphics Card (GPU) Installation
Install your graphics card into the appropriate PCIe slot on your motherboard. The chassis supports GPUs up to 360mm in length (when 120mm front fans are installed between the front panel and chassis). The FARA 512Z also supports vertical GPU mounting (requires a separate PCIe riser cable, not included).

Figure 4.4: Rear expansion slots, including options for vertical GPU mounting.
4.7 Cooling System Installation (Fans & Radiators)
The chassis comes with three 120mm ARGB fans pre-installed at the front. Additional fan and radiator support:
- Front: Up to 3x 120mm or 2x 140mm fans; up to 360mm radiator.
- Top: Up to 2x 120mm or 2x 140mm fans; up to 280mm radiator.
- Rear: 1x 120mm fan.
4.8 Front I/O Connections
Connect the front I/O cables (USB 3.0, USB Type-C, Audio, Mic, Power, Reset, LED Switch) to the corresponding headers on your motherboard. Refer to your motherboard manual for exact header locations.
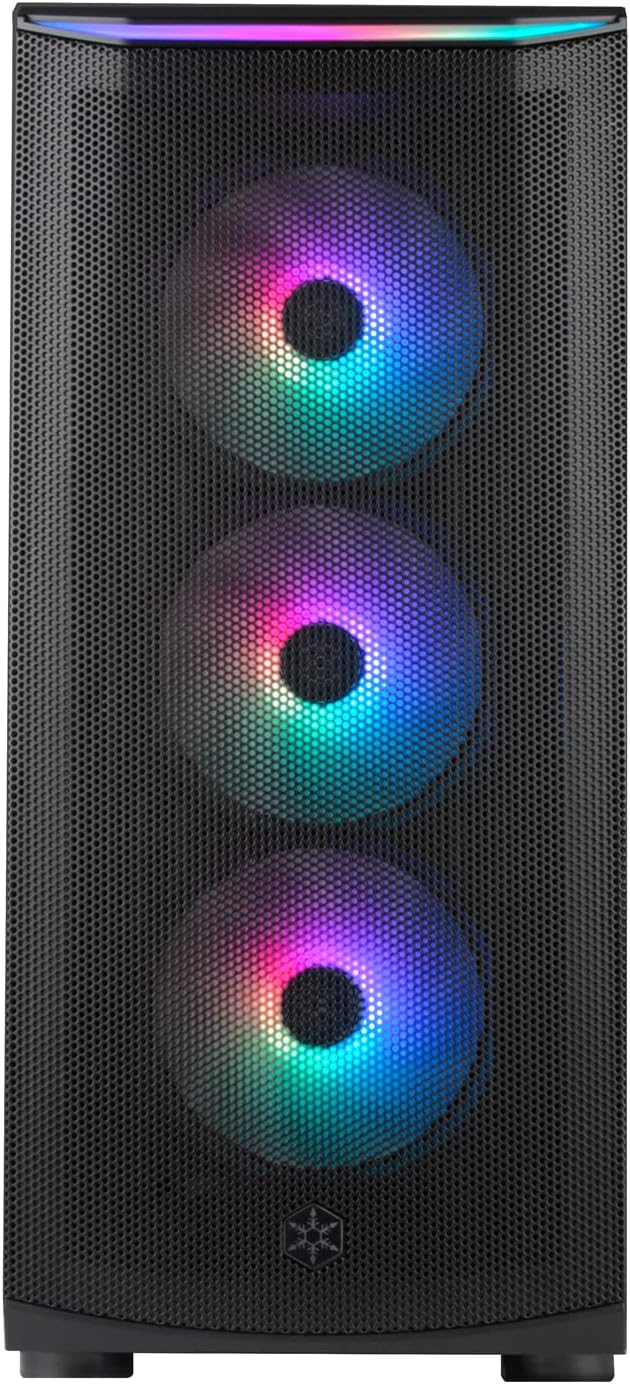
Figure 4.5: Front I/O panel featuring Power, Reset, LED Switch, USB 3.0, Mic, Audio, and USB Type-C ports.

Figure 4.6: ARGB controller hub for managing fan lighting and speed.
5. Operating Instructions
5.1 Powering On/Off
Press the Power Button on the front I/O panel to turn on your system. To turn off, either shut down via your operating system or press and hold the Power Button for a few seconds.
5.2 ARGB Lighting Control
The pre-installed ARGB fans and front light strip can be controlled via the dedicated LED Switch Button on the front I/O panel. Press the button to cycle through various lighting modes and colors. For advanced control and synchronization with other ARGB components, connect the ARGB controller to a compatible motherboard header and use the motherboard's software (if available).
6. Maintenance
6.1 Dust Filter Cleaning
The FARA 512Z includes magnetic dust filters on the top and bottom (for PSU intake) to prevent dust buildup. Regularly clean these filters to maintain optimal airflow and cooling performance.
- Gently remove the magnetic dust filters.
- Use a soft brush or vacuum cleaner to remove accumulated dust.
- Rinse with water if necessary, ensuring they are completely dry before reattaching.

Figure 6.1: Removable magnetic dust filter located at the bottom of the chassis.
6.2 General Cleaning
Wipe the exterior of the chassis with a soft, damp cloth. Avoid using harsh chemicals or abrasive materials that could damage the finish or tempered glass.
7. Troubleshooting
7.1 System Not Powering On
- Ensure the power supply is properly connected to the wall outlet and the power switch on the PSU is in the 'ON' position.
- Verify that the front panel power button cable is correctly connected to the motherboard's front panel header.
- Check all internal power connections (24-pin ATX, 8-pin CPU, PCIe power for GPU) are securely seated.
7.2 No Display Output
- Confirm your monitor is connected to the graphics card (GPU) output, not the motherboard's integrated graphics output (unless using integrated graphics).
- Reseat the graphics card in its PCIe slot.
- Check that all power cables to the graphics card are securely connected.
7.3 Fan or ARGB Issues
- Ensure fan power cables are correctly connected to the motherboard or the ARGB controller.
- Verify ARGB cables are properly connected to the ARGB controller and/or motherboard ARGB headers.
- If using the ARGB controller, ensure it is powered via SATA power from your PSU.
8. Warranty and Support
SilverStone Technology products are manufactured to the highest quality standards. For detailed warranty information, technical support, or service inquiries, please visit the official SilverStone Technology website or contact their customer support directly. Please retain your proof of purchase for warranty claims.
Official Website: www.silverstonetek.com
Ask a question about this manual
Ask about setup, troubleshooting, compatibility, parts, safety, or missing instructions. Manuals+ will review the question and use this page’s manual context to help answer it.