Introduction
This manual provides detailed instructions for the installation, operation, and maintenance of your NORXI 3-in-1 Multifunction Gauge. This digital instrument is designed to accurately display water temperature, voltage, and time for motorcycles and cars with a 12V power supply. Please read this manual thoroughly before installation and use to ensure proper function and safety.
Product Features
- Multifunctional Display: Integrates water temperature, voltmeter, and clock functions into a single digital LCD instrument.
- Wide Measuring Ranges:
- Voltmeter: 8V to 50V DC
- Clock: 24-hour format
- Water Temperature: 0°C to 120°C (32°F to 248°F), switchable between Celsius and Fahrenheit.
- Alarm Functions: Features a flash alarm for low voltage (below 11.5V) and high water temperature (exceeding 120°C / 248°F).
- Compact Design: Super slim square design (2.36 x 1.18 x 0.53 inches) for convenient installation without obstructing other instruments.
- Easy Installation: Simple wiring and mounting options suitable for all 12V motorcycles and cars.
Specifications
| Parameter | Value |
|---|---|
| Brand | NORXI |
| Model | Mini3 |
| Material | Acrylonitrile Butadiene Styrene (ABS) |
| Dimensions (L x W x H) | 2.36 x 1.18 x 0.53 inches |
| Weight | 0.18 Kilograms |
| Voltmeter Range | 8V ~ 50V |
| Clock Format | 24H |
| Water Temperature Range | 0°C ~ 120°C (32°F ~ 248°F) |
| Low Voltage Alarm | Below 11.5V |
| High Temperature Alarm | Exceeds 120°C / 248°F |
Setup and Installation
1. Wiring Instructions
Connect the wires as follows to ensure proper power supply and operation:
- Red Wire: Connect to the vehicle's DC 12V battery positive terminal (+).
- Black Wire: Connect to the vehicle's body or chassis for ground (-).
- Brown Wire: Connect to the key-controlled DC 12V main power switch (+), ensuring the gauge powers on and off with the ignition.

Image: Wiring connections for the gauge. The red wire connects to the battery positive, the black wire to ground, and the brown wire to the ignition switch.
2. Water Temperature Sensor Installation
To install the water temperature sensor, follow these steps:
- Measure Pipe Size: First, accurately measure the outer diameter of your vehicle's water pipe to select the correct adapter size.
- Select Adapter: Refer to the table below to choose the appropriate adapter based on your pipe's inside diameter.

Image: Guide for measuring water pipe diameter and selecting the correct adapter.
| Inside Diameter | Adapter Size | Outer Diameter Range |
|---|---|---|
| 16MM | 16MM | 19-21MM |
| 18MM | 18MM | 21-24MM |
| 22MM | 22MM | 25-28MM |

Image: Available water temperature sensor adapters and hose clamps.
- Cut Water Pipe: Carefully cut a section of the water pipe where the sensor adapter will be installed.
- Install Adapter: Insert the chosen adapter into the cut section of the water pipe and secure it with the provided hose clamps. Connect the temperature sensor to the adapter.
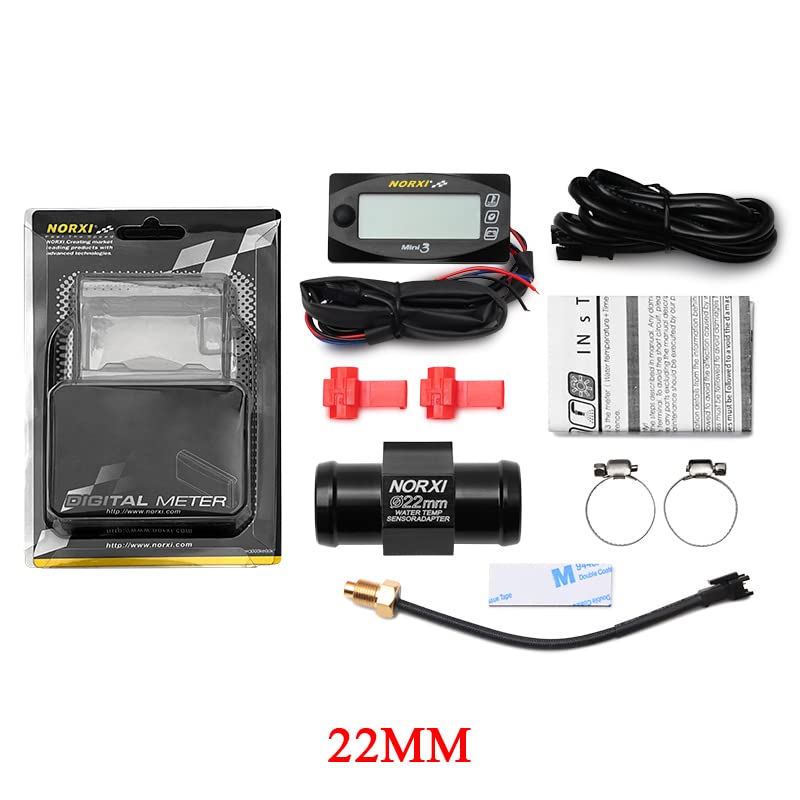
Image: Close-up of the water temperature sensor, showing its 10mm thread pitch.
3. Mounting the Gauge
The compact design allows for flexible mounting options:
- Dashboard Mounting: Use double-sided tape to secure the multimeter around the dashboard.
- Bracket Mounting: Utilize the provided brackets to mount the gauge, for example, around the rearview mirror or handlebar.

Image: Example of the gauge mounted on a motorcycle handlebar.
Operating Instructions
1. Display Modes
The NORXI 3-in-1 Multifunction Gauge cycles through three display modes: Water Temperature, Voltage, and Clock. The gauge automatically switches between these displays.

Image: The gauge displaying water temperature, voltage, and time in sequence.
2. Switching Temperature Units (Celsius/Fahrenheit)
To switch the water temperature display between Celsius (°C) and Fahrenheit (°F):
- Quickly press the button on the gauge 7 times. The display will toggle between the two units.

Image: The gauge displaying temperature in Celsius and Fahrenheit, illustrating the unit switching function.
Maintenance
To ensure the longevity and accurate performance of your NORXI 3-in-1 Multifunction Gauge, follow these general maintenance guidelines:
- Cleaning: Wipe the display and casing with a soft, damp cloth. Avoid using abrasive cleaners or solvents, which can damage the surface.
- Connections: Periodically check all wiring connections to ensure they are secure and free from corrosion.
- Environmental Protection: While the gauge is designed for automotive use, protect it from extreme weather conditions, direct prolonged sunlight, and excessive moisture when possible.
Troubleshooting
The gauge includes built-in alarm functions to alert you to potential issues:
- Low Voltage Alarm: If the voltage drops below 11.5V, the gauge will flash to indicate a low battery or charging system issue. Check your vehicle's battery and charging system.
- High Water Temperature Alarm: If the water temperature exceeds 120°C (248°F), the gauge will flash. This indicates engine overheating. Immediately check your vehicle's cooling system.
If you experience other issues not covered here, please ensure all connections are correct and secure. For persistent problems, contact customer support.
Warranty and Support
NORXI products are manufactured to high-quality standards. For warranty information or technical support, please refer to the contact details provided with your purchase or visit the official NORXI website. Please retain your proof of purchase for warranty claims.