
Nemesis Audio NA-C1500.1D
Nemesis Audio NA-C1500.1D Car Amplifier User Manual
Model: NA-C1500.1D
1. Introduction
Thank you for choosing the Nemesis Audio NA-C1500.1D Car Amplifier. This manual provides essential information for the proper installation, operation, and maintenance of your amplifier. Please read this manual thoroughly before attempting installation or operation to ensure optimal performance and safety.
2. Safety Information
Always observe the following safety precautions during installation and operation:
- Disconnect the vehicle's negative battery terminal before any electrical work.
- Ensure proper grounding to prevent electrical hazards.
- Use appropriate wire gauges for power and speaker connections to avoid overheating.
- Mount the amplifier securely in a well-ventilated area, away from moisture and direct heat.
- Do not operate the amplifier if it is damaged or malfunctioning.
- Seek professional assistance if you are unsure about any installation steps.
3. Product Features
The Nemesis Audio NA-C1500.1D is a high-performance mono car amplifier designed for powerful audio reproduction. Key features include:
- Power Output (RMS) @ 1 Ohm: 1x1500W
- Power Output (RMS) @ 2 Ohm: 1x850W
- Power Output (RMS) @ 4 Ohm: 1x450W
- Frequency Response: 15Hz-300KHz
- Total Harmonic Distortion (THD): <0.1%
- Input Level: 13.8V-14.4V
- Low Pass Filter (LPF) Crossover Control: 40Hz-180Hz
- Subsonic Crossover: OFF-50Hz
- Bass Boost: 0-12dB

Image 1: Top view of the Nemesis Audio NA-C1500.1D amplifier, showcasing its sleek black chassis and branding.
4. Installation and Setup
Proper installation is crucial for the performance and longevity of your amplifier. Follow these steps carefully:
4.1 Mounting the Amplifier
- Choose a mounting location that is dry, well-ventilated, and protected from direct sunlight and excessive heat.
- Ensure sufficient airflow around the amplifier's heatsink fins.
- Secure the amplifier firmly to a solid surface using appropriate screws.
4.2 Wiring Connections
Refer to the diagrams below for correct wiring. Always use high-quality wiring and connectors.
Power Connections
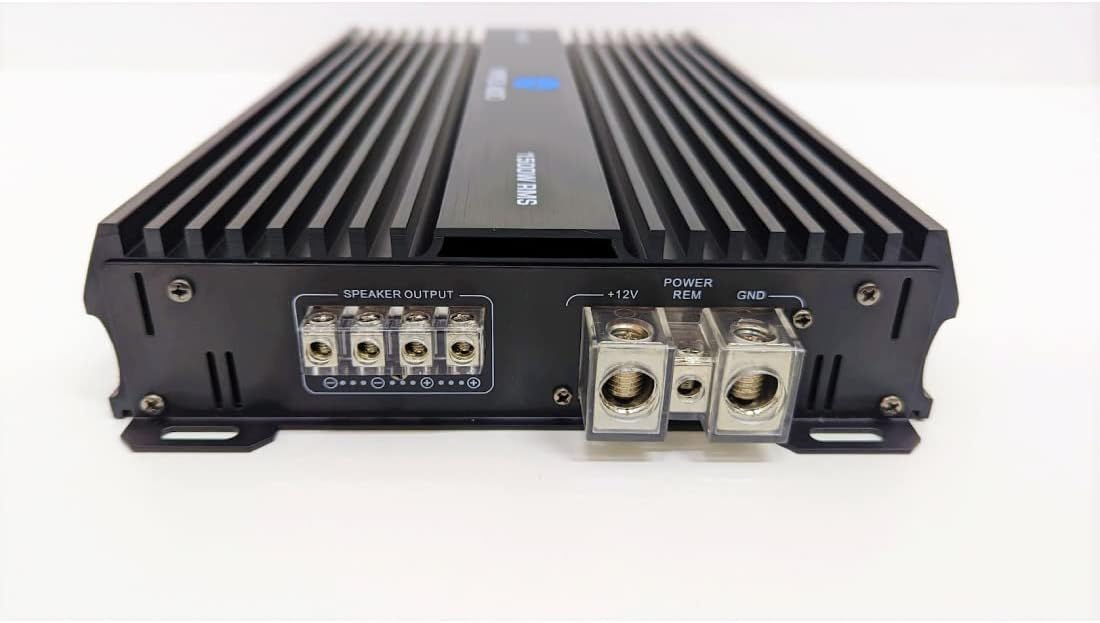
Image 2: Rear view of the amplifier, detailing the power input terminals (+12V, REM, GND) and speaker output terminals.
- +12V (Power): Connect to the positive terminal of the vehicle's battery. Use a fuse holder with an appropriate fuse (not included) within 18 inches of the battery.
- REM (Remote Turn-On): Connect to the remote turn-on lead from your head unit. This wire turns the amplifier on and off with your car's audio system.
- GND (Ground): Connect to a clean, unpainted metal surface of the vehicle chassis. Ensure a solid, low-resistance connection.
Speaker Output Connections
- Connect your subwoofer(s) to the "SPEAKER OUTPUT" terminals. Ensure correct polarity (+ to + and - to -).
- This is a mono amplifier, designed for a single subwoofer or multiple subwoofers wired to a compatible impedance. Refer to your subwoofer's specifications for impedance matching.
Audio Input Connections

Image 3: Front view of the amplifier, displaying the RCA input jacks, gain control, and crossover adjustment knobs.
- INPUT (RCA): Connect the RCA output cables from your head unit to the amplifier's RCA input jacks.
5. Operating Instructions
Once all connections are made and verified, you can power on your audio system. The amplifier will turn on automatically with your head unit via the remote turn-on wire.
5.1 Initial Power-Up
- Turn on your head unit. The amplifier's power indicator should illuminate.
- Start with all amplifier controls (Gain, LPF, Subsonic, Bass Boost) at their minimum or "OFF" positions.
- Gradually increase the head unit's volume to a moderate level.
- Slowly increase the amplifier's GAIN control until the desired volume is achieved without distortion.
6. Controls and Adjustments
The NA-C1500.1D amplifier features several controls to fine-tune your audio output:
- GAIN (Input Level): Adjusts the input sensitivity of the amplifier to match the output of your head unit. Set this to the lowest possible setting that achieves maximum clean output.
- LPF (Low Pass Filter): This control allows only frequencies below the set point to pass through to the subwoofer. Adjustable from 40Hz to 180Hz. Typically set between 80Hz and 120Hz for subwoofers.
- SUBSONIC: Filters out extremely low frequencies that are inaudible and can damage subwoofers. Adjustable from OFF to 50Hz. Set this slightly below your subwoofer's port tuning frequency or around 20-30Hz for sealed enclosures.
- BASS BOOST: Provides an adjustable bass enhancement from 0 to 12dB. Use sparingly to avoid distortion and potential speaker damage.
7. Maintenance
Your Nemesis Audio amplifier requires minimal maintenance to ensure long-term performance:
- Keep the amplifier clean and free of dust. Use a soft, dry cloth for cleaning.
- Ensure that the heatsink fins are not obstructed to allow for proper cooling.
- Periodically check all wiring connections for tightness and corrosion.
- Avoid exposing the amplifier to extreme temperatures or moisture.
8. Troubleshooting
If you experience issues with your amplifier, consult the following troubleshooting guide:
| Problem | Possible Cause | Solution |
|---|---|---|
| No Power / Amplifier Not Turning On |
|
|
| No Sound Output |
|
|
| Distorted Sound |
|
|
9. Specifications
Detailed technical specifications for the Nemesis Audio NA-C1500.1D amplifier:
| Feature | Value |
|---|---|
| Power Output (RMS) @ 1 Ohm | 1x1500W |
| Power Output (RMS) @ 2 Ohm | 1x850W |
| Power Output (RMS) @ 4 Ohm | 1x450W |
| Frequency Response | 15Hz-300KHz |
| THD | <0.1% |
| Input Level | 13.8V-14.4V |
| LPF Crossover Control | 40Hz-180Hz |
| Subsonic Crossover | OFF-50Hz |
| Bass Boost | 0-12dB |
| Item dimensions L x W x H | 12 x 8 x 3 inches |
| Voltage | 14.1 Volts (DC) |
| Maximum Supply Voltage | 14.4 Volts (DC) |
| Minimum Supply Voltage | 13.8 Volts |
| Mounting Type | Surface Mount |
| Item Weight | 5 pounds |
| Model Number | NA C150 1 |
| UPC | 636655224241 |
10. Warranty and Support
For warranty information and technical support, please refer to the official Nemesis Audio website or contact their customer service directly. Keep your purchase receipt as proof of purchase for any warranty claims.
Manufacturer: Nemesis Audio
Ask a question about this manual
Ask about setup, troubleshooting, compatibility, parts, safety, or missing instructions. Manuals+ will review the question and use this page’s manual context to help answer it.