1. Introduction
Thank you for choosing the V9 Mini Drone. This user manual provides essential information for the safe operation, setup, and maintenance of your new drone. Please read this manual thoroughly before operating the drone to ensure proper use and to maximize your flying experience. The V9 Mini Drone is a compact, foldable quadcopter equipped with a 4K camera, 2.4Ghz WiFi FPV, and intelligent flight features designed for both beginners and experienced pilots.
2. Product Overview
2.1 Package Contents
Upon unboxing, please verify that all components are present:
- V9 Mini Drone
- Remote Controller
- Modular Batteries (Quantity may vary based on package)
- USB Charging Cable
- Spare Propellers
- Propeller Guards
- Screwdriver
- User Manual

Figure 2.1: V9 Mini Drone and its complete set of accessories, including the drone, remote controller, batteries, charging cable, spare propellers, propeller guards, and a screwdriver.
2.2 Drone Components
- Foldable Arms: For compact storage and portability.
- Propellers: Four main propellers for lift and thrust.
- 4K Front Camera: High-resolution camera for aerial photography and videography.
- 1080P Bottom Camera: Secondary camera for optical flow positioning and alternative viewing angles.
- Modular Battery Compartment: Easy-to-install and remove battery for convenient charging and replacement.

Figure 2.2: Close-up view of the V9 Mini Drone's dual camera system, highlighting the 4K front camera and the 1080P bottom camera, which allows for switchable viewing angles during flight.

Figure 2.3: Detailed view of the V9 Mini Drone's 4K front camera lens, featuring a 110-degree ultra-wide-angle capture capability for expansive aerial photography.

Figure 2.4: The V9 Mini Drone in its folded state, demonstrating its compact size and ease of portability, fitting comfortably in the palm of a hand.
2.3 Remote Controller Overview
Familiarize yourself with the remote controller's layout and functions:

Figure 2.5: Diagram illustrating the various controls and indicators on the V9 Mini Drone's remote controller, including joysticks, fine-tuning buttons, and special function buttons.
- Speed Control: Adjusts flight speed.
- Throttle Lever: Controls altitude (left joystick).
- Steering Rod: Controls direction (right joystick).
- Fine-tuning Buttons: For precise adjustments to drone stability.
- One-click Take-off/Landing: Initiates automatic take-off or landing.
- Emergency Stop/Calibration: Stops motors or calibrates the drone.
- Headless/Return: Activates headless mode or initiates return-to-home.
- 360° Roll: Performs a stunt roll.
3. Setup
3.1 Charging the Battery
The V9 Mini Drone uses modular lithium batteries. Ensure the battery is fully charged before first use.
- Remove the modular battery from the drone.
- Connect the battery to the USB charging cable.
- Plug the USB cable into a 5V/1A USB power adapter (not included) or a computer USB port.
- The charging indicator light will show charging status (refer to battery or cable for specific light behavior).
- Charging typically takes approximately 60-90 minutes. A full charge provides about 15 minutes of flight time.
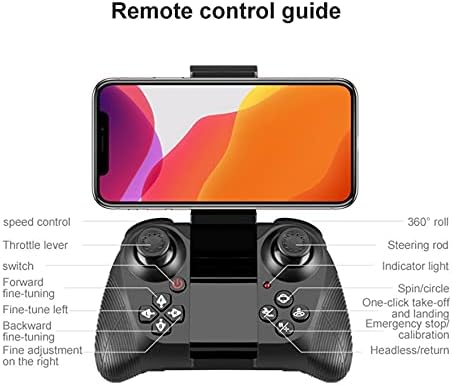
Figure 3.1: Illustration of the V9 Mini Drone's modular battery design, highlighting its easy loading and unloading for convenient charging and extended play time.
3.2 Installing the Battery
Once charged, insert the modular battery into the drone's battery compartment until it clicks securely into place.
3.3 Installing Propeller Guards (Optional)
For added protection, especially for beginners, attach the propeller guards to the drone's arms. Ensure they are firmly clipped.
3.4 Unfolding the Drone Arms
Gently unfold all four arms of the drone until they lock into their extended position. Ensure they are fully extended before flight.
4. Operating Instructions
4.1 Power On and Pairing
- Place the drone on a flat, level surface.
- Press and hold the power button on the drone until the indicator lights flash.
- Turn on the remote controller. The controller's indicator light will flash.
- Push the left joystick (throttle) all the way up, then all the way down. The drone and controller lights will become solid, indicating successful pairing.
4.2 Gyroscope Calibration
After pairing, perform gyroscope calibration for stable flight. Push both joysticks down and to the right simultaneously. The drone's lights will flash rapidly and then become solid, indicating successful calibration.
4.3 Take-off and Landing
- Manual Take-off: Push both joysticks down and outwards to start the propellers. Slowly push the left joystick (throttle) up to ascend.
- One-Key Take-off: Press the one-key take-off button on the remote controller. The drone will automatically ascend to a stable height.
- Manual Landing: Slowly pull the left joystick (throttle) down until the drone lands. Once on the ground, hold the joystick down for a few seconds until the propellers stop.
- One-Key Landing: Press the one-key landing button. The drone will automatically descend and land.

Figure 4.1: Visual representation of the one-key take-off/landing/return function and the headless mode feature, which simplifies flight by eliminating the need to discern the drone's front direction.
4.4 Flight Controls
- Left Joystick (Throttle): Up/Down for altitude; Left/Right for rotation (yaw).
- Right Joystick (Direction): Up/Down for forward/backward; Left/Right for left/right sideward flight.
- Speed Switch: Press the speed control button to cycle through different flight speeds (e.g., low, medium, high).
- Headless Mode: Press the headless mode button. In this mode, the drone's orientation is relative to the pilot, making it easier to control regardless of which way the drone is facing.
- 360° Roll: Fly the drone to a height of at least 3 meters. Press the 360° roll button, then push the right joystick in the desired direction to perform a flip.
4.5 Camera Operation
The V9 Mini Drone features a 4K front camera and a 1080P bottom camera. Connect your smartphone to the drone's Wi-Fi network (usually named "V9-XXXXXX") and use the dedicated app (refer to packaging for app name/QR code) to view live FPV feed, capture photos, and record videos. The app allows you to switch between the front and bottom cameras.
5. Maintenance
5.1 Battery Care
- Do not overcharge or over-discharge the battery.
- Store batteries in a cool, dry place away from direct sunlight.
- If not used for extended periods, charge the battery to about 50% every three months.
5.2 Cleaning
Use a soft, dry cloth to clean the drone body and camera lenses. Avoid using liquid cleaners or solvents.
5.3 Propeller Replacement
If propellers are damaged or bent, replace them with spare ones. Ensure the correct propeller (A or B, usually marked on the propeller and drone arm) is installed in the corresponding position.
6. Troubleshooting
| Problem | Possible Cause | Solution |
|---|---|---|
| Drone does not respond to controller | Not paired; Low battery; Interference | Re-pair drone and controller; Charge drone/controller battery; Move to an area with less interference |
| Drone drifts during flight | Not calibrated; Uneven surface during take-off; Damaged propeller | Perform gyroscope calibration; Take off from a flat surface; Replace damaged propellers |
| Camera feed is blurry or distorted | Dirty lens; Poor Wi-Fi connection | Clean camera lens; Ensure strong Wi-Fi signal between drone and phone; Reduce distance to drone |
| Short flight time | Battery not fully charged; Old battery; Aggressive flying | Fully charge battery; Consider replacing battery; Fly more conservatively |
7. Specifications
| Feature | Detail |
|---|---|
| Model Name | V9 |
| Video Capture Resolution | 4K (Front Camera), 1080P (Bottom Camera) |
| Connectivity Technology | Wi-Fi (2.4Ghz FPV) |
| Special Features | Integrated Camera, Foldable, Rechargeable, Height Keep, Headless Mode, One-Key Take-off/Landing |
| Control Type | Remote Control |
| Skill Level | Advanced, Professional |
| Battery Life | Approx. 15 minutes (per battery) |
| Age Range (Description) | Adult |
8. Warranty and Support
This product is subject to the warranty terms provided by the seller at the time of purchase. Please refer to your purchase documentation for specific warranty details and duration.
For technical support, troubleshooting assistance beyond this manual, or warranty claims, please contact the seller or manufacturer directly through the platform where the product was purchased. Provide your order number and a detailed description of the issue for prompt assistance.