1. Introduction
Thank you for purchasing the COSTWAY Mobile 3-in-1 Air Cooler, Humidifier, and Fan. This appliance is designed to provide a comfortable environment by offering cooling, humidification, and air circulation functions. It features a 10-liter water tank, three operating modes, three fan speeds, a 15-hour timer, and a remote control for convenient operation. Please read this manual thoroughly before use to ensure proper operation, maintenance, and safety.

Image 1.1: Front view of the COSTWAY Mobile 3-in-1 Air Cooler.
2. Safety Instructions
To reduce the risk of fire, electric shock, or injury, always follow these basic safety precautions:
- Read all instructions before using the appliance.
- Ensure the power supply voltage matches the rating label on the appliance.
- Do not immerse the appliance, power cord, or plug in water or other liquids.
- Unplug the appliance from the power outlet when not in use, before cleaning, or before moving.
- Keep the appliance out of reach of children and pets.
- Do not operate the appliance with a damaged cord or plug, or if it malfunctions or has been damaged in any way.
- Place the appliance on a stable, level surface.
- Do not block air inlets or outlets. Maintain at least 20 cm clearance from walls and other objects.
- Do not use the appliance in bathrooms or other humid environments where it could come into contact with water.
- Only use clean tap water in the water tank. Do not add any chemicals or additives other than recommended ice packs.
- Do not attempt to repair or modify the appliance yourself. Contact qualified service personnel.
3. Product Overview
3.1 Components
The air cooler consists of the main unit, a water tank, a removable air filter, a honeycomb cooling pad, and a remote control. Two ice packs are also included for enhanced cooling.
3.2 Control Panel and Display
The LED control panel on top of the unit allows you to manage all functions. It includes buttons for Power, Speed, Mode, Timer, Oscillation, and Cooling. The display shows current settings.

Image 3.1: Detailed view of the LED control panel and remote control.
4. Setup
4.1 Unpacking and Positioning
- Carefully remove the appliance from its packaging.
- Place the air cooler on a firm, level surface. Ensure there is at least 20 cm of space around the unit for proper airflow.
- The unit is equipped with 360° swivel wheels and integrated handles for easy movement.

Image 4.1: The air cooler features wheels and handles for easy portability.
4.2 Filling the Water Tank
- Pull out the water tank from the bottom rear of the unit.
- Fill the tank with clean tap water up to the 'MAX' level indicator. Do not overfill.
- For enhanced cooling, place the included ice packs in a freezer for a few hours until frozen.
- Once frozen, place the ice packs into the water tank.
- Slide the water tank back into the unit until it clicks into place.
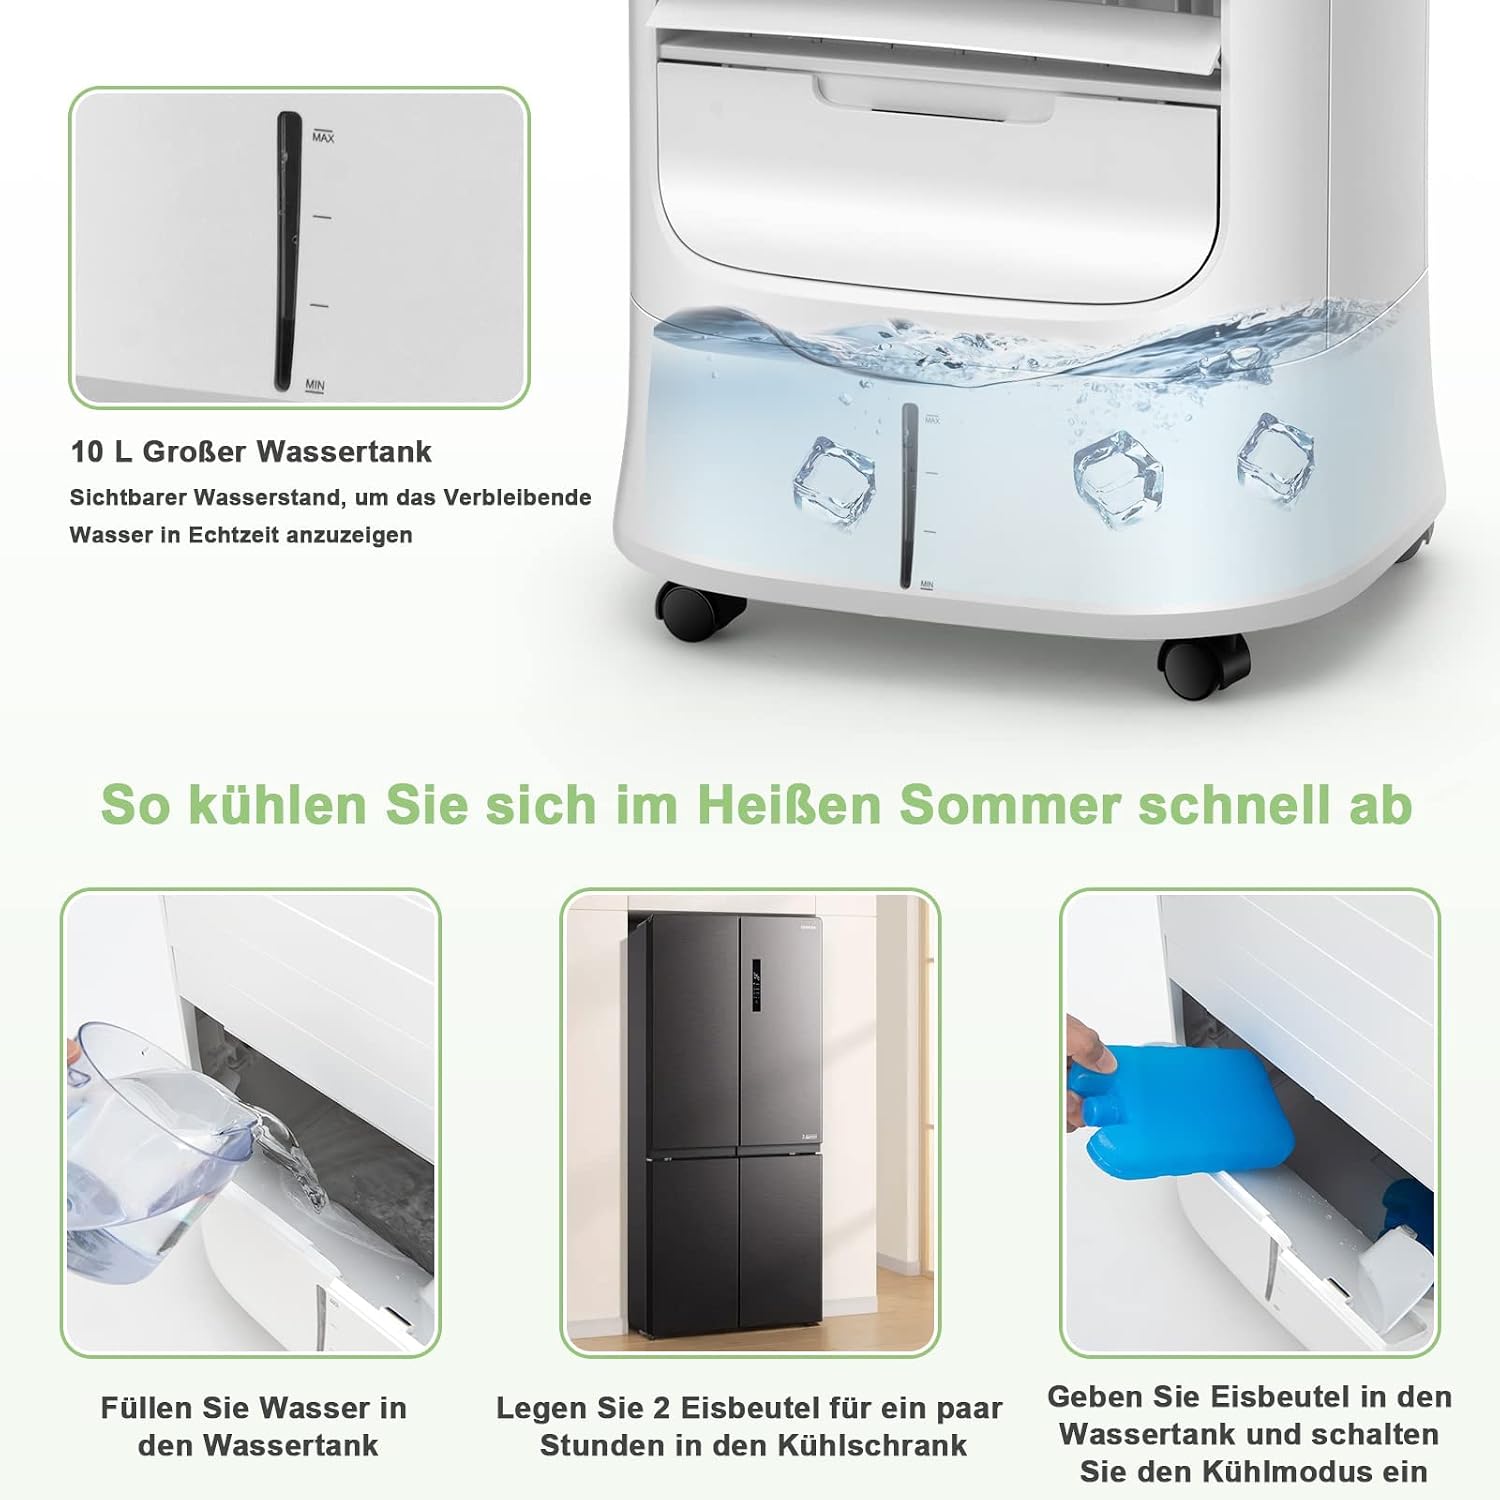
Image 4.2: Steps for filling the water tank and adding ice packs.
5. Operating Instructions
5.1 Power On/Off
- Plug the power cord into a suitable electrical outlet.
- Press the Power button on the control panel or remote control to turn the unit on or off.
5.2 Fan Speed Adjustment
- Press the Speed button repeatedly to cycle through the three fan speeds: Low, Medium, and High.
5.3 Mode Selection
Press the Mode button to select one of the following operating modes:
- Normal Mode: Provides a constant airflow at the selected speed.
- Natural Mode: Simulates natural breeze by varying fan speed.
- Sleep Mode: Operates at a lower, quieter speed, gradually decreasing fan speed for undisturbed sleep.

Image 5.1: The air cooler offers Normal, Natural, and Sleep modes with adjustable fan speeds.
5.4 Oscillation Function
- Press the Oscillation button to activate the automatic horizontal swing of the external louvers (120° up and down).
- The internal louvers can be manually adjusted 63° left and right to direct airflow.

Image 5.2: The air cooler features wide-angle oscillation for even air distribution.
5.5 Timer Setting
- Press the Timer button repeatedly to set the desired operating time (from 1 to 15 hours). The unit will automatically turn off after the set time.
5.6 Cooling/Humidification Function
- Ensure the water tank is filled and ice packs are inserted (if desired).
- Press the Cool button to activate the cooling and humidification function. The unit will draw water from the tank to cool and humidify the air.
6. Maintenance
Regular maintenance ensures optimal performance and extends the lifespan of your air cooler.
6.1 Cleaning the Air Filter and Honeycomb Cooling Pad
- Unplug the appliance before cleaning.
- Remove the rear filter screen and the honeycomb cooling pad.
- Clean the air filter and cooling pad with a soft brush and mild detergent, then rinse thoroughly with clean water.
- Allow them to air dry completely before reinserting them into the unit.

Image 6.1: The air cooler's filtration system, including the removable dust filter and honeycomb cooling pad.
6.2 Cleaning the Water Tank
- Unplug the appliance.
- Pull out the water tank and empty any remaining water.
- Clean the tank with a soft cloth and mild detergent. Rinse thoroughly to remove any residue.
- For thorough cleaning, the drain plug at the bottom of the unit can be used to empty the tank.
- Allow the tank to dry completely before reinserting.
6.3 Storage
If the appliance will not be used for an extended period, empty and clean the water tank and filter. Store the unit in a cool, dry place, preferably in its original packaging.
7. Troubleshooting
| Problem | Possible Cause | Solution |
|---|---|---|
| No power | Power cord not plugged in; no power at outlet; unit turned off. | Check power cord connection; check circuit breaker; press Power button. |
| Weak airflow | Air filter or cooling pad clogged; fan speed too low. | Clean air filter and cooling pad; increase fan speed. |
| No cooling effect | Water tank empty; cooling function not activated; ice packs not used. | Fill water tank; press Cool button; add frozen ice packs. |
| Water leakage | Water tank overfilled; tank not properly seated; drain plug loose. | Do not overfill; ensure tank is correctly inserted; check drain plug. |
| Unusual noise | Unit not on a level surface; foreign object in fan. | Place on a level surface; unplug and check for obstructions. |
If the problem persists after trying these solutions, please contact customer support.
8. Specifications
| Feature | Specification |
|---|---|
| Brand | COSTWAY |
| Model Name | ES10122DE-WH-GM |
| Functions | Air Cooler, Humidifier, Fan |
| Material | ABS Terpolymer |
| Color | White |
| Mounting Type | Freestanding |
| Control Type | Remote Control, LED Panel |
| Water Tank Capacity | 10 Liters |
| Product Weight | 7.7 Kilograms |
| Product Dimensions (L x W x H) | 39 x 33 x 74 cm |
| Wattage | 78 W |
| Voltage | 220-240 V, 50/60 Hz |
| Noise Level | Less than 58 Decibels |
| Number of Speeds | 3 |
| Timer | 0-15 Hours |
| Air Speed | 1.8-5 m/s |
| Included Components | 2 x Ice Packs |

Image 8.1: Dimensions and technical specifications of the air cooler.
9. Warranty and Support
This product comes with a standard manufacturer's warranty. For detailed warranty information, please refer to the warranty card included with your purchase or contact COSTWAY customer service. If you encounter any issues or have questions regarding the operation or maintenance of your air cooler, please reach out to our support team for assistance.
Contact information for support can typically be found on the product packaging, the official COSTWAY website, or your purchase receipt.