1. Important Safety Instructions
Please read all instructions carefully before using this appliance. Retain this manual for future reference.
1.1 General Safety
- This appliance is intended for household use only. Do not use outdoors or on wet surfaces.
- Do not allow children to operate the vacuum cleaner. Close supervision is necessary when used near children.
- Do not pick up flammable or combustible liquids, such as gasoline, or use in areas where they may be present.
- Do not pick up anything that is burning or smoking, such as cigarettes, matches, or hot ashes.
- Do not use without the dust cup and filter in place.
- Turn off the appliance before connecting or disconnecting the battery charger.
- Do not handle the charger or appliance with wet hands.
- Use only as described in this manual. Use only manufacturer's recommended attachments.
1.2 Electrical and Battery Safety
- Recharge only with the charger specified by the manufacturer. A charger that is suitable for one type of battery pack may create a risk of fire when used with another battery pack.
- Do not modify or attempt to repair the appliance or the battery pack.
- Do not expose the battery pack or appliance to fire or excessive temperature. Exposure to fire or temperature above 130°C (265°F) may cause explosion.
- Follow all charging instructions and do not charge the battery pack or the appliance outside of the temperature range specified in the instructions. Improperly charging or at temperatures outside the specified range may damage the battery and increase the risk of fire.
2. Product Overview
Familiarize yourself with the components of your HONITURE H203 handheld vacuum cleaner.

Figure 2.1: The HONITURE H203 handheld vacuum cleaner shown with its included accessories: charging adapter, brush nozzle, crevice tool, and extension hose.
2.1 Package Contents
- HONITURE H203 Handheld Vacuum Cleaner
- Adapter (Charger)
- Instruction Manual
- Brush Nozzle
- Crevice Tool
- Extension Nozzle (Hose)
2.2 Product Features
- Powerful Suction: 9000Pa suction power for effective cleaning of dust and small particles.
- Wet & Dry Capability: Designed to handle both dry debris and small liquid spills.
- Cordless & Lightweight: Weighing approximately 0.68 kg, offering portability and ease of use.
- Integrated LED Light: Illuminates dark areas for improved visibility during cleaning.
- Versatile Attachments: Includes crevice tool, brush nozzle, and extension hose for various cleaning tasks.
3. Setup
3.1 Charging the Vacuum
- Ensure the vacuum cleaner is turned off.
- Connect the adapter to the charging port on the vacuum cleaner.
- Plug the adapter into a standard electrical outlet.
- The charging indicator light will illuminate (refer to product for specific light behavior).
- Allow 4-5 hours for a full charge. A full charge provides approximately 25 minutes of runtime.
- Disconnect the charger once fully charged or before use.
Note: For optimal battery life, avoid completely draining the battery before recharging, and do not leave it on charge for extended periods after it is full.
3.2 Attaching Accessories
The vacuum comes with various nozzles for different cleaning needs.

Figure 3.1: Illustration of the vacuum's strong suction capability, capturing various debris types like dust, pollen, sand, bread crumbs, and pet hair.
- Crevice Tool: Ideal for reaching tight spaces, corners, and gaps in car interiors or furniture. Simply push it onto the vacuum's suction inlet until secure.
- Brush Nozzle: Suitable for cleaning delicate surfaces, upholstery, and for dislodging pet hair. Attach it to the suction inlet or to the end of the crevice tool for extended reach.
- Extension Nozzle (Hose): Provides flexibility and extended reach for difficult-to-access areas, such as under seats or behind furniture. Attach it to the suction inlet, then attach other nozzles to the end of the hose.
4. Operating the Vacuum Cleaner
4.1 Power On/Off
- To turn on the vacuum, press the power button located on the handle.
- To turn off the vacuum, press the power button again.
4.2 Dry Vacuuming
For general dry cleaning, attach the appropriate nozzle (crevice tool for tight spots, brush for surfaces) and turn on the vacuum. Move the nozzle slowly over the area to be cleaned to allow the suction to effectively pick up debris.

Figure 4.1: The HONITURE H203 vacuum cleaner demonstrating its versatility in various environments, including car interiors, office desks, and under furniture at home.
4.3 Wet Vacuuming
The HONITURE H203 can pick up small liquid spills. Follow these guidelines:
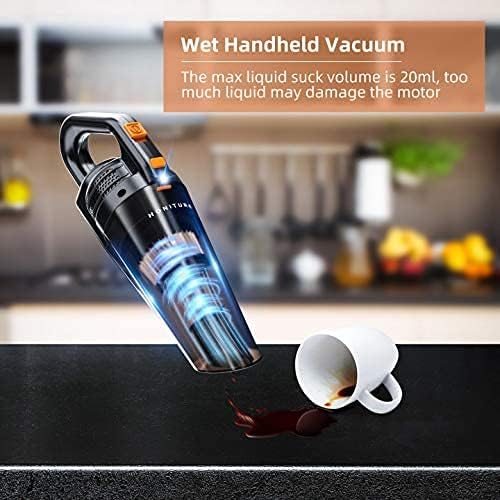
Figure 4.2: The handheld vacuum is shown effectively cleaning a small liquid spill on a countertop, highlighting its wet vacuuming capability.
- Ensure the dust cup is empty and clean before wet vacuuming.
- Do not exceed the maximum liquid capacity of 20ml. Exceeding this volume may damage the motor.
- After wet vacuuming, immediately empty and clean the dust cup and filter to prevent odors and mold growth.
- Allow the filter to air dry completely before reassembling the vacuum for dry use.
4.4 Using the LED Light
The integrated LED light helps illuminate dark areas, making it easier to spot dust and debris in dimly lit environments.

Figure 4.3: The vacuum's LED light is shown illuminating a dark car footwell, highlighting debris that would otherwise be difficult to see, demonstrating its utility in low-light conditions.
- The LED light typically activates automatically when the vacuum is turned on, or it may have a separate button (refer to your specific unit for details).
- Use it to clean under furniture, in car crevices, or other poorly lit spaces.
5. Maintenance
Regular maintenance ensures optimal performance and extends the lifespan of your vacuum cleaner.
5.1 Emptying the Dust Cup
- Ensure the vacuum is turned off.
- Locate the dust cup release button (usually near the handle or main body).
- Press the button and detach the dust cup from the main unit.
- Hold the dust cup over a trash bin and open its lid/bottom flap to empty the contents.
- Reattach the dust cup securely until it clicks into place.
5.2 Cleaning the Filter
The filter should be cleaned regularly, especially after wet vacuuming, to maintain suction power.
- Remove the dust cup as described above.
- Carefully remove the filter assembly from inside the dust cup.
- Tap the filter gently over a trash bin to remove loose dust.
- If necessary, rinse the filter under cool running water. Do not use hot water or detergents.
- Allow the filter to air dry completely for at least 24 hours before reinserting it. Using a wet filter can damage the motor.
- Once dry, reinsert the filter into the dust cup and reattach the dust cup to the vacuum.
5.3 Cleaning Accessories
Wipe down nozzles and the extension hose with a damp cloth as needed. Ensure they are dry before storage.
5.4 Storage
Store the vacuum cleaner and its accessories in a cool, dry place, away from direct sunlight and extreme temperatures. Ensure the battery is partially charged before long-term storage.
6. Troubleshooting
If you encounter issues with your vacuum cleaner, refer to the following table for common problems and solutions.
| Problem | Possible Cause | Solution |
|---|---|---|
| Vacuum does not turn on. | Battery is depleted. | Charge the vacuum cleaner for 4-5 hours. |
| Low suction power. | Dust cup is full. Filter is clogged. Nozzle/hose is blocked. | Empty the dust cup. Clean or replace the filter. Check and clear any blockages in the nozzles or hose. |
| Vacuum not charging. | Charger not properly connected. Faulty adapter/outlet. | Ensure the adapter is securely plugged into both the vacuum and the wall outlet. Try a different outlet or inspect the adapter for damage. |
| Water leakage during wet vacuuming. | Liquid capacity exceeded. Dust cup not properly sealed. | Do not exceed 20ml liquid capacity. Ensure the dust cup is securely attached and sealed. |
If the problem persists after attempting these solutions, please contact customer support.
7. Specifications
| Feature | Specification |
|---|---|
| Brand | HONITURE |
| Model | H203 |
| Color | Black |
| Suction Power | 9000Pa |
| Motor Power | 130W |
| Voltage | 12 Volts |
| Runtime | Up to 25 minutes |
| Charging Time | 4-5 hours |
| Noise Level | 80 Decibels |
| Item Weight | 0.68 kg (680 g) |
| Max Liquid Capacity | 20ml |
| Special Features | Cordless, Mini, Lightweight, LED Light, Wet & Dry Function |
8. Warranty and Support
8.1 Warranty Information
HONITURE offers a free 2-year warranty upon product registration. This warranty covers manufacturing defects and workmanship under normal use. Please retain your proof of purchase for warranty claims.
8.2 Customer Support
For any questions, technical assistance, or warranty claims, please contact HONITURE customer service:
- Email: support-CA@honiture.com
- Customer service is available 7 days a week, 24 hours a day.
A parts replacement service is also available through customer support.