Introduction
The RECOIL LOCD is a versatile 2-channel line output converter and line driver designed for seamless integration of aftermarket amplifiers into factory car audio systems. This unit converts high-level speaker signals to low-level RCA outputs, providing a clean 10V pre-amp output. It features an intelligent signal sensing turn-on circuit, eliminating the need for a separate remote lead, and includes adjustable gain controls with clipping LEDs for precise signal matching. Its ultra-low impedance design minimizes noise interference, ensuring high-fidelity audio.
Product Features
- Premium 2-Channel line output converter and line driver 2-in-1 solution.
- Removable terminal blocks for all input connections.
- Intelligent signal sensing turn-on circuit for easy aftermarket amplifier addition to OEM radios.
- Input gain adjustments and pre-amp 10V high RCA Output for cleanly driving any amplifier.
- Ultra-low 50m Ohm output / 20k Ohm input impedance, virtually impervious to noise interference.
- SMT (Surface Mount Technology) & precision components for noise-free operation.
- Output clipping LEDs provide visual adjustment indicators for maximum output on each channel.
Package Contents
- RECOIL LOCD Line Output Converter Line Driver 2-in-1 Unit
- Removable Terminal Blocks (2)
- Mounting Screws (2)
Setup
Proper installation is crucial for optimal performance. Ensure the vehicle's battery is disconnected before beginning installation.
1. Mounting the LOCD Unit
Choose a secure, dry location for mounting the LOCD unit, away from excessive heat or moisture. Use the provided mounting screws to secure the unit.

Image: The RECOIL LOCD unit, showing its compact design and various connection points.
2. Power and Ground Connections
- GND (Ground): Connect to a solid chassis ground point in the vehicle. Ensure a clean, paint-free metal surface for the best connection.
- +12V (Power): Connect to a constant +12V power source. This should be fused appropriately (not included).
- Remote In: This input is optional. If your factory radio provides a remote turn-on lead, connect it here. If not, the LOCD's auto-sense feature will manage the turn-on.
- Remote Out: Connect this output to the remote turn-on input of your aftermarket amplifier(s). The LOCD will provide a turn-on signal to the amplifier when it detects audio input.
3. Input Connections
The LOCD supports both high-level (speaker) and low-level (RCA) inputs. Use the 'Input Choose' switch to select the appropriate input type.
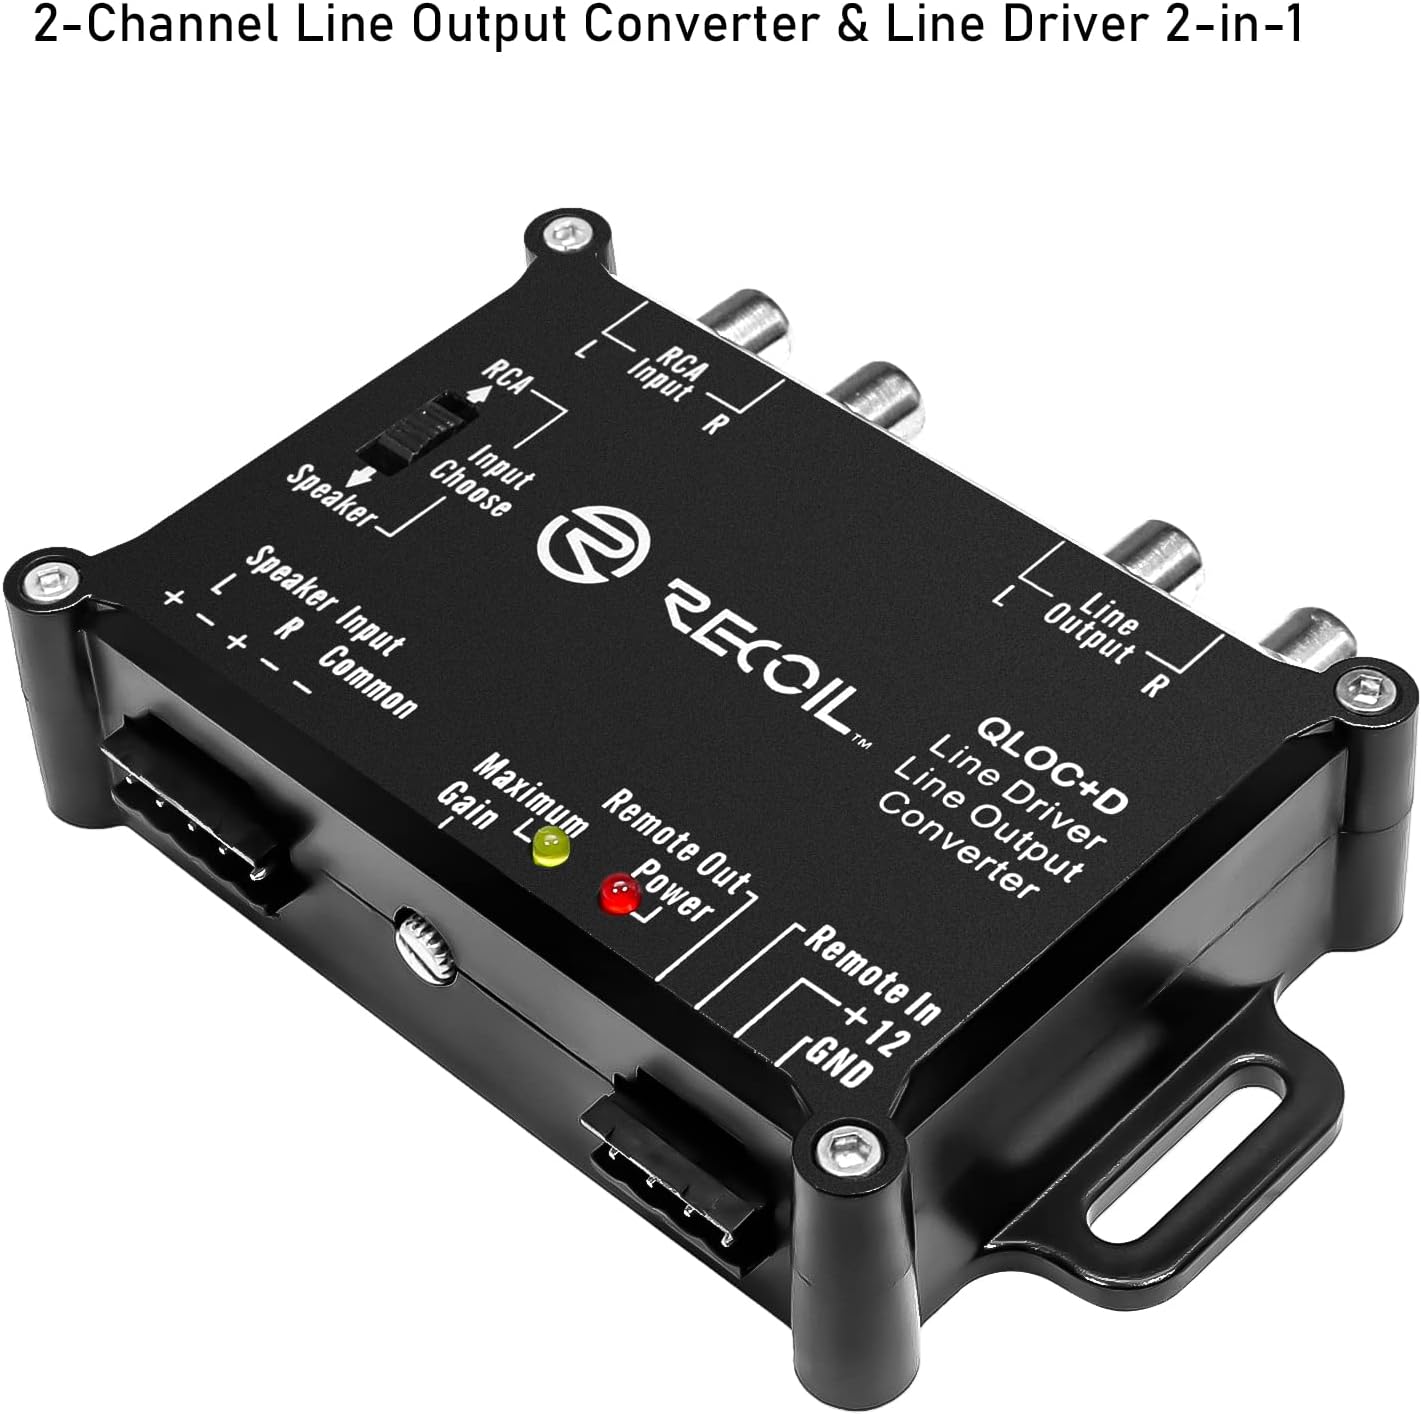
Image: The RECOIL LOCD unit, highlighting the 'Input Choose' switch and the speaker and RCA input terminals.
- Speaker Input: If using high-level inputs, connect the factory speaker wires (Left +, Left -, Right +, Right -, Common) to the removable terminal block labeled 'Speaker Input'. Ensure correct polarity.
- RCA Input: If using low-level RCA inputs, connect your source unit's RCA outputs to the 'RCA Input' jacks.
4. Output Connections
Connect the 'Line Output' RCA jacks to the RCA inputs of your aftermarket amplifier.

Image: A close-up view of the RECOIL LOCD's RCA input and line output connections.
5. Gain Adjustment
The LOCD features adjustable gain controls and clipping LEDs. These are crucial for matching the output level of the LOCD to the input sensitivity of your amplifier without introducing distortion.

Image: The RECOIL LOCD unit, highlighting the gain adjustment screw and the 'Maximum Gain' (clipping) and 'Power' LEDs.
Before adjusting, ensure your amplifier's gain is set to its minimum. Play a test tone (e.g., 0dB, 1kHz sine wave) at about 75% of your head unit's maximum volume. Slowly increase the LOCD's gain until the 'Maximum Gain' (clipping) LED just begins to flicker. Then, back off slightly until the LED remains off. This sets the LOCD for maximum clean output. Finally, adjust your amplifier's gain to achieve the desired volume.
Installation Video
Video: A demonstration of a car stereo high-to-low converter, illustrating the basic principles of signal conversion relevant to the RECOIL LOCD.
Operating
Once installed and configured, the RECOIL LOCD operates automatically. When the head unit is turned on and audio signal is present, the LOCD will detect the signal and provide a remote turn-on signal to your connected amplifier(s). The 'Power' LED on the unit will illuminate to indicate it is active.
The auto-sense feature ensures that your amplifier turns on and off with your factory radio, preventing battery drain and simplifying system operation.

Image: The RECOIL LOCD unit discreetly installed within a car's interior, showcasing its role in enhancing audio output.
Product Overview Video
Video: A product summary video providing an overview of the RECOIL LOCD's features and benefits.
Maintenance
The RECOIL LOCD is designed for reliable, maintenance-free operation. To ensure longevity and consistent performance:
- Keep the unit clean and free from dust and debris. Use a soft, dry cloth for cleaning.
- Periodically check all wiring connections to ensure they are secure and free from corrosion.
- Avoid exposing the unit to extreme temperatures or direct moisture.
Troubleshooting
If you encounter issues with your RECOIL LOCD, refer to the following common troubleshooting steps:
No Sound Output
- Check Power: Ensure the +12V and GND connections are secure and receiving power. The 'Power' LED should be illuminated.
- Input Selection: Verify the 'Input Choose' switch is set correctly for either RCA or Speaker input.
- Input Signal: Confirm that the head unit is providing an audio signal to the LOCD.
- Output Connections: Check RCA connections from the LOCD to the amplifier.
- Amplifier Status: Ensure the amplifier is powered on and functioning correctly.
Distorted Sound
- Gain Adjustment: Re-adjust the LOCD's gain using the clipping LED as a guide. Ensure the LED does not stay illuminated, indicating signal clipping.
- Amplifier Gain: Check the amplifier's gain setting. It should be adjusted after the LOCD's gain is set.
- Source Volume: Avoid setting the head unit volume to maximum, as this can introduce distortion before the LOCD.
- Wiring: Inspect speaker input wiring for correct polarity and secure connections.
Amplifier Not Turning On
- Remote Out: Ensure the 'Remote Out' from the LOCD is connected to the amplifier's remote turn-on input.
- Auto-Sense: If not using 'Remote In', verify that the LOCD is receiving an audio signal from the head unit to trigger its auto-sense turn-on.
- Power LED: Confirm the LOCD's 'Power' LED is on when the head unit is active.
Specifications
| Feature | Specification |
|---|---|
| Brand | RECOIL |
| Model Number | LOCD |
| Number of Channels | 2 |
| Interface | RCA |
| Maximum Supply Voltage | 20 Volts |
| Minimum Supply Voltage | 12 Volts (DC) |
| Mounting Type | Cable Mount |
| Material | Electronic Components |
| Included Components | Line Output Converter Line Driver 2-in-1 |

Image: Technical drawing showing the dimensions of the RECOIL LOCD unit.
Warranty Information
RECOIL products are designed and manufactured to the highest quality standards. This product is covered by a limited warranty against defects in materials and workmanship. The duration and terms of the warranty may vary by region and retailer. Please retain your proof of purchase for warranty claims.
For specific warranty details, please refer to the warranty card included with your product or contact RECOIL customer support.
Support
For technical assistance, installation questions, or troubleshooting not covered in this manual, please contact RECOIL customer support. You can typically find contact information on the RECOIL website or through your product retailer.
When contacting support, please have your product model number (LOCD) and proof of purchase available.