JMT N47986
JMT PCI-E 4.0 x16 1 to 2 Expansion Card User Manual
Model: N47986
1. Product Overview
The JMT PCI-E 4.0 x16 1 to 2 Expansion Card is designed to split a single PCI-E x16 slot into two PCI-E x8 slots, enabling the use of multiple PCI-E devices on compatible motherboards. This card supports PCI-E 4.0 (Gen4) protocol and is backward compatible with Gen3, offering flexibility for various system configurations. It includes a CPU4P auxiliary power supply port for stable operation of connected devices.
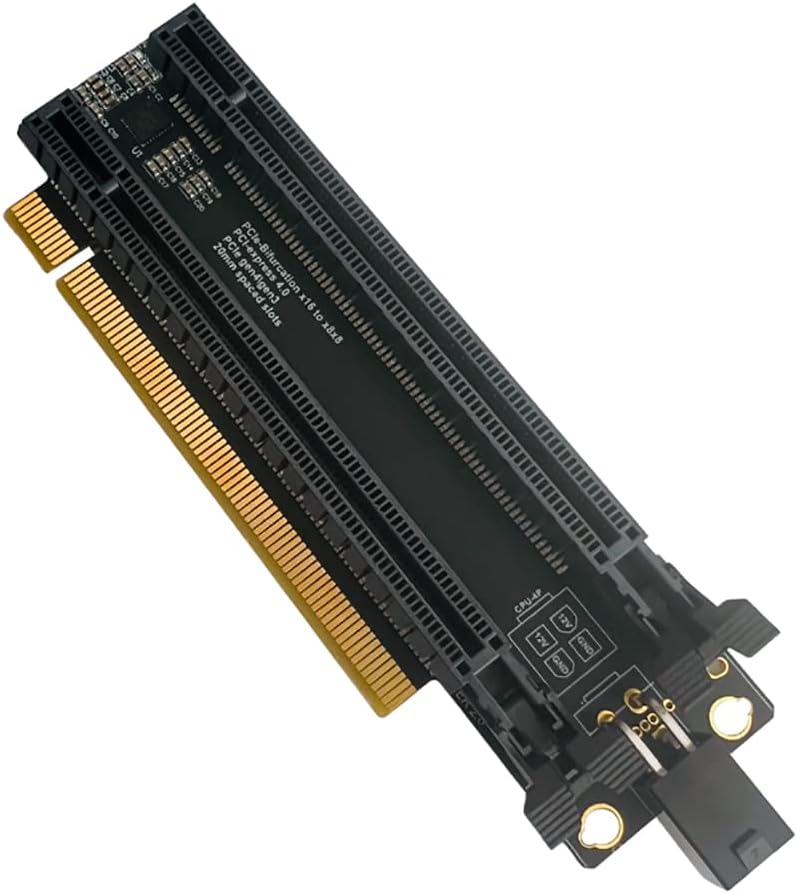
Figure 1: JMT PCI-E 4.0 x16 1 to 2 Expansion Card with 4-pin power cable.
2. Features
- PCI-E X16 Full Bandwidth 4.0: Supports GEN4 protocol, compatible with GEN3.
- PCIe-Bifurcation x16 to x8x8: Allows a single x16 slot to be split into two x8 slots.
- Gold Finger Sinking Process: Enhanced durability with 5U gold thickness on the connector.
- New Generation GEN4 Connector: Equipped with a dust plug and snap for secure connection.
- Clock Splitting IC: Integrated for stable signal distribution.
- Power On LED Indicator: Provides visual confirmation of power status.
- CPU4P Auxiliary Power Supply Port: Ensures sufficient power for connected devices.
- 2cm Slot Spacing: Designed for optimal clearance between installed cards.
- Supports PCI-E Extension Cable Adapter: Compatible with extension cables for flexible installation.
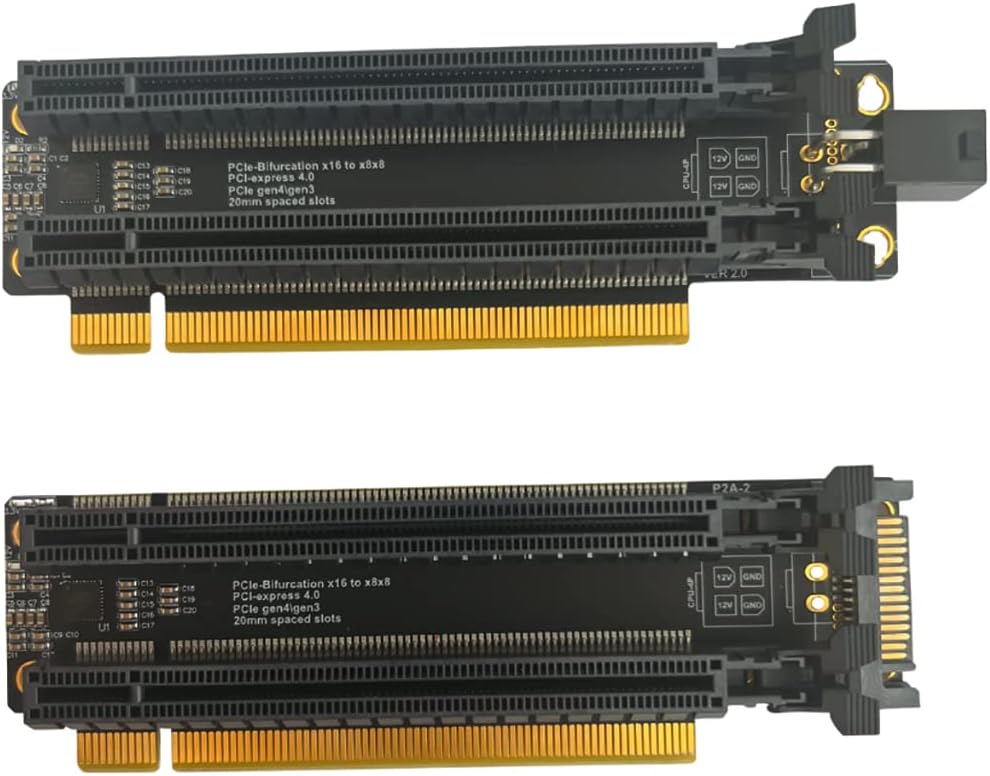
Figure 2: Top view of the expansion card, showing the two x8 slots and the CPU4P power input.

Figure 3: Close-up view of the CPU4P auxiliary power supply port and LED indicator.
3. Specifications
| Attribute | Value |
|---|---|
| Brand | JMT |
| Model Number | N47986 |
| Hardware Interface | PCI Express x16 (splits to x8x8) |
| PCI-E Protocol | PCI-E 4.0 (GEN4), compatible with GEN3 |
| Operating System Compatibility | Windows, macOS, Linux |
| Item Weight | 2.08 ounces (0.06 Kilograms) |
| Package Dimensions | 8.86 x 6.69 x 0.79 inches |
| Slot Spacing | 2cm |
| Auxiliary Power | CPU4P Port |
4. Setup and Installation
Proper installation of the JMT PCI-E 4.0 x16 1 to 2 Expansion Card requires specific motherboard BIOS settings. Please follow these steps carefully:
- Motherboard Compatibility: Ensure your motherboard supports PCI-E bifurcation. Refer to your motherboard's manual or manufacturer's website for confirmation. A list of some supported motherboards is provided below for reference.
- BIOS Configuration: Enter your motherboard's BIOS settings. Navigate to the PCI-E configuration section and set the operating mode for the target PCI-E x16 slot to X8X8 mode. The exact menu path may vary by motherboard manufacturer.
- Card Installation: Install the JMT PCI-E 4.0 x16 1 to 2 Expansion Card into the PCI-E x16 slot that has been configured for X8X8 bifurcation in the BIOS. Ensure it is seated firmly.
- Auxiliary Power Connection: Connect the provided 4-pin power cable to the CPU4P auxiliary power supply port on the expansion card. Connect the other end of the cable to a suitable power source from your power supply unit (PSU). This is crucial for providing sufficient power to the connected PCI-E devices, as the motherboard typically provides a maximum of 75W to the PCI-E slot.
- Device Installation: Install your PCI-E devices (e.g., graphics cards, network cards) into the two x8 slots on the expansion card.

Figure 4: Partial list of motherboards confirmed to support PCI-E bifurcation.
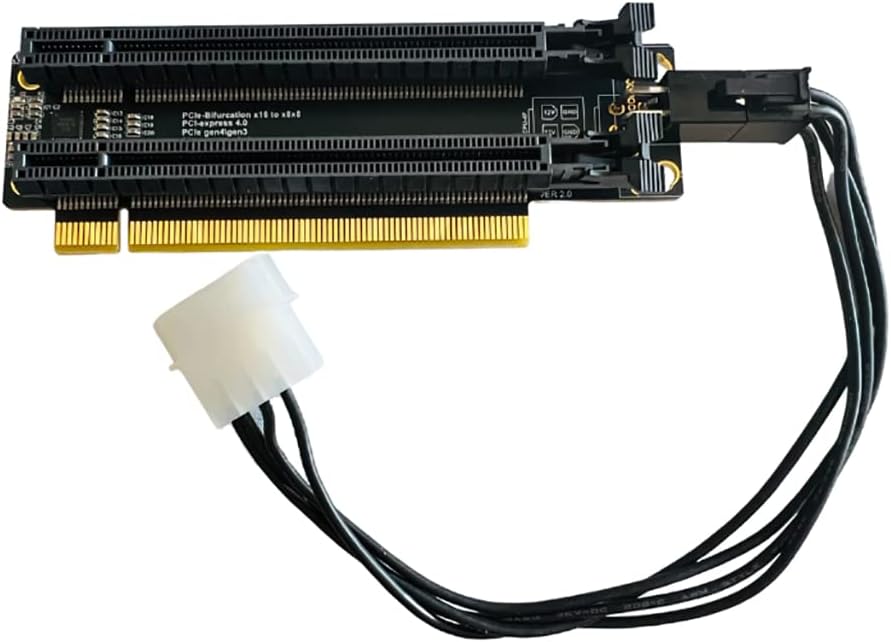
Figure 5: The expansion card with the 4-pin auxiliary power cable connected.
5. Operating Instructions
Once installed and configured, the expansion card operates transparently, allowing your operating system to detect and utilize the two x8 PCI-E slots. No specific software or drivers are required for the expansion card itself, as it functions as a hardware-level splitter.
Ensure that all connected PCI-E devices have their necessary drivers installed for proper functionality within your operating system (Windows, macOS, Linux).
6. Troubleshooting
- Devices Not Detected or Not Running:
- Verify that your motherboard's BIOS is correctly configured for X8X8 bifurcation on the specific PCI-E x16 slot where the card is installed.
- Check if the expansion card is fully seated in the PCI-E slot.
- Ensure the CPU4P auxiliary power cable is securely connected to both the expansion card and the PSU.
- If using two graphics cards and they are not running, try setting the PCI-E speed in your BIOS to GEN3. Some older or specific hardware configurations might perform better at GEN3.
- Test each connected PCI-E device individually in a known working slot to rule out device malfunction.
- System Instability or Crashes:
- Insufficient power is a common cause. Ensure your PSU has adequate wattage to support all components, especially if running two power-hungry devices like graphics cards. The CPU4P auxiliary power connection is critical.
- Check for loose connections on the expansion card, connected devices, and power cables.
- Ensure your system's drivers (chipset, GPU, etc.) are up to date.
- Card Shorting or PC Fails to Post:
- Immediately disconnect power from the PC.
- Carefully inspect the expansion card and motherboard PCI-E slot for any visible damage or foreign objects.
- Ensure the card is installed correctly and not misaligned.
- If the issue persists, contact JMT customer support.
7. Maintenance
The JMT PCI-E 4.0 x16 1 to 2 Expansion Card requires minimal maintenance. Keep the card and surrounding components free from dust accumulation to ensure optimal performance and longevity. Use compressed air to gently clean the slots and card surface periodically.
Avoid physical stress on the card and its connectors. Ensure proper airflow within your PC case to prevent overheating of components, which can indirectly affect the expansion card's performance.
8. Warranty and Support
For warranty information and technical support, please refer to the official JMT website or contact your point of purchase. Keep your purchase receipt as proof of purchase for warranty claims.
JMT Direct Store: Visit the JMT Store on Amazon