OMAC Omega Crossbars Roof Racks (U026418)
OMAC Smooth Roof Racks Cross Bars Instruction Manual
Model: Omega (U026418) for Honda CR-V 2017-2022
Product Overview
The OMAC Smooth Roof Racks Cross Bars are designed to provide a secure and versatile cargo solution for your Honda CR-V (2017-2022 models). These aerodynamic cross bars are engineered for easy installation and feature an anti-theft design, ensuring both convenience and security for your belongings.
They are ideal for transporting a variety of gear, including kayaks, canoes, surfboards, skis, snowboards, and roof cargo boxes, making them a valuable accessory for adventure enthusiasts.

Image: OMAC Smooth Roof Racks Cross Bars, showing the product both individually and installed on a vehicle's roof.
Compatibility
This product is specifically compatible with Honda CR-V models manufactured between 2017 and 2022. It is designed exclusively for vehicles with a naked/smooth roof type. Please verify your vehicle's roof type before installation to ensure proper fitment.

Image: Compatibility diagram illustrating the required naked/smooth roof type for installation, and examples of incompatible roof types.
What's in the Box
Upon opening your package, please ensure all the following components are present:
- 2 Pieces of Roof Rack (Cross Bars)
- 2 Pieces of Lock
- 2 Pieces of Key
- 4 Pieces of Fixing Kit
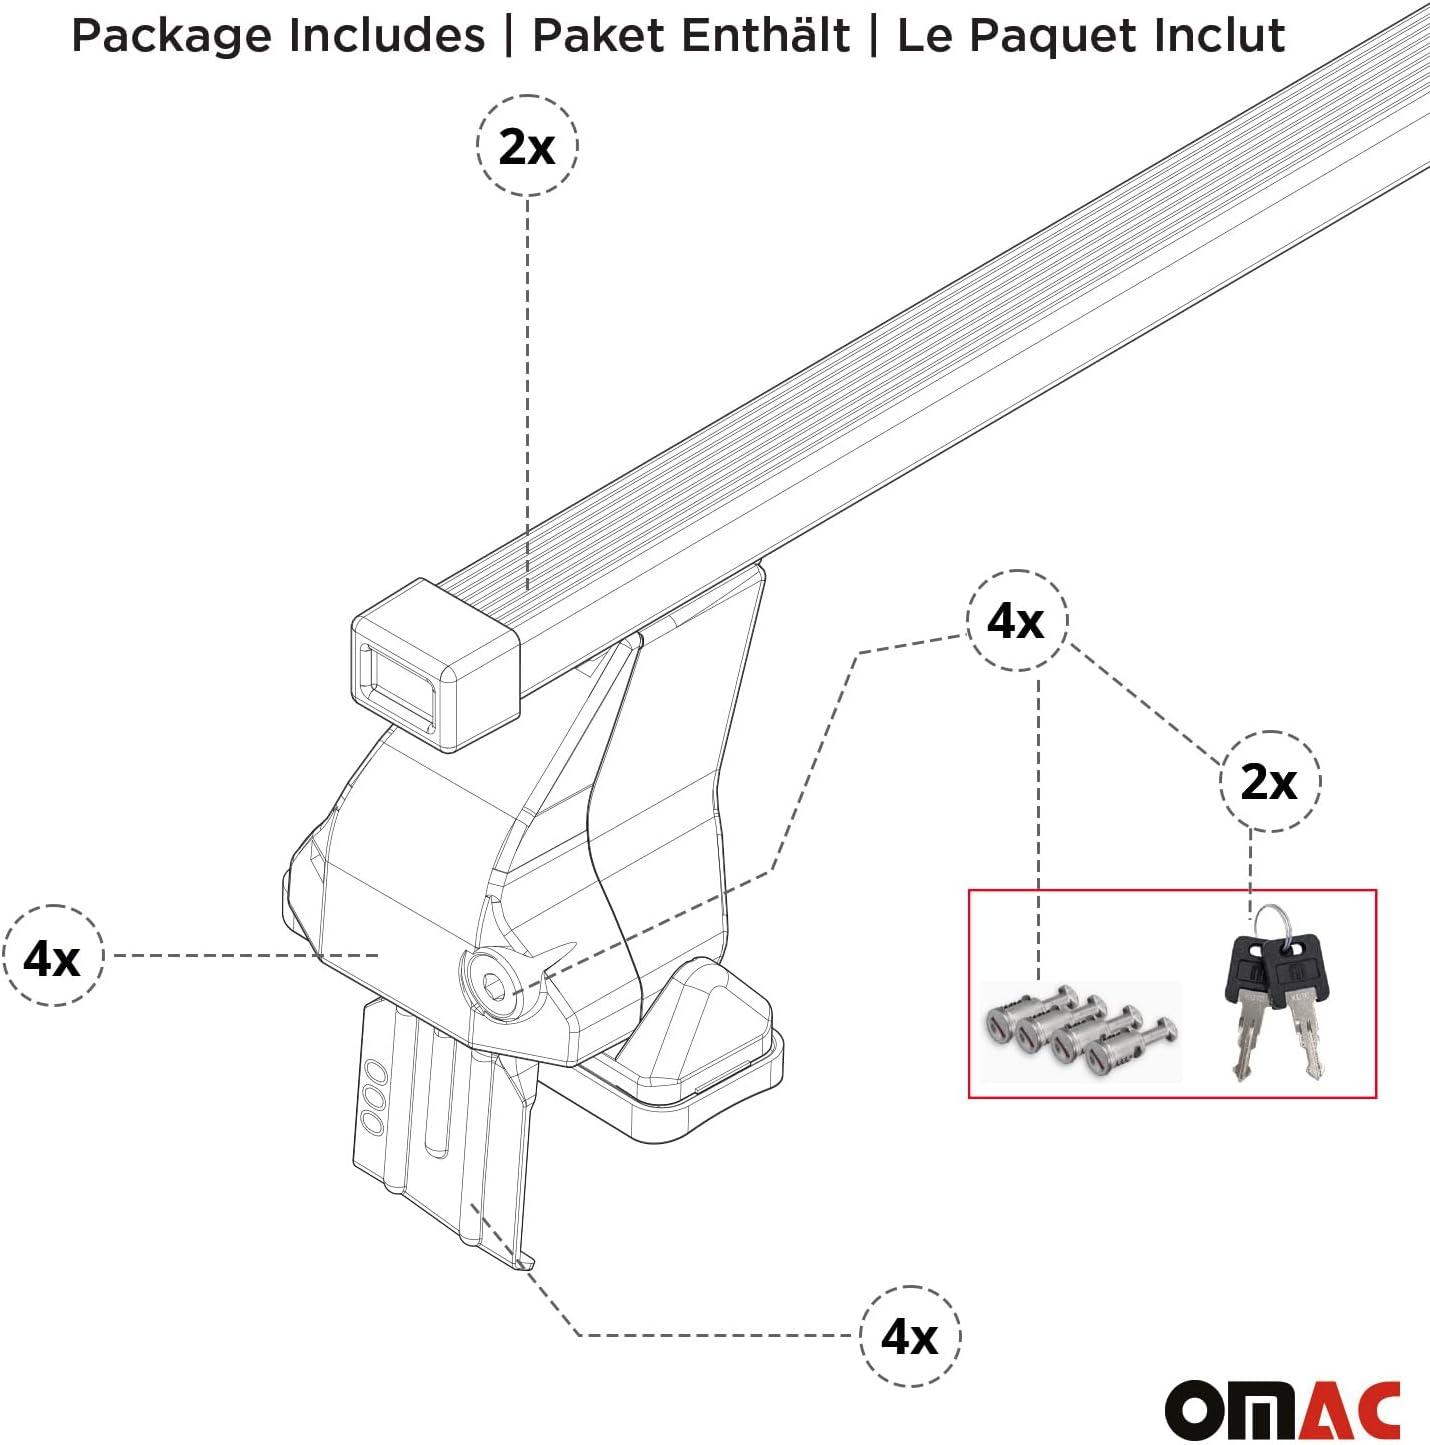
Image: Detailed diagram of package contents, including roof bars, locks, keys, and fixing kit components.
Unboxing Video
Video: An official OMAC video demonstrating the unboxing and initial assembly of the roof rack components.
Specifications
| Feature | Detail |
|---|---|
| Color | Black |
| Material | High-quality Steel |
| Item Dimensions (L x W x H) | 53 x 9 x 15 inches |
| Load Capacity | Up to 199.9 Pounds (approx. 90.7 kg) |
| Mounting Type | Roof Mount, Crossbar Mount |
| Special Features | Easy Installation, Lightweight, Durable, Multifunctional, Wind-Resistant, Anti-Theft Lock |
| Country of Origin | Italy |

Image: Technical specifications and dimensions of the roof rack components.
Installation Guide
Follow these steps carefully for a secure installation of your OMAC Roof Racks. Refer to the included fixing kit manual for precise measurements for your specific Honda CR-V model.
Step 1: Prepare the Cross Bars
- Identify the front and rear cross bars. They may have different lengths or markings.
- Consult your fixing kit manual to determine the correct measurement settings (D1 for front bar, D2 for rear bar) for your vehicle's model year.
- Adjust the internal mechanism of each cross bar to match the specified measurements. This ensures the feet align correctly with your vehicle's roof.

Image: Detailed installation steps, including adjusting the crossbar length according to the fixing kit manual.
Step 2: Attach the Fixing Kit Components
- Attach the rubber pads to the base of each roof rack foot. Ensure they are securely fitted to protect your vehicle's paintwork.
- Insert the vehicle-specific clamps into the designated slots on the roof rack feet. These clamps are designed to grip your vehicle's smooth roof edge.
- Secure the clamps using the provided screws and the hex key. Do not fully tighten at this stage.

Image: Close-up of the roof rack foot, highlighting the vehicle-specific clamp and its attachment point.
Step 3: Position and Secure on Vehicle
- Carefully place the assembled front and rear cross bars onto your vehicle's roof. Ensure the feet are correctly positioned over the designated mounting points (refer to your fixing kit manual for exact locations, typically indicated by A1 and A2 measurements).
- Once positioned, begin tightening the screws on each foot using the hex key. Tighten gradually and evenly, alternating between sides and bars.
- Initially tighten to 25-50% of full torque, then proceed to 75-100% to ensure even pressure and a secure fit. The recommended torque is 6Nm (4.4 lbf·ft).
- After tightening, install the anti-theft cover locks on each foot. Use the provided keys to lock them, preventing unauthorized removal.
Installation Video
Video: An official OMAC video demonstrating the fixed G point installation process for the roof racks on a vehicle.
Operating and Usage
Your OMAC roof racks are designed for versatility and durability. They can be used to transport various items, including:
- Bike carriers
- Ski/snowboard carriers
- Roof cargo boxes
- Kayaks and canoes
- Surfboards
Always ensure that any attached accessories (e.g., bike racks, cargo boxes) are securely fastened to the cross bars according to their respective instruction manuals. Distribute weight evenly across the bars and adhere to the maximum load capacity.

Image: The roof racks in use, illustrating their versatility for carrying various sports equipment and cargo.
Safety Information and Load Limits
Adhering to safety guidelines is crucial when using roof racks. Failure to do so can result in damage to your vehicle, the roof racks, or personal injury.
- Maximum Load Capacity: Do not exceed the maximum load capacity of 199.9 pounds (approx. 90.7 kg) for these roof racks. This includes the weight of the racks themselves, any attached accessories, and the cargo.
- Vehicle Roof Load Limit: Always consult your vehicle's owner's manual for its specific roof load limit. Never exceed the lower of the two limits (either the roof rack's limit or your vehicle's limit).
- Weight Distribution: Distribute the cargo weight as evenly as possible across the cross bars. Place heavier items closer to the center of the vehicle.
- Secure Cargo: Ensure all cargo is securely fastened to the roof racks using appropriate straps or tie-downs. Check tightness before and during your journey.
- Speed Limits: Reduce your speed, especially when carrying large or heavy loads, or in strong winds. Avoid sudden braking or sharp turns.
- Height Clearance: Be aware of the increased height of your vehicle with the roof racks and cargo, especially when entering garages, car washes, or low-clearance areas.
- Regular Checks: Periodically check the tightness of all mounting bolts and the security of your cargo during long trips.

Image: Important safety guidelines and warnings regarding load capacity, speed, and proper usage of the roof racks.
Maintenance
To ensure the longevity and optimal performance of your OMAC roof racks, follow these maintenance tips:
- Regular Cleaning: Clean the roof racks regularly with mild soap and water to remove dirt, road grime, and salt, which can cause corrosion. Rinse thoroughly and dry completely.
- Inspect for Damage: Periodically inspect all components for any signs of wear, cracks, bends, or corrosion. Pay close attention to the feet, clamps, and cross bars.
- Check Tightness: Before each use, and especially after the first few uses, check that all mounting bolts and screws are securely tightened. Re-tighten if necessary.
- Lubrication: If any moving parts (e.g., lock mechanisms) become stiff, apply a small amount of silicone-based lubricant.
- Storage: If you plan to remove the roof racks for an extended period, clean them thoroughly and store them in a dry, protected area away from direct sunlight and extreme temperatures.
Troubleshooting
Here are some common issues and their potential solutions:
- Issue: Roof racks feel loose after installation.
Solution: Re-check all mounting bolts and ensure they are tightened to the recommended torque (6Nm / 4.4 lbf·ft). Ensure the internal bar adjustments (D1/D2) are correct for your vehicle model as per the fixing kit manual. - Issue: Excessive wind noise or whistling.
Solution: Ensure the cross bars are installed correctly and are not twisted. Check that all end caps are securely in place. Sometimes, repositioning cargo slightly can reduce noise. - Issue: Difficulty locking the anti-theft covers.
Solution: Ensure the cover is properly aligned with the lock mechanism. The internal screw must be fully tightened before the cover can be locked. Do not force the key. - Issue: Scratches on vehicle roof after installation.
Solution: This usually indicates that the protective rubber pads were not correctly installed or have shifted. Ensure pads are clean and properly seated before placing the racks on the roof. Always clean the roof surface thoroughly before installation.
Warranty and Support
OMAC products are manufactured with high-quality standards. For any warranty claims, technical support, or inquiries regarding your roof racks, please contact OMAC customer service directly. Keep your purchase receipt as proof of purchase.
You can find more information and contact details on the official OMAC website or through your original point of purchase.
For additional protection, consider the available protection plans offered at the time of purchase:
- 2-Year Protection Plan
- Complete Protect: One plan covers all eligible past and future purchases