1. Introduction
The XORO HMT 600 V2 is a versatile all-in-one stereo internet radio system designed to provide a comprehensive audio experience. This micro-compact unit integrates modern radio functions, including Internet Radio, DAB+, and FM reception, offering access to over 30,000 stations worldwide. It also features a CD player, USB port for MP3 playback, Bluetooth connectivity for wireless music streaming, and support for UPnP streaming from your home network or PC. The device includes integrated stereo speakers housed in a wooden fiber cabinet, delivering rich sound. Its full-graphic color TFT display provides essential information such as station, music title, date, and time, and can show a five-day weather forecast in standby mode.
2. Product Overview
2.1 Key Features
- All-in-One Audio System: Combines Internet Radio, DAB+, FM, CD Player, USB, Bluetooth, and UPnP streaming.
- Extensive Station Access: Over 30,000 Internet radio stations, plus DAB+ and FM reception.
- Seamless Switching: Transition between DAB+/FM and Internet Radio for the same station to maintain reception quality.
- Multiple Playback Options: CD player, USB 2.0 port, MP3 streaming (UPnP) from PC or home network.
- Wireless Connectivity: Bluetooth 5.2 for streaming from smartphones or tablets (up to 10m range, environmental conditions apply).
- Integrated Stereo Speakers: Housed in a wooden fiber cabinet for rich sound.
- Full-Graphic Color TFT Display: Shows station, music title, date, time, and a five-day weather forecast in standby.
- Podcast Support: Access a wide selection of interesting podcasts.
- Spotify Connect: Integrated support for Spotify streaming.
2.2 Components and Controls
The XORO HMT 600 V2 unit consists of the main radio unit and a remote control. Familiarize yourself with the layout for optimal use.

Image 1: Front view of the XORO HMT 600 V2 Internet Radio with its remote control. The radio features a central display, control buttons, and speaker grilles on both sides. The remote control provides convenient access to various functions.

Image 2: Rear view of the XORO HMT 600 V2, highlighting the connectivity ports. These include a headphone jack, USB port, DC IN for power, and an AUX IN port for external audio sources. An extendable antenna is also visible for improved radio reception.

Image 3: Close-up view of the integrated CD player tray on the XORO HMT 600 V2. The tray is shown open, ready to accept a compact disc for playback.
3. Setup
3.1 Unpacking and Placement
- Carefully remove the XORO HMT 600 V2 from its packaging.
- Place the unit on a stable, flat surface away from direct sunlight, heat sources, and moisture. Ensure adequate ventilation around the device.
- Extend the telescopic antenna for optimal DAB+ and FM reception.
3.2 Connecting Power
- Connect the provided power adapter to the DC IN port on the rear of the unit.
- Plug the power adapter into a suitable wall outlet.
3.3 Initial Setup Wizard
Upon first power-on, the device will guide you through an initial setup wizard:
- Language Selection: Use the navigation controls to select your preferred language and confirm.
- Time and Date: Set the current time and date. The device can often synchronize this automatically via network connection.
- Network Configuration:
- Select Wi-Fi as your connection type.
- The radio will scan for available Wi-Fi networks. Select your network from the list.
- Enter your Wi-Fi password using the on-screen keyboard and navigation buttons. Confirm your entry.
- Once connected, the Wi-Fi icon will appear on the display.
4. Operating Instructions
4.1 Basic Controls
The XORO HMT 600 V2 can be operated using the buttons on the front panel or the included remote control. The central navigation dial and surrounding buttons allow for menu navigation, volume control, and function selection.

Image 4: The 2.4-inch color display of the XORO HMT 600 V2, showing menu options. The image also illustrates the possibility of controlling the device via a dedicated smartphone application, offering an alternative interface for navigation and function selection.
4.2 Internet Radio
Access thousands of radio stations from around the world via your Wi-Fi connection.
- Press the Mode button (or select from the menu) to choose Internet Radio.
- Navigate through categories (e.g., Location, Genre, Popular Stations) or use the search function to find specific stations.
- Select a station to begin playback.
- To save a station as a favorite, refer to the Favorites section in your full manual.
4.3 DAB+ Radio
Enjoy high-quality digital radio broadcasts.
- Press the Mode button (or select from the menu) to choose DAB+ Radio.
- The radio will perform a scan for available DAB+ stations. This may take a few moments.
- Once the scan is complete, a list of available stations will appear. Use the navigation controls to select a station.
4.4 FM Radio
Tune into traditional analog FM broadcasts.
- Press the Mode button (or select from the menu) to choose FM Radio.
- Use the navigation controls to manually tune to a frequency or initiate an auto-scan for available stations.
4.5 CD Player
Play audio CDs from your collection.
- Gently insert an audio CD into the CD slot on the front of the unit. The disc will be drawn in automatically.
- The device should automatically switch to CD mode and begin playback. If not, select CD Player from the mode menu.
- Use the Play/Pause, Skip, and Stop buttons on the unit or remote control to manage playback.
4.6 USB Playback
Play MP3 files from a USB storage device.
- Insert a USB flash drive (formatted to FAT32) containing MP3 files into the USB port on the rear of the unit.
- Select USB from the mode menu.
- Navigate through the folders and files on the USB drive using the display and controls.
- Select a file to begin playback.
4.7 Bluetooth Connectivity
Stream music wirelessly from your smartphone or tablet.
- Select Bluetooth from the mode menu. The radio will enter pairing mode, indicated on the display.
- On your smartphone or tablet, enable Bluetooth and search for available devices.
- Select "XORO HMT 600 V2" from the list of devices to pair.
- Once paired, you can play music from your device, and it will be streamed through the XORO HMT 600 V2.
4.8 UPnP/DLNA Streaming
Stream music from a PC or network-attached storage (NAS) device on your home network.
- Ensure your PC or NAS is running a UPnP/DLNA server and is connected to the same network as the XORO HMT 600 V2.
- Select UPnP or Media Center from the mode menu.
- The radio will scan for available media servers. Select your desired server.
- Browse your music library and select tracks for playback.
4.9 Spotify Connect
Control and play Spotify music directly through your radio.
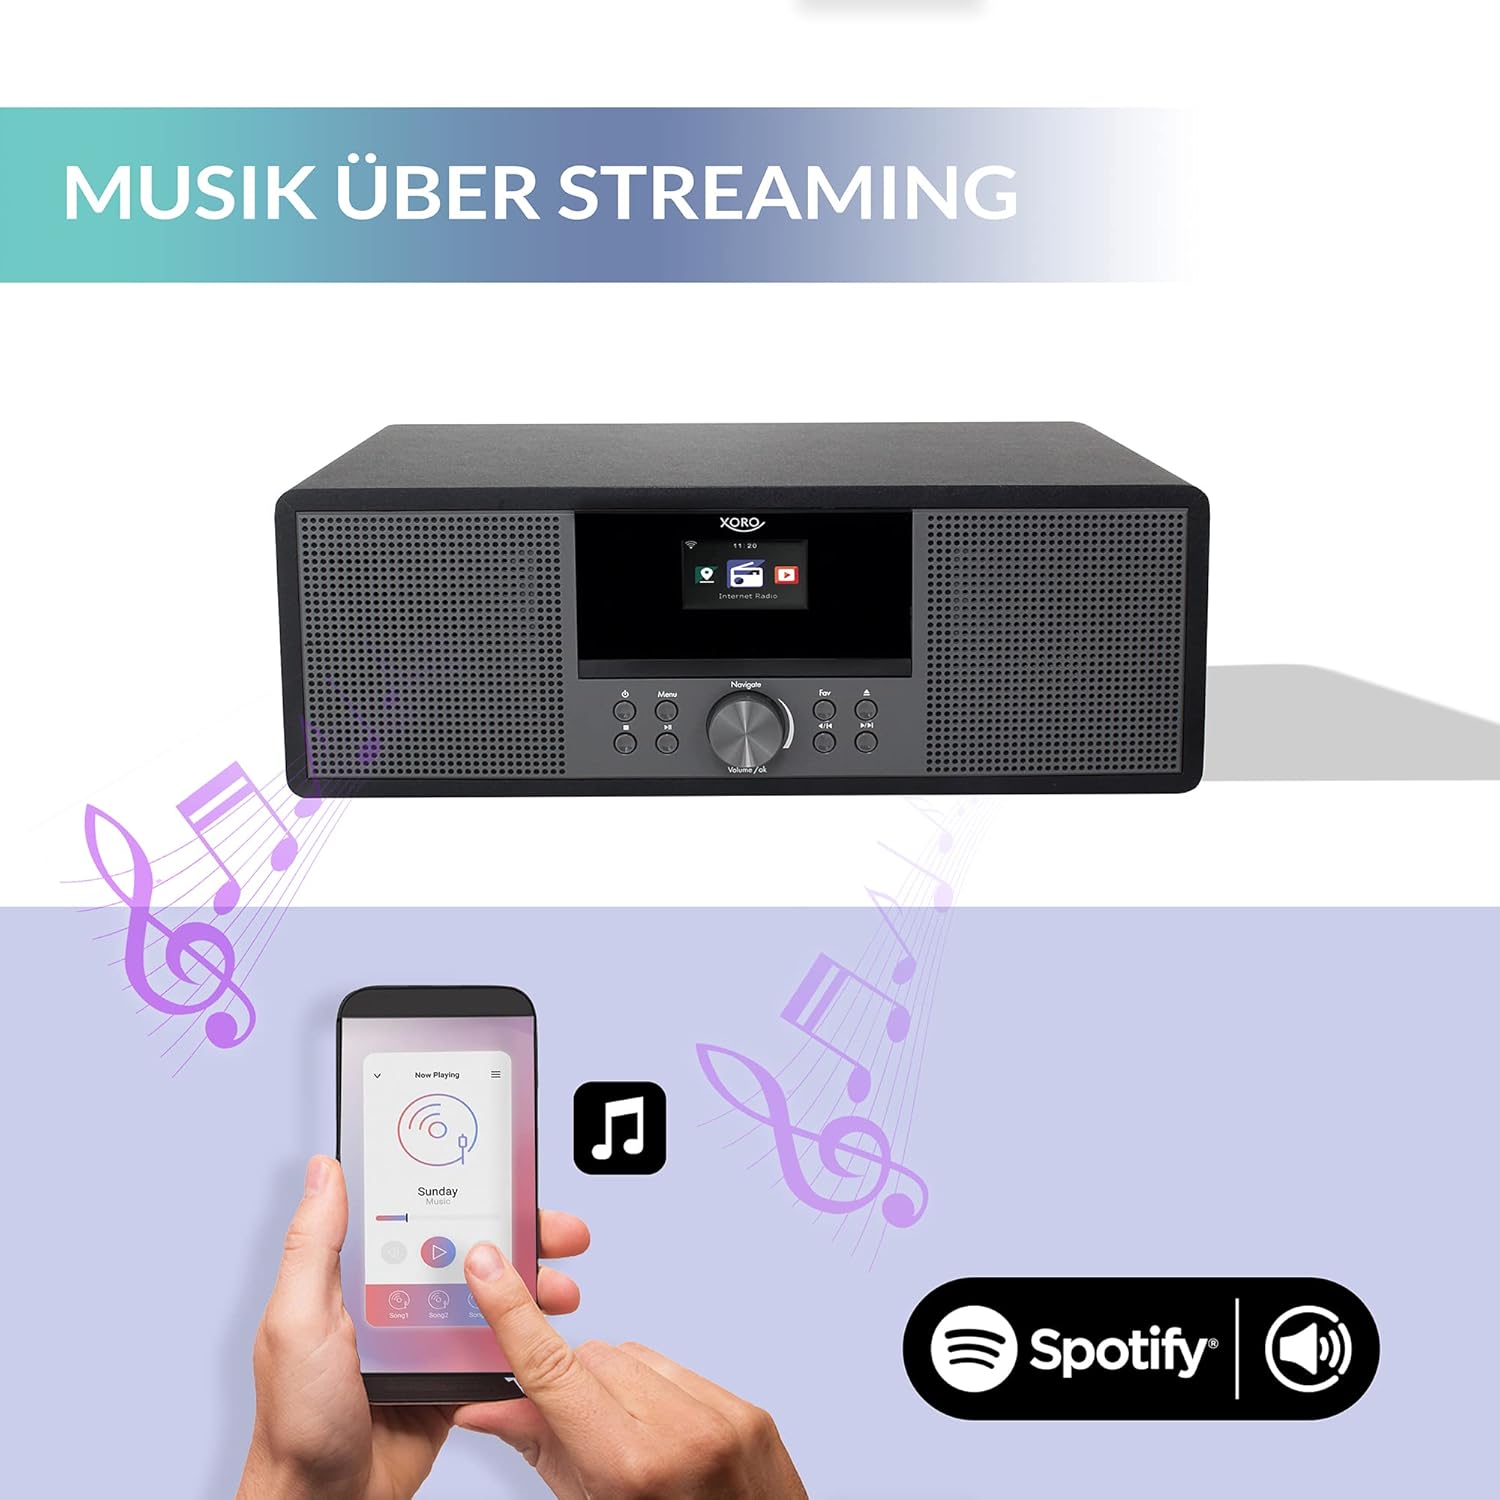
Image 5: The XORO HMT 600 V2 demonstrating music streaming capabilities. A smartphone is shown interacting with the radio, indicating the use of Spotify Connect to stream audio directly to the device.
- Ensure your XORO HMT 600 V2 is connected to the internet.
- Open the Spotify app on your smartphone, tablet, or computer.
- Play a song and tap the Devices Available icon (usually a speaker or computer icon).
- Select "XORO HMT 600 V2" from the list of available devices. Your music will now play through the radio.
4.10 Podcasts
Explore and listen to a wide range of podcasts.
- Select Podcasts from the main menu.
- Browse by category, search for specific podcasts, or access your subscribed podcasts (if applicable).
- Select an episode to begin playback.
4.11 Alarm and Sleep Timer
The XORO HMT 600 V2 includes alarm clock and sleep timer functions. Refer to the detailed instructions in your full manual for setting these features.
4.12 Weather Forecast Display
In standby mode, the display can show a five-day weather forecast for a selected location. Configure this option in the system settings.
5. Maintenance
5.1 Cleaning
- Always disconnect the power adapter before cleaning.
- Use a soft, dry cloth to wipe the exterior surfaces of the unit.
- Do not use abrasive cleaners, waxes, or solvents as they may damage the finish.
- For the display, use a soft, lint-free cloth specifically designed for screens.
5.2 General Care
- Avoid exposing the unit to extreme temperatures, humidity, or direct sunlight.
- Do not block ventilation openings.
- Handle CDs and USB drives carefully to prevent damage.
6. Troubleshooting
If you encounter issues with your XORO HMT 600 V2, please consult the following common problems and solutions:
| Problem | Possible Cause | Solution |
|---|---|---|
| No power | Power adapter not connected; power outlet faulty. | Ensure power adapter is securely connected to the unit and a working power outlet. |
| No sound | Volume too low; Mute function active; incorrect audio source selected. | Increase volume; check if mute is active; ensure the correct mode (e.g., Internet Radio, CD) is selected. |
| Cannot connect to Wi-Fi | Incorrect password; Wi-Fi signal too weak; router issues. | Verify Wi-Fi password; move unit closer to router; restart router; check network settings. |
| Poor DAB+/FM reception | Antenna not extended; poor signal area. | Fully extend the telescopic antenna; reposition the unit for better signal. |
| CD not playing | CD inserted incorrectly; CD is dirty or scratched; unsupported disc format. | Reinsert CD correctly; clean CD with a soft cloth; ensure it's an audio CD. |
| Bluetooth pairing fails | Device not in pairing mode; other device already connected; Bluetooth disabled on source device. | Ensure radio is in Bluetooth pairing mode; disconnect other Bluetooth devices; enable Bluetooth on your source device. |
For more detailed troubleshooting, refer to the comprehensive manual or contact customer support.
7. Specifications
Technical specifications for the XORO HMT 600 V2:
| Feature | Specification |
|---|---|
| Brand | Xoro |
| Model Number | HMT 600 V2 |
| Color | Black |
| Connectivity Technology | Wi-Fi, Bluetooth |
| Special Features | Integrated Clock, Internet Radio, DAB+, FM, CD Player, USB Playback, Spotify Connect, UPnP Streaming |
| Compatible Devices | Tablet, Smartphone, PC/NAS (via UPnP) |
| Tuning Technology | DAB+ |
| Supported Radio Bands | 3 bands (Internet, DAB+, FM) |
| Power Source | Corded Electric |
| Product Dimensions | 38L x 14W x 26H centimeters |
| Included Components | Internet radio, power supply unit, user manual, infrared remote control |
| Software Updates Guaranteed Until | October 6, 2026 |
8. Support and Warranty
8.1 Customer Support
For technical assistance or inquiries, please contact XORO customer service:
- Telephone (Germany): 04161 - 800 24 24 (Monday-Friday: 11:00 AM to 5:00 PM)
- Email: support@ensservice.de
8.2 Warranty Information
Specific warranty details are typically provided with your purchase documentation. Please retain your proof of purchase for warranty claims. Software updates are guaranteed until October 6, 2026.