1. Introduction
Thank you for choosing the Frigidaire 22 Pint Dehumidifier. This appliance is designed to remove excess moisture from the air, helping to create a more comfortable and healthier indoor environment. This manual provides essential information for the safe and efficient operation, maintenance, and troubleshooting of your dehumidifier. Please read it thoroughly before use and retain it for future reference.

Image 1.1: Front view of the Frigidaire 22 Pint Dehumidifier, showing the control panel on top and the water bucket indicator on the lower front.
2. Safety Information
To prevent injury to the user or other people and property damage, the following instructions must be followed. Incorrect operation due to ignoring instructions may cause harm or damage.
- Always plug the unit into a grounded electrical outlet.
- Do not operate the unit with a damaged power cord or plug.
- Do not block the air intake or exhaust vents.
- Ensure the unit is placed on a level, stable surface to prevent tipping.
- Do not use the unit near flammable gases or combustibles.
- Keep children and pets away from the unit during operation.
- Unplug the unit before cleaning or performing any maintenance.
3. Product Features
The Frigidaire 22 Pint Dehumidifier incorporates several features designed for user convenience and effective moisture removal:
- Easy-to-Clean Washable Filter: Captures dust from the air and maintains dehumidifier efficiency.
- Custom Humidity Control: Allows precise adjustment of the desired humidity level in your room.
- Continuous Drain Option: Enables continuous drainage, eliminating the need to manually empty the water bucket.
- Automatic Shut-Off: The unit automatically turns off when the water bucket is full.
- Front-Loading Bucket with Carrying Handle and Splash Guard: Provides convenient access for emptying and reduces spills.

Image 3.1: Visual representation of key features including portable design, multi-speed fan, and automatic shut-off.
4. Parts Identification
Familiarize yourself with the main components of your dehumidifier:
Image 4.1: Front View (1. Control Panel, 2. Air Outlet, 3. Water Bucket, 4. Water Level Indicator)
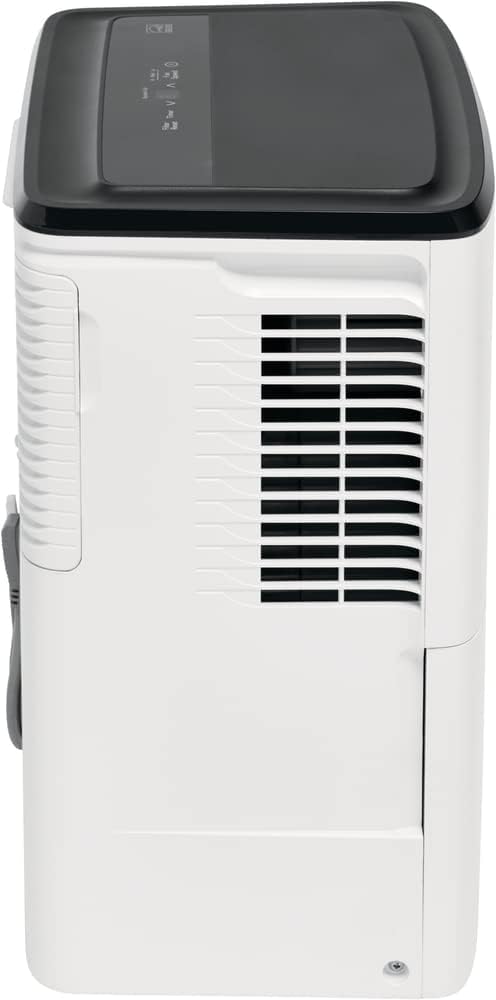
Image 4.2: Side View (5. Air Intake Grille)

Image 4.3: Back View (6. Power Cord, 7. Continuous Drain Outlet, 8. Air Filter Access)
5. Setup
5.1 Placement
For optimal performance, place the dehumidifier in a location where the humidity is highest and air circulation is good. Ensure there is at least 8 inches (20 cm) of space around the unit for proper airflow.

Image 5.1: Example of proper dehumidifier placement in a room, ensuring adequate space around the unit.
5.2 Power Connection
Plug the power cord into a grounded 115V AC, 60Hz electrical outlet. Do not use an extension cord.
6. Operating Instructions
6.1 Control Panel Overview

Image 6.1: Control Panel (1. Filter Reset, 2. Timer, 3. Humidity Up/Down, 4. Digital Display, 5. Fan Speed, 6. Power, 7. Bucket Full Indicator)
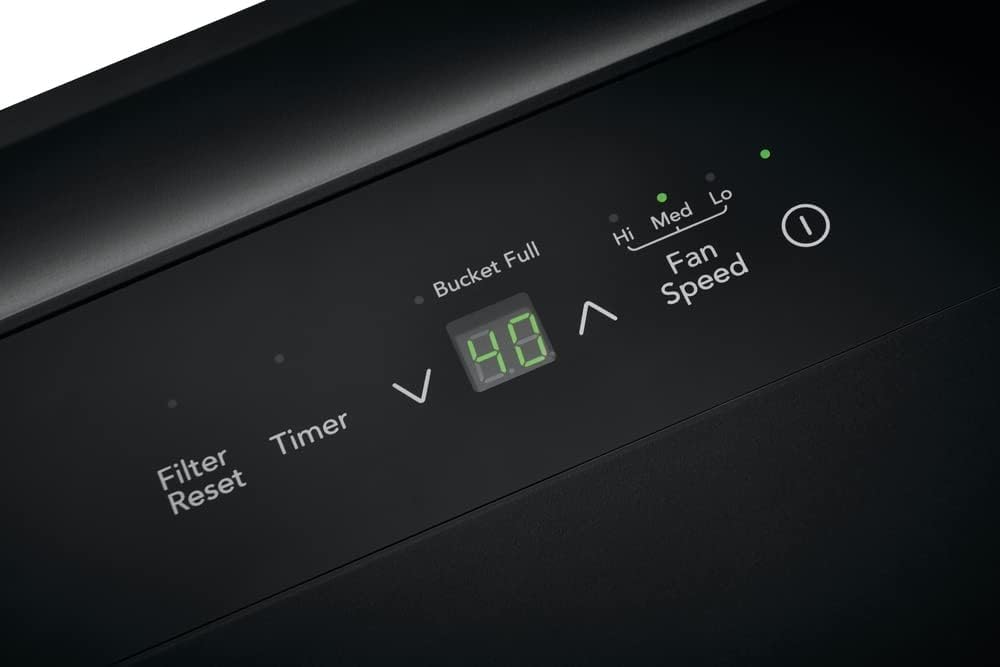
Image 6.2: Close-up of the digital display and control buttons.
6.2 Power On/Off
Press the Power button to turn the unit on or off.
6.3 Setting Desired Humidity Level
When the unit is on, use the Up or Down arrows to set the desired humidity level between 35% and 85% relative humidity (RH). The unit will operate until the set humidity level is reached, then cycle on and off to maintain it.
6.4 Fan Speed Selection
Press the Fan Speed button to cycle through available fan speeds: High, Medium, and Low. Higher fan speeds result in faster moisture removal.
6.5 Timer Function
Press the Timer button to set a delay for the unit to turn on or off. Use the Up/Down arrows to adjust the time in 0.5-hour increments up to 10 hours, then 1-hour increments up to 24 hours.
7. Maintenance
7.1 Emptying the Water Bucket
When the water bucket is full, the 'Bucket Full' indicator light will illuminate, and the unit will automatically shut off. To empty:
- Grasp the sides of the bucket and pull it out from the front of the unit.
- Carefully carry the bucket to a sink or drain.
- Pour out the collected water.
- Slide the empty bucket back into the unit until it clicks into place. The unit will resume operation.

Image 7.1: Removing the front-loading water bucket for emptying.

Image 7.2: The water bucket features a carrying handle and splash guard for easy, spill-free emptying.
7.2 Continuous Drain Option
For continuous operation without emptying the bucket, you can connect a standard garden hose (not included) to the continuous drain outlet:
- Locate the continuous drain outlet on the back of the unit (refer to Image 4.3).
- Remove the plastic cap from the outlet.
- Thread a standard garden hose onto the outlet. Ensure the connection is secure to prevent leaks.
- Direct the other end of the hose to a floor drain or suitable receptacle, ensuring the hose is sloped downwards for gravity drainage.

Image 7.3: Illustration of connecting a hose for continuous drainage.
7.3 Cleaning the Washable Filter
The air filter should be cleaned approximately every two weeks or when the 'Filter Reset' indicator light illuminates. A dirty filter can reduce efficiency.
- Turn off the unit and unplug it.
- Remove the filter from the back of the unit (refer to Image 4.3).
- Wash the filter with warm, soapy water. Rinse thoroughly.
- Allow the filter to air dry completely before reinstalling.
- Once reinstalled, plug in the unit and press the Filter Reset button to clear the indicator light.
8. Troubleshooting
Before contacting customer service, please review the following common issues and solutions:
| Problem | Possible Cause | Solution |
|---|---|---|
| Unit does not turn on. | No power; Bucket full; Temperature too low. | Check power cord connection and outlet; Empty water bucket; Ensure room temperature is above 41°F (5°C). |
| Unit runs but does not collect water. | Humidity setting too high; Room temperature too low; Air filter clogged. | Lower the desired humidity setting; Ensure room temperature is adequate; Clean the air filter. |
| Unit is noisy. | Unit not level; Air filter clogged; Fan obstruction. | Place unit on a firm, level surface; Clean the air filter; Check for any obstructions in the fan area. |
| Water leaks from the unit. | Water bucket not properly seated; Continuous drain hose loose or clogged. | Reinsert water bucket correctly; Check continuous drain hose connection and ensure it is not blocked. |
9. Specifications
Detailed technical specifications for the Frigidaire 22 Pint Dehumidifier:
| Specification | Value |
|---|---|
| Brand | Frigidaire |
| Model Name | FFAD2234W1 |
| Capacity | 22 Pints |
| Floor Area Coverage | 1500 Square Feet |
| Dehumidification Capacity | 1.7 Gallons per Day |
| Tank Volume | 16.9 Pints |
| Product Dimensions (D x W x H) | 11.34"D x 15.5"W x 19.78"H |
| Item Weight | 35.4 pounds |
| Color | White |
| Number of Speeds | 3 |
| Wattage | 152 watts |
| Upper Temperature Rating | 95 Degrees Fahrenheit |
| UPC | 012505285103 |
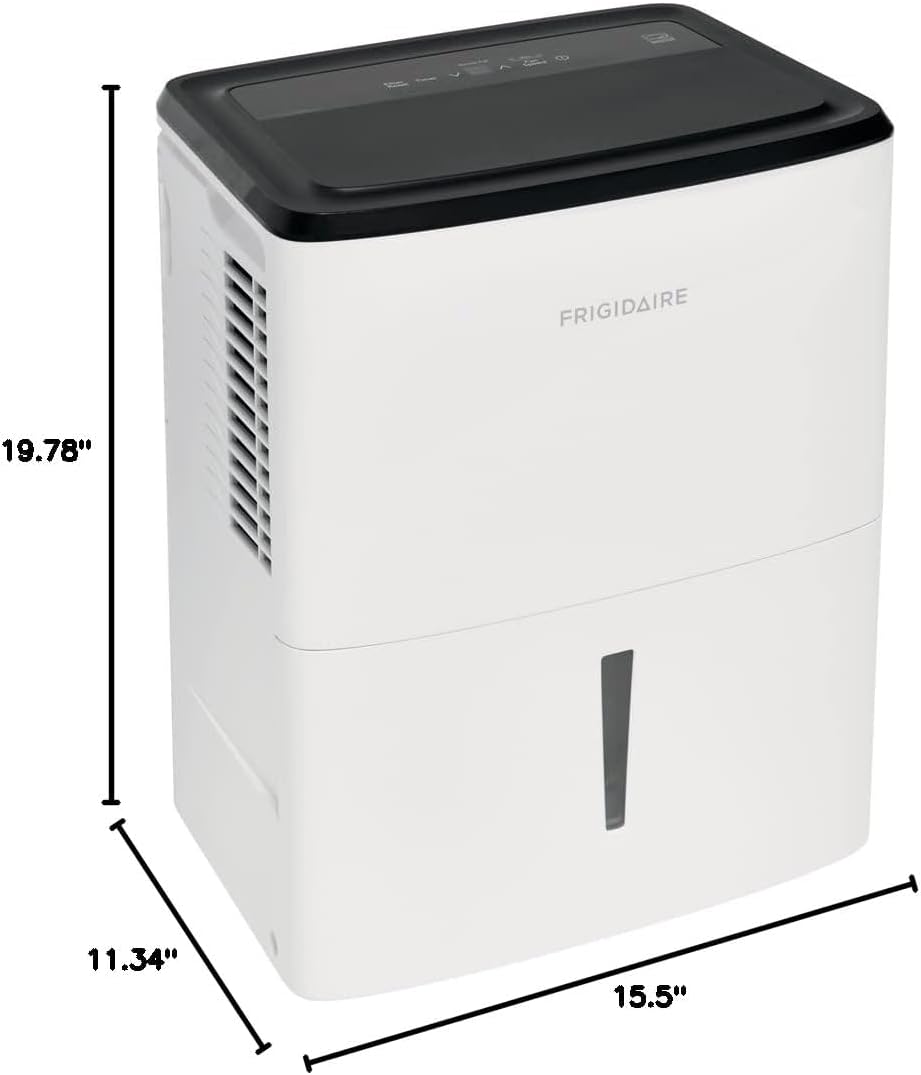
Image 9.1: Product dimensions: 11.34 inches deep, 15.5 inches wide, and 19.78 inches high.
10. Warranty and Support
For warranty information or technical support, please refer to the warranty card included with your product or visit the official Frigidaire website. You may also contact Frigidaire customer service directly for assistance with product operation, parts, or service inquiries.
Please have your model number (FFAD2234W1) and serial number ready when contacting support.


