1. Introduction
The VEVOR Thermal Imaging Camera (Model SC204) is a professional-grade infrared camera designed for a wide range of applications, including home inspections, HVAC troubleshooting, electrical and mechanical system diagnostics, and outdoor observation. It utilizes advanced thermal imaging technology to visualize temperature differences, helping users identify hidden issues and anomalies that are invisible to the naked eye.
This manual provides detailed instructions on the proper setup, operation, maintenance, and troubleshooting of your VEVOR Thermal Imaging Camera. Please read this manual thoroughly before using the device to ensure safe and efficient operation.

Figure 1.1: Main view of the VEVOR Thermal Imaging Camera.
This image displays the VEVOR Thermal Imaging Camera from a front-side angle, showcasing its ergonomic design and the display screen. The device is black with yellow VEVOR branding.
2. Safety Information
Always adhere to the following safety precautions to prevent injury or damage to the device:
- Do not point the camera directly at extremely high-intensity heat sources (e.g., the sun, lasers) as this may damage the infrared sensor.
- Keep the device dry. Although it is IP54 rated for water and dust resistance, prolonged exposure to water or submersion is not recommended.
- Avoid dropping the device from heights exceeding 6.6 ft (2 m).
- Do not attempt to disassemble or modify the camera. Repairs should only be performed by authorized service personnel.
- Use only the provided USB cable for charging.
- Store the camera in a cool, dry place away from direct sunlight and extreme temperatures.
3. Package Contents
Verify that all items listed below are included in your package:
- 1 x VEVOR Thermal Imager (Model SC204)
- 1 x 32GB SD Card
- 1 x USB Cable
- 1 x Carry Bag
- 1 x User Guide
Figure 3.1: VEVOR Thermal Imaging Camera and included accessories.
This image displays the VEVOR Thermal Imaging Camera alongside its accessories: a KIOXIA EXCERIA 16GB SD card (note: product description states 32GB, this image shows 16GB), a USB cable, and a protective carry bag.
4. Product Overview
The VEVOR Thermal Imaging Camera features a robust design for comfortable and efficient use. Key components include:
- Ergonomic Handle: Designed for comfortable and secure grip during extended use.
- 2.8" Screen: A clear display for real-time thermal imaging and menu navigation.
- Infrared Lens: The primary sensor for capturing thermal data.
- Visible Light Lens: For capturing standard visual images, often used for image blending.
- LED Spotlight: Provides illumination in dark environments for visible light capture.
- Capture Button (Trigger): Used to take thermal images or record video.
- Navigation Buttons: For navigating menus and adjusting settings.
- USB Port: For charging the device and transferring data to a computer.
- SD Slot: For inserting the Micro SD card to store images and videos.
- Tapped Hole: A standard 1/4-inch tripod mount for stable positioning.

Figure 4.1: Labeled components of the VEVOR Thermal Imaging Camera.
This image highlights the various components of the thermal camera, including the LED spotlight, infrared lens, visible light lens, capture button, ergonomic handle, 2.8" screen, USB port, SD slot, and tapped hole for tripod mounting.
5. Setup
5.1. Charging the Battery
The VEVOR Thermal Imaging Camera comes with a built-in rechargeable Li-ion battery. Before first use, fully charge the device.
- Locate the USB port cover on the device (refer to Figure 4.1).
- Open the cover and connect the provided USB-C cable to the camera's USB port.
- Connect the other end of the USB cable to a compatible USB power adapter (not included) or a computer's USB port.
- The battery indicator on the screen will show charging status. A full charge provides up to 9 hours of continuous operation.
5.2. Inserting the SD Card
The camera requires a Micro SD card to store captured images and videos. A 32GB SD card is included.
- Locate the SD card slot next to the USB port (refer to Figure 4.1).
- Gently insert the Micro SD card into the slot with the gold contacts facing down until it clicks into place.
- To remove the SD card, gently push it inwards until it clicks again, then release to allow it to spring out.
6. Operating Instructions
6.1. Powering On/Off
- To power on: Press and hold the red power button located below the screen until the VEVOR logo appears.
- To power off: Press and hold the red power button until the device shuts down.
6.2. Basic Thermal Imaging
Once powered on, the camera will display a real-time thermal image. The screen will show temperature readings (Max, Min, and Center Spot) and a color scale indicating temperature ranges.

Figure 6.1: Super Resolution thermal image vs. standard.
This image illustrates the improved clarity of the thermal image with Super Resolution (320x240 pixels) compared to the standard 240x180 pixels, showing more detail and accuracy.
6.3. Capturing Images and Videos
- To capture an image: Aim the camera at the desired target and press the trigger button located on the handle. The image will be automatically saved to the SD card if auto-save is enabled in settings.
- To record video: Navigate to the video recording mode (if available) via the menu and press the trigger to start/stop recording.
6.4. Changing Color Palettes
The camera offers four color palettes to visualize thermal data. Each palette highlights temperature differences in a unique way:
- Rainbow: A general-purpose palette showing a full spectrum of colors.
- Iron: Ideal for high-contrast thermal images, often used for industrial applications.
- Black Hot: Hotter areas appear darker.
- White Hot: Hotter areas appear brighter.
To change the palette: Use the navigation buttons to access the "Palette" option in the menu and select your preferred mode.
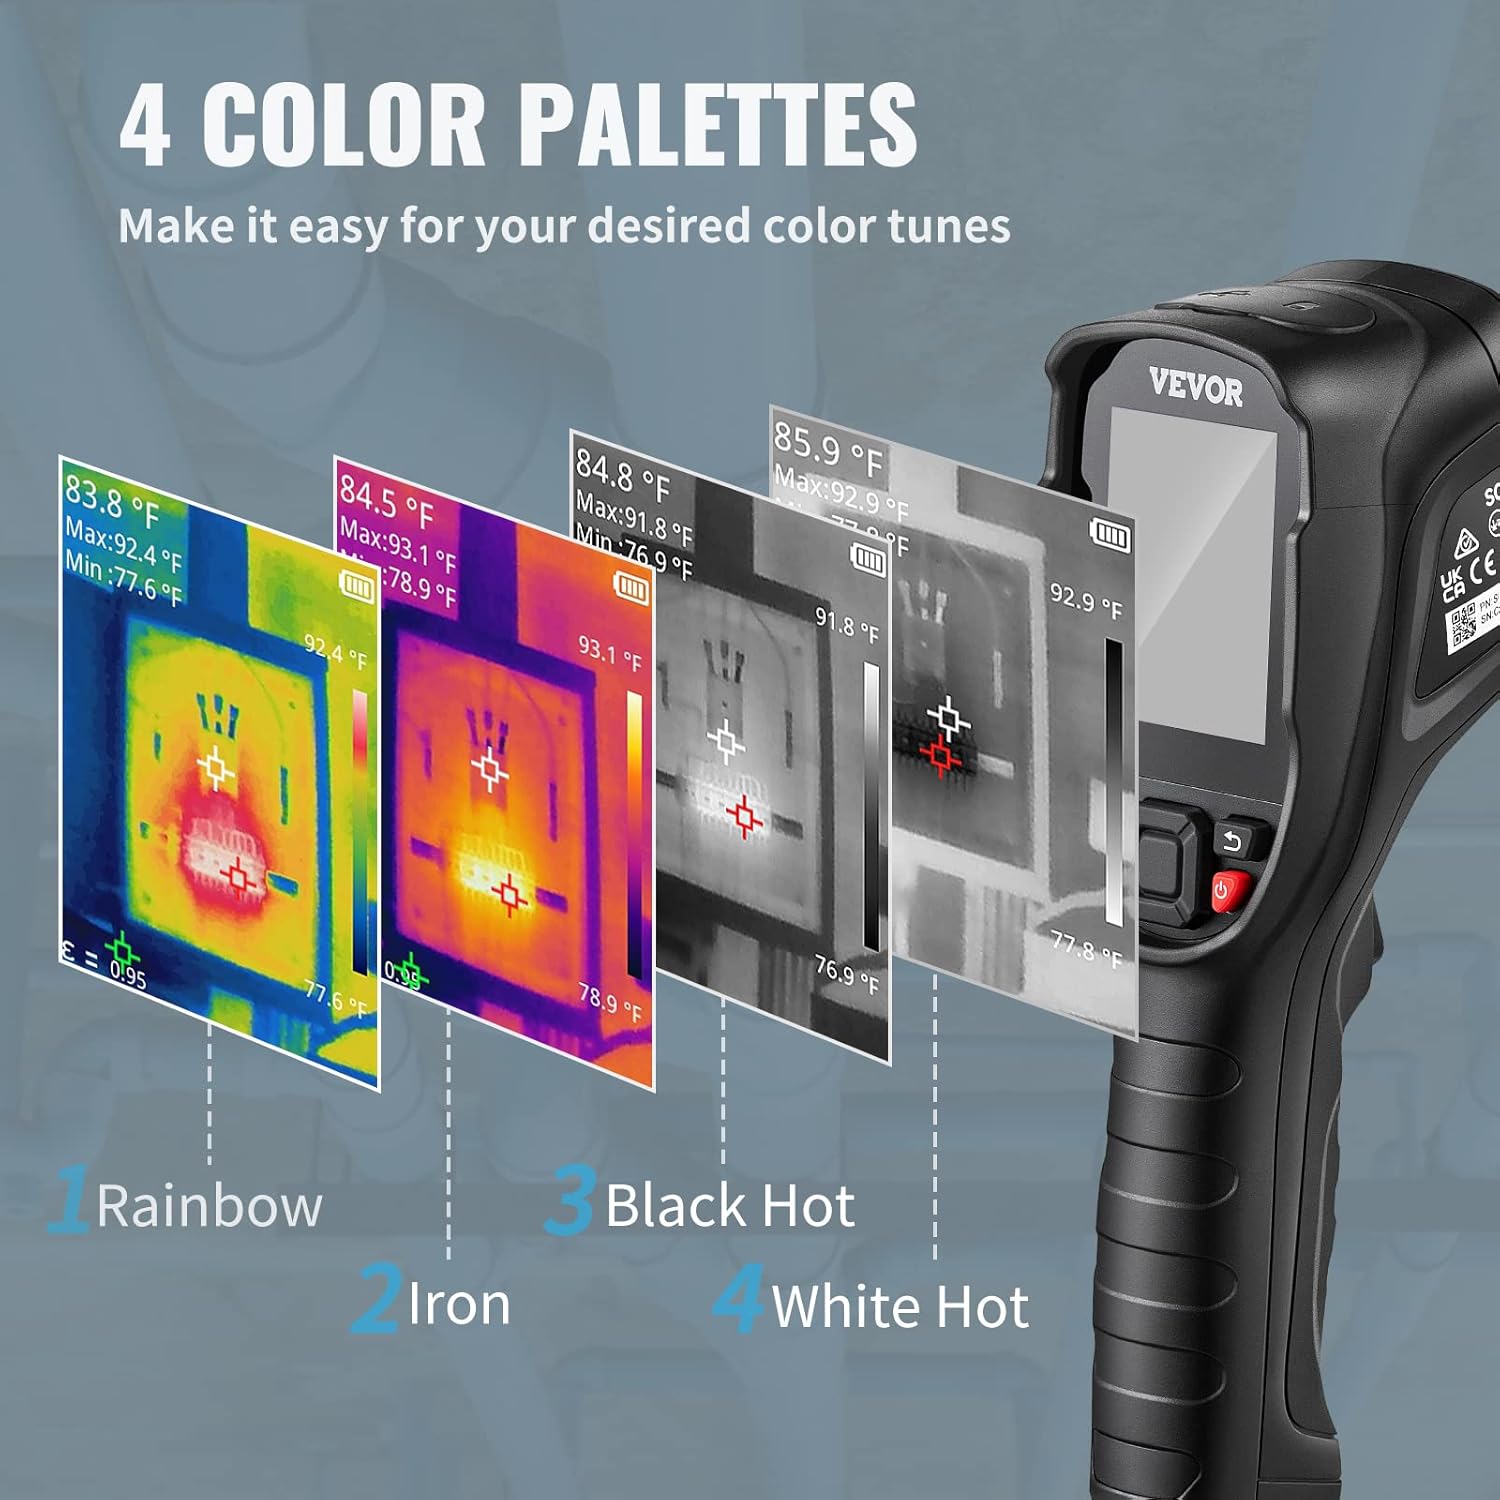
Figure 6.2: Available color palettes: Rainbow, Iron, Black Hot, and White Hot.
This image displays four different thermal views of a circuit board, each rendered with a different color palette: Rainbow, Iron, Black Hot, and White Hot, demonstrating the visual variations.
6.5. Accessing Settings
The camera's settings allow for customization of various parameters, including temperature scale (°C/°F), auto power-off, and photo auto-save.
- Press the center navigation button to access the main menu.
- Navigate to the "Setting" option and press the center button to enter.
- Adjust desired settings using the navigation buttons.
7. Maintenance
7.1. Cleaning the Device
- Use a soft, dry cloth to clean the camera body.
- For the lenses and screen, use a lens cleaning cloth and specialized cleaning solution to avoid scratches.
- Do not use abrasive cleaners or solvents.
7.2. Storage
- When not in use, store the camera in its provided carry bag to protect it from dust and physical damage.
- Store in a cool, dry environment.
7.3. Battery Care
- Charge the battery regularly, even if the device is not in frequent use, to maintain battery health.
- Avoid completely draining the battery before recharging.
8. Troubleshooting
| Problem | Possible Cause | Solution |
|---|---|---|
| Device does not power on. | Low or depleted battery. | Charge the device fully using the provided USB cable. |
| Thermal image is blurry or unclear. | Dirty lens or incorrect focus (if applicable). | Clean the infrared lens with a soft, lint-free cloth. Ensure proper distance settings are used. |
| Cannot save images/videos. | SD card is full or not inserted correctly. | Check SD card insertion. Delete old files or replace with a new SD card. Ensure auto-save is enabled. |
| Temperature readings seem inaccurate. | Incorrect emissivity setting or environmental factors. | Adjust emissivity setting in the menu based on the material being inspected. Avoid strong air currents or reflective surfaces. |
9. Specifications
| Feature | Detail |
|---|---|
| Model | SC204 |
| IR Resolution | 240x180 pixels |
| Refresh Rate | 25Hz |
| Super Resolution | 320 × 240 pixels |
| Temperature Range | -4 to 752°F (-20°C to 400°C) |
| Thermal Sensitivity | 40 mK |
| Angle of Field | 52.5°x39.5° |
| Distance Settings | 1.6-13.1 ft / 0.5-4 m |
| Battery Life | Up to 9 hours |
| SD Card | 32GB (stores up to 90,000 photos) |
| Drop Test Resistance | 6.6 ft (2 m) |
| Waterproof Rating | IP54 |
| Product Size | 7.1 x 5.9 x 11.8 in (18 x 15 x 30 cm) |
| Product Weight | 2.4 lbs (1.1 kg) |

Figure 9.1: Detailed product information and specifications.
This image provides a visual summary of the VEVOR Thermal Imaging Camera's key specifications, including IR resolution, Super Resolution, refresh rate, temperature range, thermal sensitivity, battery life, SD card capacity, drop test, and waterproof rating, along with certifications (CE, RoHS, FC, UK CA).
10. Warranty and Support
For warranty information, technical support, or service inquiries, please refer to the official VEVOR website or contact their customer service directly. Keep your purchase receipt as proof of purchase for warranty claims.
Visit the VEVOR Store: VEVOR Official Store on Amazon


