1. Introduction
This instruction manual provides detailed guidance for installing and configuring the ViaBecs CAN019-R 16-Pin Car Radio Wire Harness. This harness is designed to integrate an aftermarket Android stereo head unit into specific Honda vehicles, retaining essential factory features such as steering wheel controls and the factory backup camera.
2. Package Contents
Verify that all components are present in your package:
- 1 x ViaBecs CAN019-R 16-Pin Aftermarket Radio Wire Harness with integrated Canbus box
3. Compatibility
3.1 Compatible Vehicles
- Honda CRV: 2012, 2013, 2014, 2015, 2016 (2.0L models, Low Configuration)
- Honda Civic: 2012, 2013, 2014, 2015 (Low Configuration)
Important Note: Due to variations in vehicle configurations (low/mid/high), full compatibility is not guaranteed without verification. Please ensure your vehicle's dashboard and original radio match the compatible types shown in the diagrams.

Figure 3.1: Visual guide for compatible Honda CRV (2012-2016) and Civic (2012-2015) dashboard configurations (Type A and B are compatible, Type C is not).

Figure 3.2: Overview of applicable Honda Civic (2012-2015) and CRV (2012-2016) models, showing compatible and incompatible original radio types.
3.2 Aftermarket Stereo Compatibility
This harness is designed for aftermarket Android car stereos equipped with a 16-pin power socket.
3.3 Incompatible Stereo Brands
This harness is NOT compatible with head units from major brands such as Kenwood, Pioneer, Alpine, Sony, JVC, BOSS Audio Systems, or similar. These brands typically use proprietary (non-standard) power connectors. Always confirm your stereo's wiring diagram before purchase.

Figure 3.3: The 16-pin connector layout and examples of incompatible 16-pin and 20-pin radio connectors from other brands.
4. Installation Guide
4.1 Pre-Installation Checklist
- Ensure the vehicle's ignition is off and the battery is disconnected before starting installation.
- Verify that your aftermarket Android stereo has a 16-pin power socket.
- Identify the original radio's connectors and compare them with the harness.
4.2 Wiring Connections
The ViaBecs CAN019-R harness is designed for plug-and-play installation, minimizing the need for wire cutting. Refer to the diagrams below for connection details.

Figure 4.1: Overview of the ViaBecs CAN019-R wiring harness and Canbus box.

Figure 4.2: Detailed diagram showing the CAN019-R harness components and their connection points on the back of an OEM radio (Model A).
4.2.1 16-Pin Connector Pinout
Understand the function of each pin on the 16-pin connector:

Figure 4.3: Pin assignment for the 16-pin power connector.
4.2.2 Connecting the Harness to the Aftermarket Stereo
- Connect the 16-pin power socket from the harness to the corresponding port on your aftermarket Android stereo.
- Connect the FM/AM Radio Antenna (1) to your stereo's antenna input.
- Connect the 4PIN USB adapter (2) if your stereo supports it.
- Ensure the 8PIN Canbus Port (4) is securely connected to the Canbus box (3).
- Connect the 10PIN CAM VIN & Wifi Line (5) and Male rear camera (6) if you are using a backup camera.
- If your CRV has a factory amplifier or no sound, connect the AMP CONT line of connector (7) to the 12V+ AMP CONT line of the audio cable (8).

Figure 4.4: Step-by-step connection guide for the wiring harness to the aftermarket stereo.

Figure 4.5: Example of the plug-and-play harness connected within the vehicle's dashboard.
4.2.3 OEM USB Port Connection
The harness includes an adapter to retain the functionality of your vehicle's original USB port.

Figure 4.6: Connection for retaining the Honda OEM USB port functionality.
4.2.4 OEM Radio Back Connector Guide
Familiarize yourself with the original radio's back connectors to ensure proper harness connection. Turn off the car and power off the unit before installation to prevent damage to the Canbus box or rear view camera functionality.
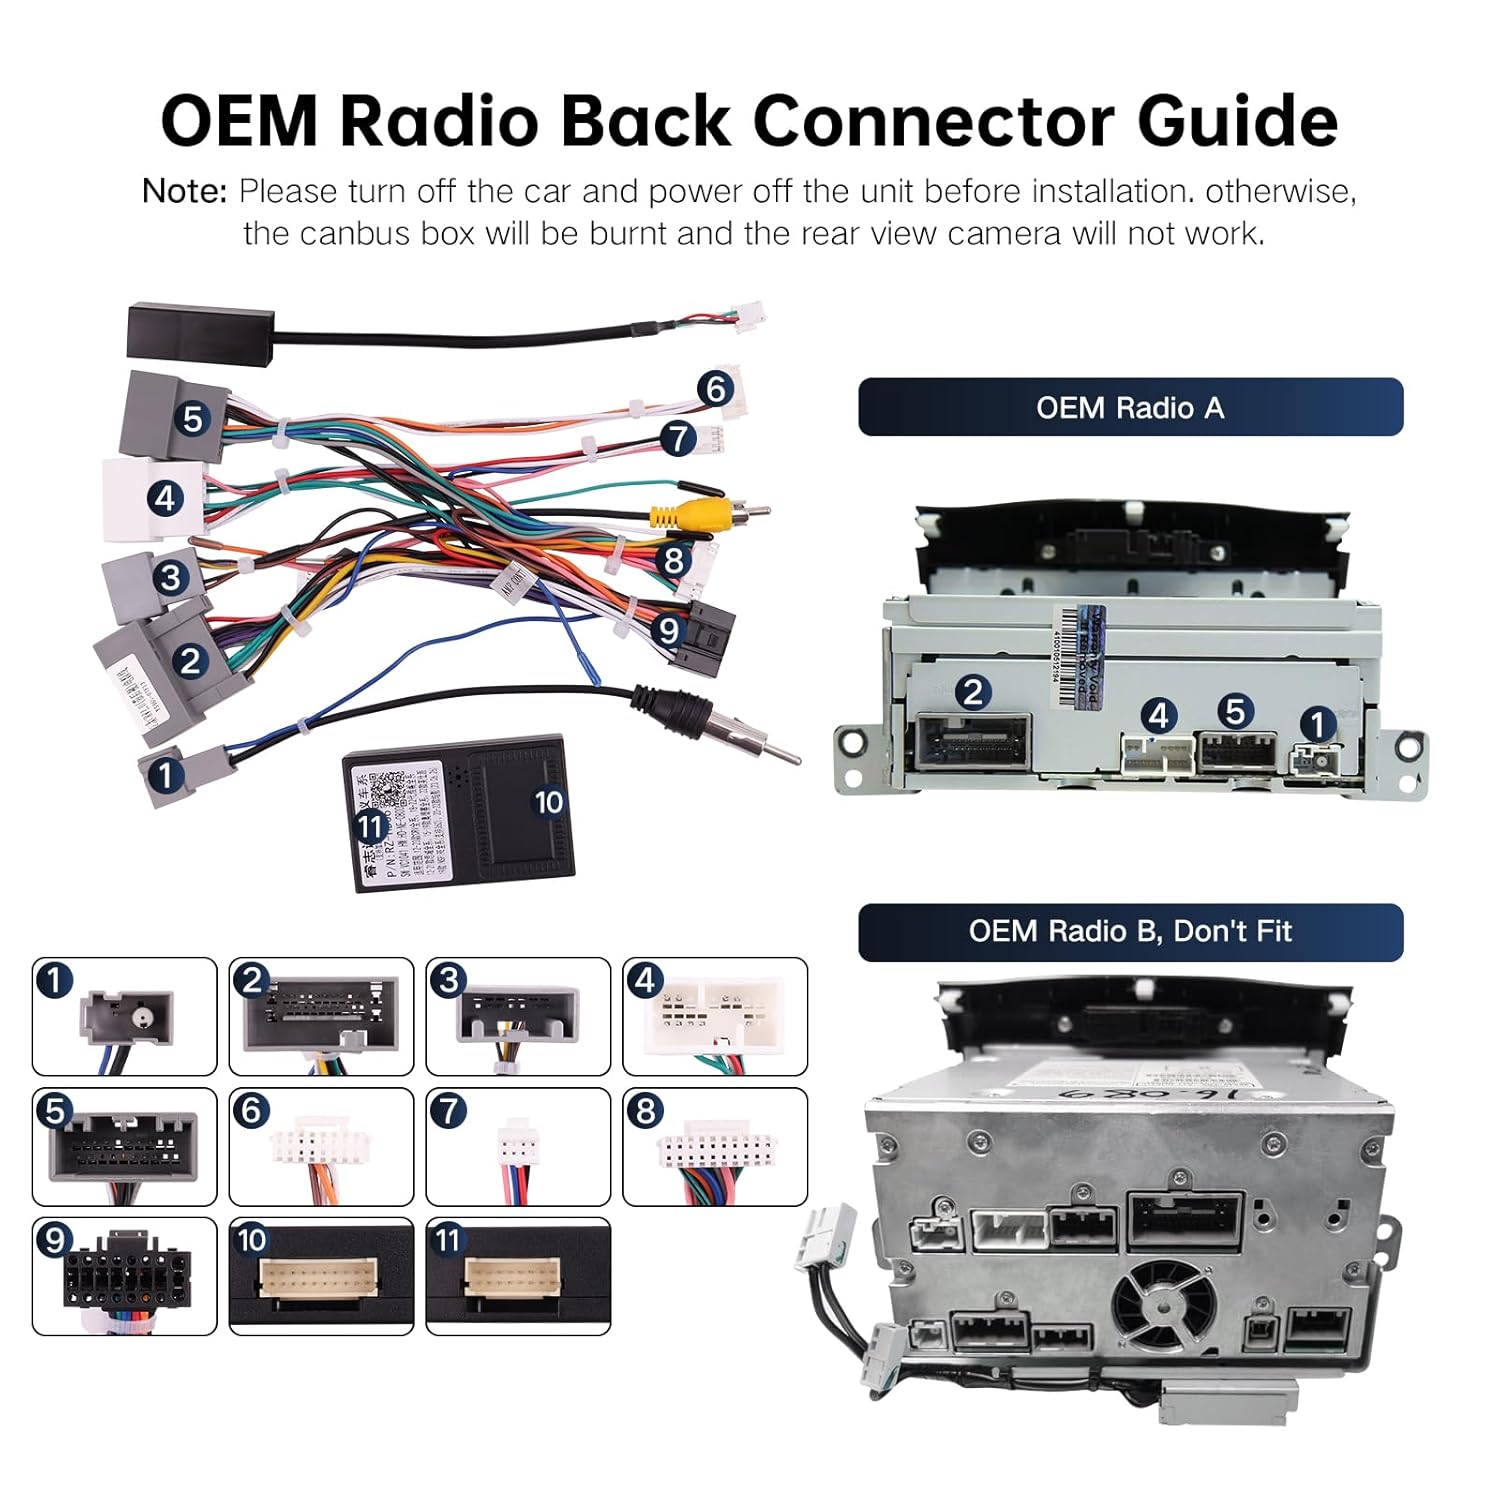
Figure 4.7: Reference guide for OEM radio back connectors, distinguishing between compatible (OEM Radio A) and incompatible (OEM Radio B) types.
4.3 Canbus Configuration
After physical installation, configure the Canbus settings on your Android stereo for optimal performance and feature retention.
- Ensure the 8-pin Canbus plug is securely connected to the Canbus box.
- Access your Android stereo's settings menu.
- Navigate to the Canbus settings section.
- Select the "Raise" brand for the Canbus.
- Choose your specific car model and year (e.g., Honda CRV 12-15).
- Select the appropriate configuration (e.g., "LowConfig").
- Confirm settings and reboot the head unit.

Figure 4.8: Guide for configuring the Canbus settings on your Android stereo, showing the selection of "Raise" brand and car model/year.
5. Retained Factory Features
This wiring harness allows your aftermarket Android stereo to retain several original vehicle functions:
- Steering Wheel Controls: Maintain control over audio functions directly from your steering wheel.
- Factory Amplifier: Supports the original amplifier for continued audio quality.
- Factory Backup Camera: The original backup camera display will function, typically on the small upper screen if it was originally displayed there.
- Factory USB Port: The original USB port remains functional.
- Door Information Display: Door open hints and other relevant vehicle information may be displayed.
- A/C Info Display: Air conditioning information may be displayed on the new head unit.
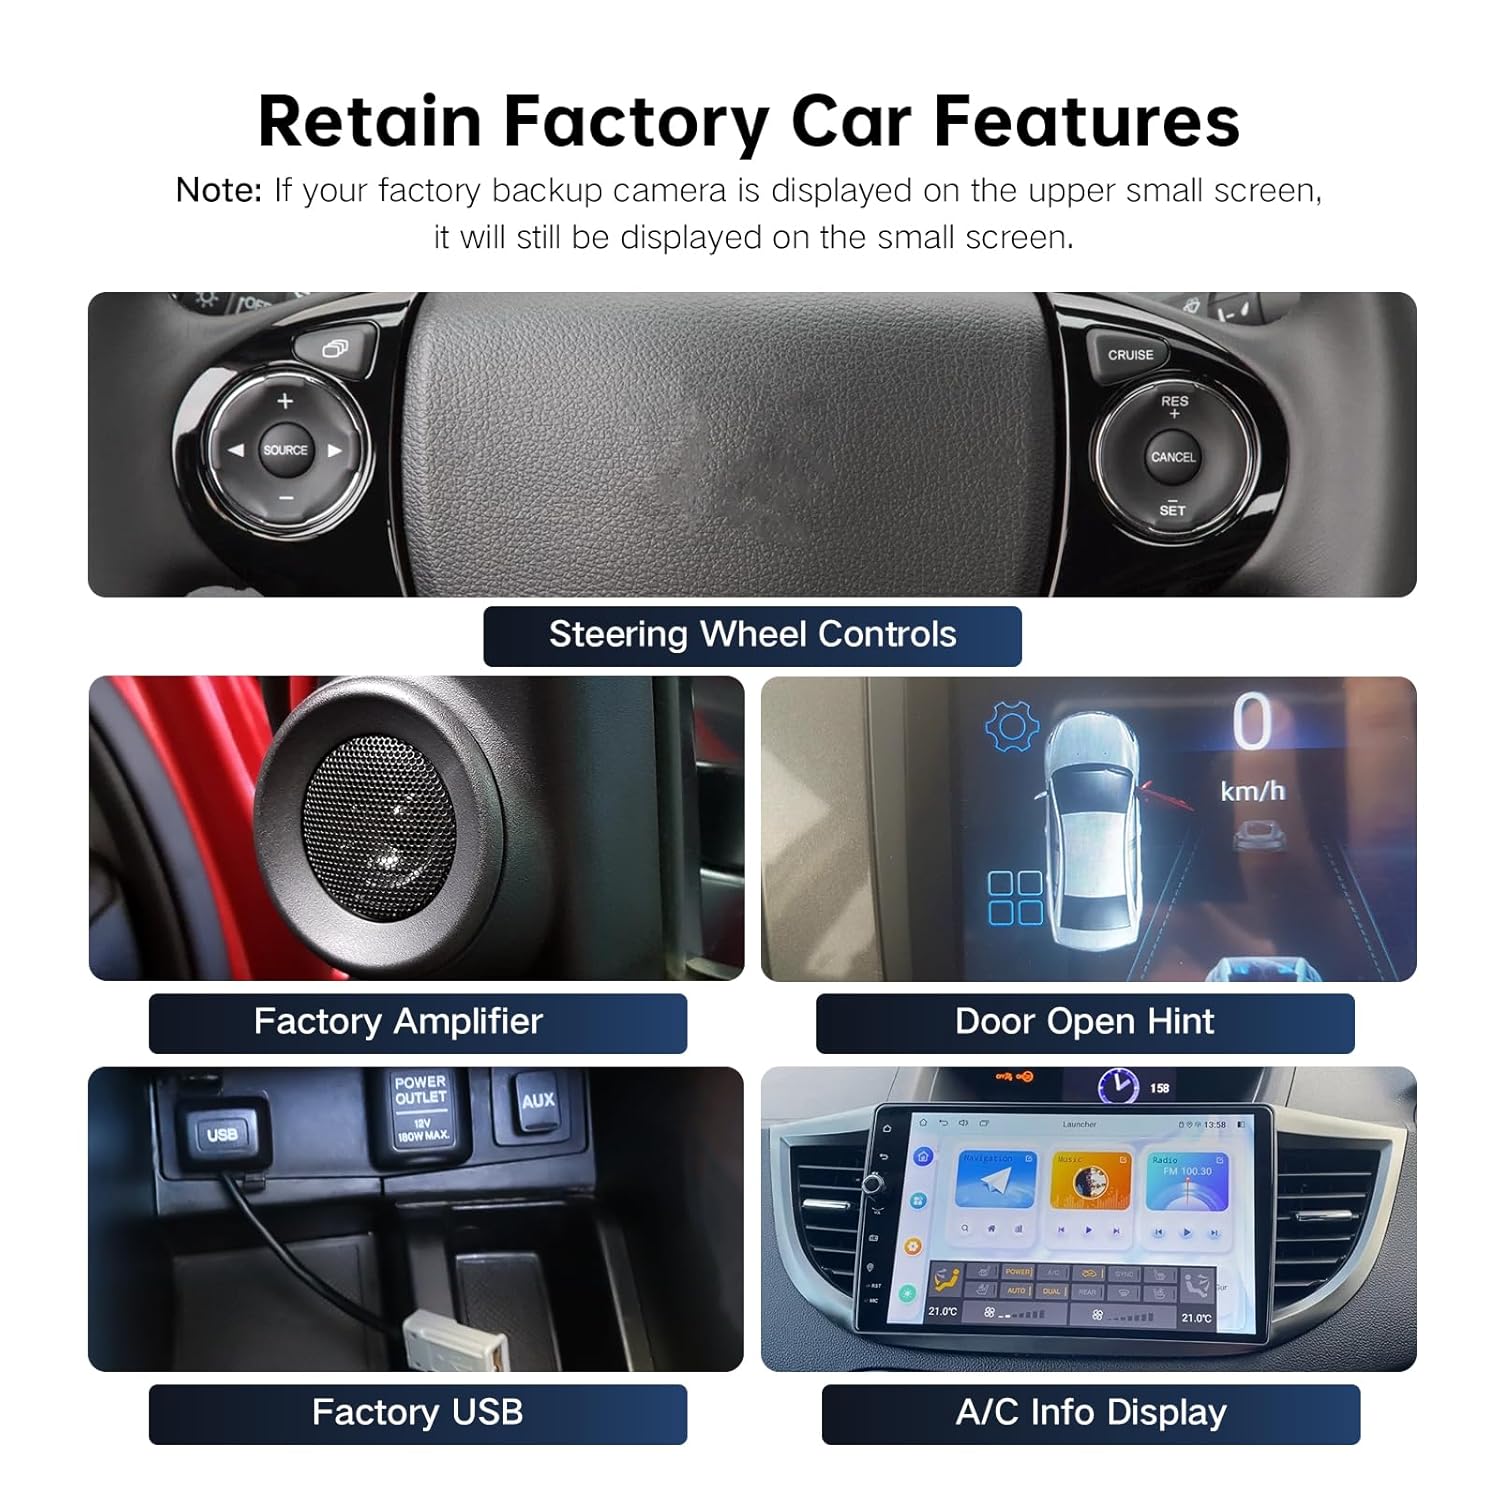
Figure 5.1: Visual representation of factory features retained with the harness, including steering wheel controls, amplifier, door open hint, factory USB, and A/C info display.
6. Specifications
| Model Number | CAN019-R |
| Brand | ViaBecs |
| Connector Type | 16-pin Power Socket |
| Material | Polyvinyl Chloride (PVC) |
| UPC | 753165265387 |
| Compatible Vehicles | Honda CRV (2012-2016), Honda Civic (2012-2015) |
7. Troubleshooting
- No Sound / Amplifier Issue: If your CRV has a factory amplifier and you experience no sound, ensure the AMP CONT line of connector (7) is correctly connected to the 12V+ AMP CONT line of the audio cable (8) as per the installation guide.
- Backup Camera Not Working: If your factory backup camera displays on the upper small screen, it will continue to do so. If it's not working at all, ensure all camera connections (10PIN CAM VIN & Wifi Line, Male rear camera) are secure. Also, verify that the original radio was powered off before installation to prevent Canbus box damage.
- Steering Wheel Controls Not Functioning: Ensure the Canbus box is correctly connected and configured in your Android stereo's settings (refer to Section 4.3). Incorrect Canbus settings can prevent steering wheel controls from working.
- Incompatibility with Stereo: This harness is specifically for aftermarket Android stereos with a 16-pin power socket. It is not compatible with major brand stereos (Kenwood, Pioneer, Alpine, Sony, JVC, BOSS Audio Systems) due to proprietary connectors. Verify your stereo's connector type before installation.
- General Connection Issues: Double-check all connections for tightness and correct placement. A loose connection can cause intermittent functionality.
8. Warranty and Support
ViaBecs offers a 60-day return policy and lifetime technical support for this product. If you encounter any issues with connection, compatibility, or functionality, please contact ViaBecs customer support via your order page for assistance.


