
Introduction
The Mxmoonfree Mini Digital Dry Bath Incubator is a compact, microprocessor-controlled device designed for precise temperature regulation in laboratory applications. It features a digital display for simultaneous viewing of set and actual time and temperature, and supports various interchangeable heating blocks (sold separately) for versatile use. This manual provides essential information for the safe and efficient operation of your dry bath incubator.

Figure 1: Mxmoonfree Mini Digital Dry Bath Incubator. This image shows the compact design of the incubator with its clear lid and digital display.
1. Setup
1.1 Unpacking and Inspection
Carefully unpack the dry bath incubator and all included components. Inspect the unit for any signs of damage that may have occurred during transit. If any damage is found, contact your supplier immediately.
Included components:
- Dry Bath Incubator Unit
- Power Cord
- User Manual (this document)
- Wrench (for block installation/removal)
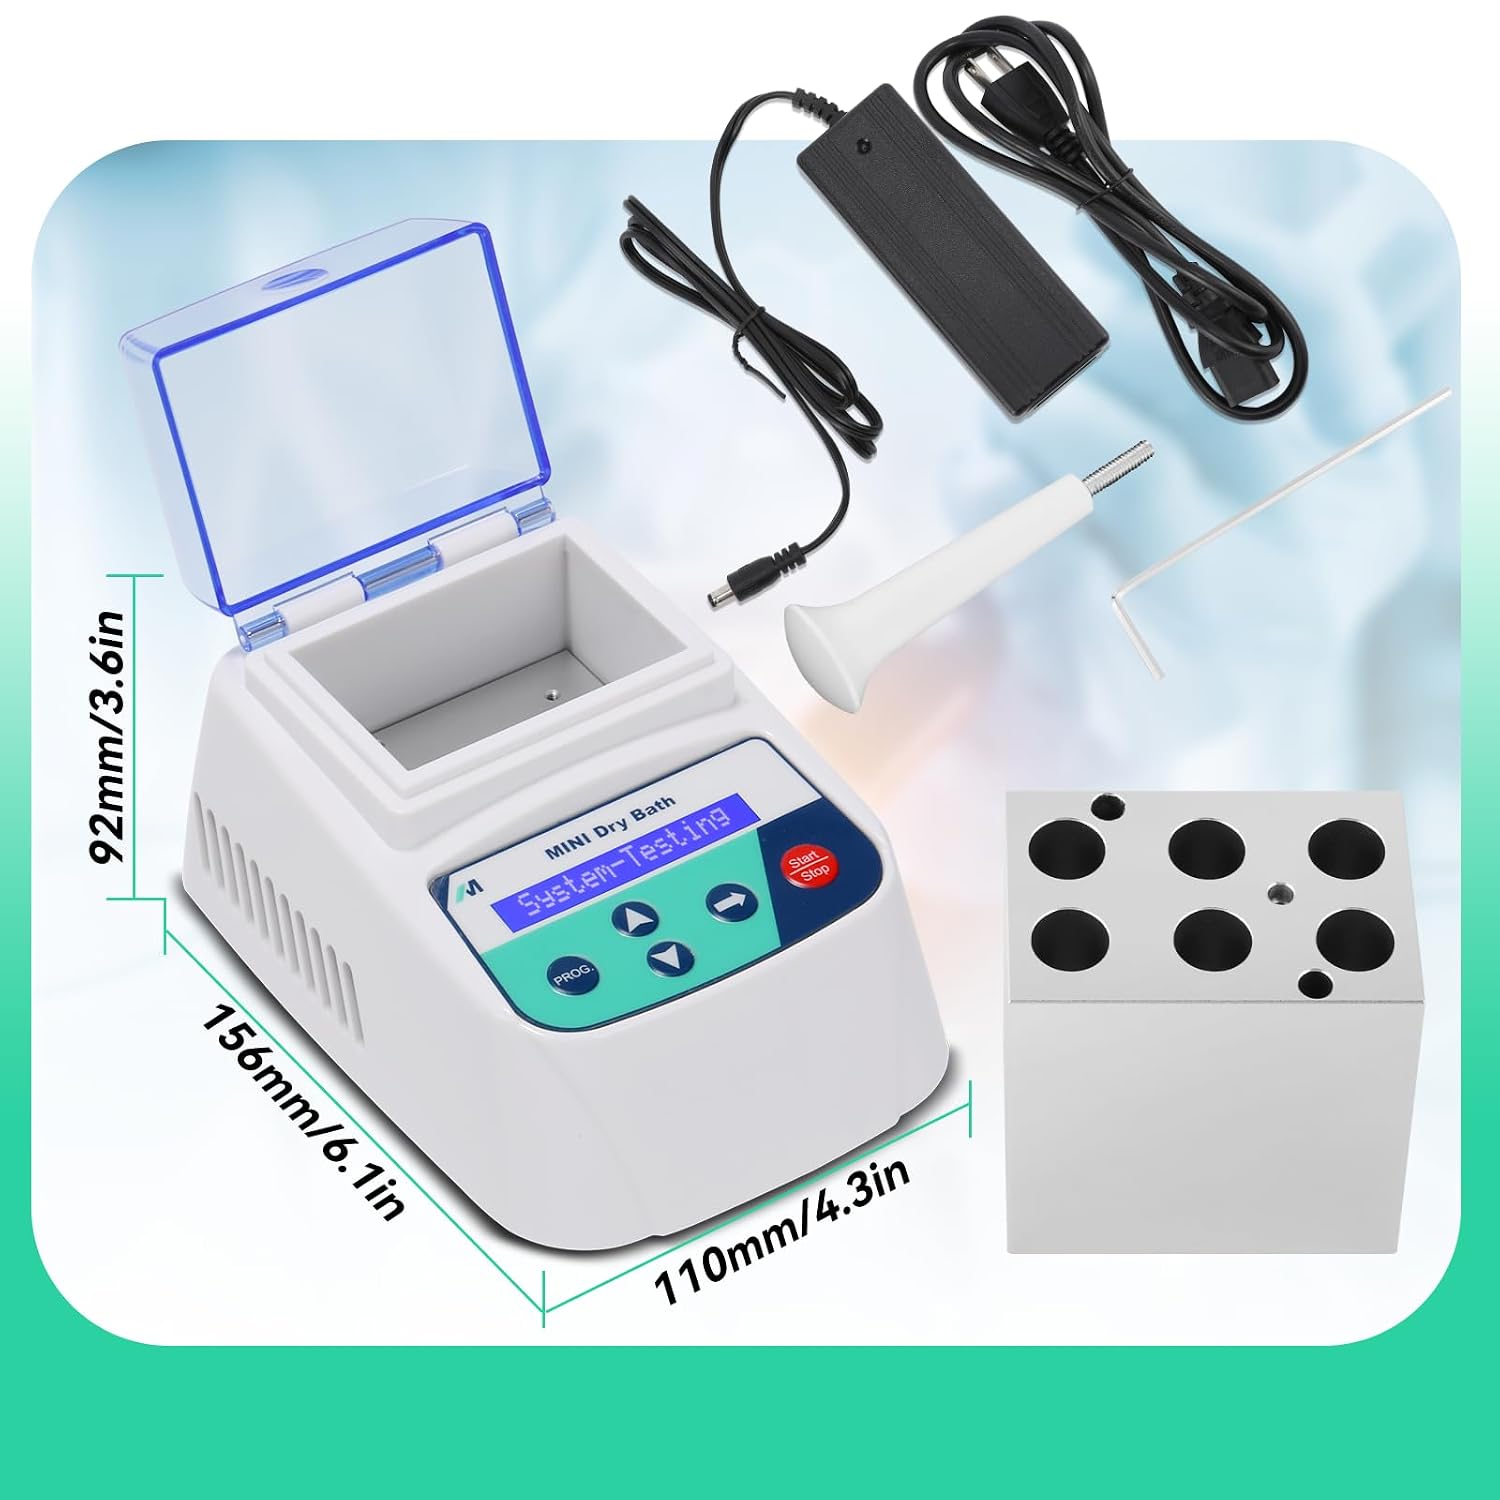
Figure 2: Included components and dimensions. This image displays the dry bath incubator unit, power cord, wrench, and a heating block, along with the unit's dimensions.
1.2 Placement
Place the incubator on a stable, level surface away from direct sunlight, heat sources, or strong vibrations. Ensure adequate ventilation around the unit.
1.3 Heating Block Installation (Blocks sold separately)
The dry bath incubator requires a compatible heating block for operation. Heating blocks are not included with the main unit and must be purchased separately.
- Ensure the unit is powered off and unplugged.
- Carefully place the desired heating block into the chamber. Ensure it sits flush at the bottom.
- Some blocks may require securing with the provided wrench. Refer to your specific block's instructions if applicable.

Figure 3: Various heating block options. This image illustrates two dry bath incubators, one fitted with a 6 x 5ml block and another with a 15 x 1.5ml block, demonstrating the interchangeable nature of the blocks.
1.4 Power Connection
Connect the power adapter to the DC input port on the back of the unit, then plug the AC convertor into a standard 110-240V electrical outlet.
2. Operating Instructions
2.1 Power On/Off
Flip the power switch located on the side or back of the unit to the "ON" position. The LCD display will illuminate, and the unit will perform a self-calibration test.
2.2 Understanding the Display and Controls
The LCD display simultaneously shows the set temperature/time and the actual temperature/remaining time. The control panel typically includes:
- PROG Button: To select or enter programming mode.
- Up/Down Arrows: To adjust values (temperature, time) or navigate menus.
- Left/Right Arrows: To move cursor or select parameters.
- Start/Stop Button: To initiate or terminate a heating program.

Figure 4: Control panel and display. This image highlights the LCD screen displaying temperature and time, along with the PROG, arrow, and Start/Stop buttons.
2.3 Setting Temperature and Time (Single Segment Program)
The unit allows for precise temperature control from 5°C above ambient to 100°C. Timing can be set from 1 minute to 999 minutes or 1 second to 999 seconds.
- Press the PROG button to enter program selection mode. Use the Up/Down arrows to select a program (e.g., P1).
- Press the PROG button again to enter parameter setting for the selected program.
- Use the Left/Right arrows to navigate between temperature and time settings.
- Use the Up/Down arrows to adjust the desired temperature (e.g., 40.0°C) and time (e.g., 060sec or 060min).
- Once settings are confirmed, press the Start/Stop button to begin the heating cycle. The display will show the actual temperature and countdown timer.
- To stop the program prematurely, press the Start/Stop button again.
2.4 Multi-Segment Programming
The incubator supports multiple programs, each with two heating segments, allowing for complex temperature profiles.
- Follow steps 1-3 from "Setting Temperature and Time" to select a program and enter parameter setting.
- After setting Segment 1 (e.g., P1 40.0°C 060sec), use the Left/Right arrow to move to Segment 2.
- Adjust the desired temperature and time for Segment 2 (e.g., P1 75.0°C 060min).
- Once both segments are set, press the Start/Stop button to initiate the program. The unit will execute Segment 1, then automatically proceed to Segment 2.

Figure 5: Multi-segment program display. This image shows the LCD screen configured for a program (P1) with two distinct heating segments, each with its own temperature and time setting.
2.5 Temperature Calibration
The unit features a professional temperature calibration function to ensure accuracy. Refer to the detailed instructions in the full manual (if provided separately) for calibration procedures. Generally, this involves comparing the unit's displayed temperature with a certified external thermometer and adjusting the calibration offset.
3. Maintenance
3.1 Cleaning
Ensure the unit is powered off and unplugged before cleaning. Use a soft, damp cloth with a mild detergent to clean the exterior surfaces. Do not use abrasive cleaners or solvents. For the heating block, remove it from the unit and clean as necessary, ensuring it is dry before reinstallation.
The heating blocks are designed for easy cleaning and disinfection.
3.2 Storage
When not in use for extended periods, store the dry bath incubator in a clean, dry environment at room temperature.
4. Troubleshooting
The unit is equipped with an automatic fault detection function and a buzzer alarm to indicate issues. It also has a built-in over-temperature protection device.
| Problem | Possible Cause | Solution |
|---|---|---|
| Unit does not power on. | No power supply; power cord loose; power switch off. | Check power cord connection; ensure power switch is ON; verify power outlet functionality. |
| Temperature not reaching set point or fluctuating. | Heating block not properly seated; ambient temperature too low/high; faulty heating element. | Ensure heating block is flush; operate in a stable environment; if problem persists, contact support. |
| Buzzer alarm sounds. | Over-temperature condition; internal fault detected. | Power off the unit, allow it to cool, then restart. If alarm persists, contact support. |
| Settings do not stay set after power cycle. | Program not saved correctly; internal memory issue. | Ensure program settings are confirmed and saved before powering off. If issue persists, contact support. |

Figure 6: Safety features. This image highlights the automatic power-off protection and over-temperature alarm, indicating the unit's built-in safety mechanisms.
5. Specifications
| Feature | Detail |
|---|---|
| Model Number | MINIB-100 |
| Manufacturer | Miulab |
| Temperature Range | Ambient +5°C to 100°C |
| Temperature Control Accuracy | ≤ 0.5°C |
| Display Accuracy | 0.1°C |
| Timing Range | 1 min - 999 min or 1 sec - 999 sec |
| Heating Time (20°C to 100°C) | ≤ 15 minutes |
| Input Power | 24V DC (with 110-240V AC convertor) |
| Dimensions (L x W x H) | 10.92 x 15.49 x 9.14 cm (4.3 x 6.1 x 3.6 inches) |
| Item Weight | 1.13 kg |
| Material | ABS plastic, Aluminium |
| Special Features | Compact design, One program could set two sections, Automatic fault detection, Over-temperature protection |
6. Warranty Information
Specific warranty details for the Mxmoonfree Mini Digital Dry Bath Incubator are not provided in this document. Please refer to the product packaging, purchase documentation, or contact your vendor for warranty terms and conditions.
7. Customer Support
For technical assistance, troubleshooting beyond this manual, or inquiries regarding parts and service, please contact your authorized Mxmoonfree distributor or the point of purchase. Keep your model number (MINIB-100) and purchase date ready when contacting support.
You may also visit the Mxmoonfree Store on Amazon for additional product information.