MiiElAOD Rock Pi E
MiiElAOD Rock Pi E User Manual
Model: Rock Pi E (1GB SingleBoard, No Acrylic Shell)
1. Introduction
The Rock Pi E is a compact and powerful Single Board Computer (SBC) designed by Radxa, featuring the Rockchip RK3328 processor. This versatile board is ideal for a wide range of applications, including IoT devices, network solutions, and embedded systems. Its small form factor and robust connectivity options make it a suitable choice for projects requiring a reliable and efficient computing platform.
This manual provides essential information for setting up, operating, and maintaining your Rock Pi E, ensuring optimal performance and longevity.
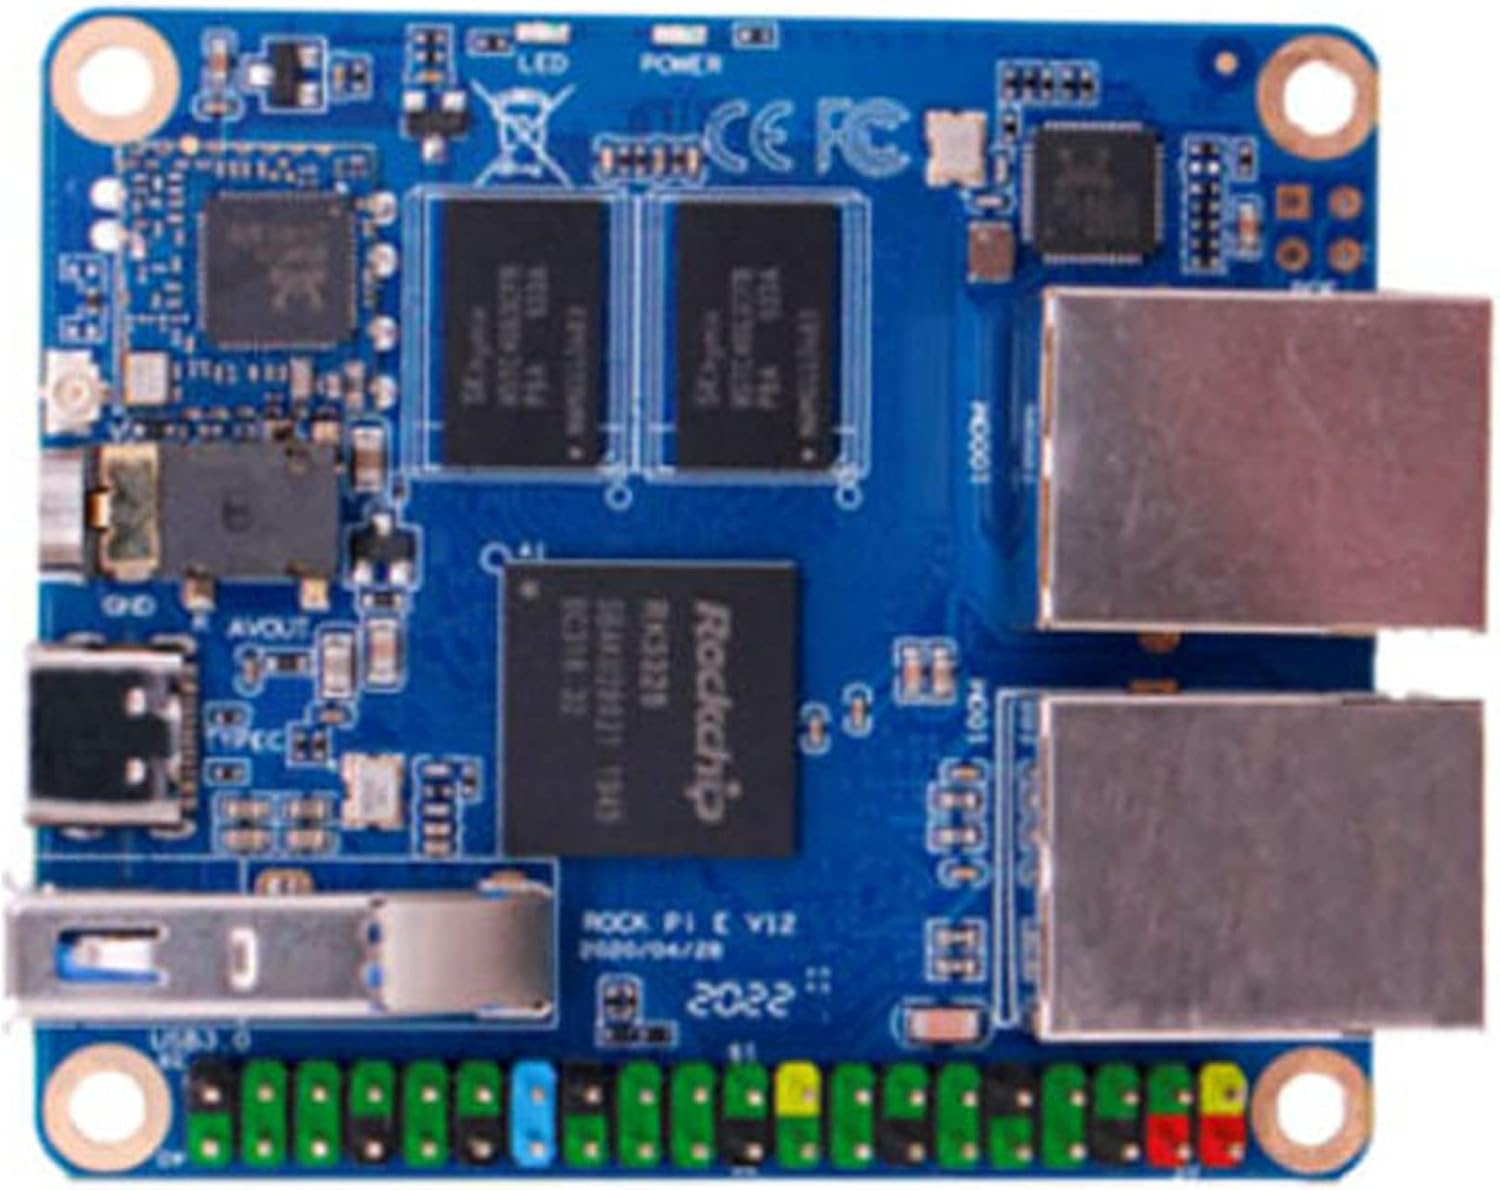
Figure 1: Top view of the Rock Pi E board, highlighting key components.
2. Package Contents
Upon opening the package, please verify that all components are present and undamaged. The standard package for this model includes:
- 1x Rock Pi E Single Board Computer (1GB RAM, No Acrylic Shell)
Note: Additional accessories such as power adapters, microSD cards, eMMC modules, or PoE HATs are sold separately and are not included in this package.
3. Specifications
The following table details the technical specifications of the Rock Pi E:

Figure 2: Detailed technical specifications of the Rock Pi E.
| Feature | Description |
|---|---|
| Processor | Rockchip RK3328, Quad-core Cortex-A53 ARM 64-bit, up to 1.3GHz |
| Memory | 1GB DDR3 |
| Storage | MicroSD (TF) slot (up to 128GB), eMMC module support (16GB/32GB/64GB/128GB) |
| Wireless | 802.11 b/g/n Wi-Fi, Bluetooth 4.0 (rtl8723du/rtl8821cu), external antenna connector |
| USB Ports | 1x USB 3.0 Type-A Host, 1x USB 2.0 (via 40-pin header) |
| Ethernet | 1x 1000Mbit Ethernet (Gigabit), 1x 100Mbit Ethernet (Fast Ethernet) |
| GPIO/IO | 40-pin expansion header (I2C x1, SPI x1, UART x2, I2S x1) |
| Power Input | USB Type-C DC 5V, 2x 5V DC power in, 2x 3.3V DC power in |
| Dimensions | 56mm x 65mm (2.5 x 2.2 inches) |
| Operating System Support | Debian, Ubuntu, OpenWRT, Linux |
4. Board Layout and Components
Familiarize yourself with the various ports and components on the Rock Pi E board:

Figure 3: Rock Pi E board layout with labeled components.
- USB 3.0 Type-A Host: For connecting high-speed USB devices.
- 3.5mm Jack: Audio output.
- Antenna Socket: For connecting an external Wi-Fi/Bluetooth antenna.
- Wi-Fi/BT Module: Integrated wireless connectivity.
- User LED & Power LED: Status indicators.
- 40-pin Header: General Purpose Input/Output (GPIO) pins for expansion and interfacing with other hardware.
- RJ45 100M & RJ45 1000M: Dual Ethernet ports for network connectivity. The 1000M port supports optional Power over Ethernet (PoE) with an additional HAT.
- TF (MicroSD) Slot: For booting the operating system and storage.
- eMMC Socket: For connecting an eMMC module for faster and more reliable storage.
- Reset Key & Maskrom Key: System control buttons.
- USB Type-C: Primary power input (DC 5V).
5. Setup Guide
5.1. Preparing the Operating System
The Rock Pi E supports various Linux distributions, including Debian, Ubuntu, and OpenWRT. You will need to prepare an operating system image on either a microSD card or an eMMC module.
- Download OS Image: Obtain the desired OS image for Rock Pi E from the official Radxa website or a trusted source.
- Prepare Storage Medium:
- MicroSD Card: Insert a high-quality microSD card (Class 10 or higher, up to 128GB) into your computer.
- eMMC Module: If using an eMMC module, you may need an eMMC reader/writer to flash the image.
- Flash OS Image: Use an imaging tool (e.g., Balena Etcher, Win32 Disk Imager) to write the downloaded OS image to your chosen storage medium. Follow the instructions provided by the imaging tool.
- Insert Storage: Once the image is successfully written, safely eject the microSD card or eMMC module from your computer. Insert the prepared microSD card into the TF card slot on the Rock Pi E, or connect the eMMC module to its dedicated socket.
5.2. Connecting Peripherals
Before powering on, connect any necessary peripherals:
- Network: Connect an Ethernet cable to either the 100M or 1000M RJ45 port for wired network access.
- USB Devices: Connect USB keyboards, mice, or other peripherals to the USB 3.0 Type-A host port.
- Antenna: If using Wi-Fi/Bluetooth, connect an external antenna to the antenna socket.
- Power: Connect a 5V DC power supply to the USB Type-C port. Ensure the power supply can provide sufficient current (e.g., 2A or higher).
6. Operation
6.1. First Boot
After connecting all necessary components and power, the Rock Pi E should begin to boot. The power LED will illuminate, and the user LED may flash indicating activity.
- Headless Operation: For most network and IoT applications, the Rock Pi E is operated headless (without a monitor). You can access it via SSH over the network. Refer to your chosen OS documentation for default login credentials and network configuration.
- Serial Console: For debugging or initial setup without network access, you can use a USB-to-TTL serial adapter connected to the UART pins on the 40-pin header.
6.2. Network Configuration
Upon first boot, the Rock Pi E will typically attempt to obtain an IP address via DHCP. You can verify network connectivity and IP address using commands like ifconfig or ip a in the terminal.
- Wired Ethernet: Connect an Ethernet cable to either RJ45 port. The 1000M port offers higher speed.
- Wi-Fi: If using Wi-Fi, ensure an external antenna is connected. Configure Wi-Fi settings through the operating system's network manager or command-line tools.
6.3. System Updates
Regularly update your operating system and installed packages to ensure security and optimal performance. Use the package manager commands specific to your OS (e.g., sudo apt update && sudo apt upgrade for Debian/Ubuntu).
7. Maintenance
Proper maintenance ensures the longevity and stable operation of your Rock Pi E.
- Environmental Conditions: Operate the board in a clean, dry environment, away from extreme temperatures, humidity, and direct sunlight.
- Dust Accumulation: Periodically inspect the board for dust accumulation. Use compressed air or a soft brush to gently remove dust from components and connectors.
- Power Supply: Always use a stable and appropriate 5V DC power supply. Unstable power can lead to system instability or damage.
- Safe Shutdown: Always perform a proper system shutdown through the operating system before disconnecting power to prevent data corruption on the storage medium.
- Firmware Updates: Check the official Radxa website for any available firmware updates for the Rock Pi E, which may improve performance or add features.
8. Troubleshooting
This section addresses common issues you might encounter with your Rock Pi E.
- Issue: Board does not power on / No LEDs illuminate.
- Solution:
- Ensure the 5V DC power supply is correctly connected to the USB Type-C port.
- Verify the power supply is providing sufficient current (recommended 2A or higher).
- Test with a different power supply if available.
- Issue: Operating system does not boot.
- Solution:
- Confirm the microSD card or eMMC module is properly inserted.
- Re-flash the OS image to the storage medium, ensuring the process completes without errors.
- Try a different microSD card or eMMC module.
- Ensure you are using the correct OS image for the Rock Pi E.
- Issue: No network connectivity (wired or wireless).
- Solution:
- Wired: Check Ethernet cable connection. Verify router/switch status. Ensure network services are running on the OS.
- Wireless: Ensure external antenna is securely connected. Verify Wi-Fi configuration in the OS (SSID, password). Check if the Wi-Fi module is enabled.
- Restart the board.
- Issue: USB devices not recognized.
- Solution:
- Ensure the USB device is properly connected to the USB 3.0 Type-A port.
- Test with a different USB device.
- Check OS logs for USB device detection errors.
- Some high-power USB devices may require an external powered USB hub.
9. Warranty and Support
For warranty information and technical support, please refer to the official MiiElAOD or Radxa websites. You can also visit the MiiElAOD Store on Amazon for product-related inquiries.
Community forums and online resources for Rock Pi boards are also valuable sources of information and assistance for advanced users.
Related Documents - Rock Pi E
 |
Radxa ROCK 3 Model C: Low Power 4K Single Board Computer - Product Brief Detailed product brief for the Radxa ROCK 3 Model C, a low-power 4K single board computer featuring RK3566 SoC, 1GB/2GB LPDDR4, extensive connectivity including HDMI, USB 3.0, Gigabit Ethernet, M.2, and 40-pin GPIO. Ideal for makers, IoT enthusiasts, and PC DIY projects. |
 |
Orange Pi 5 Plus User Manual Comprehensive user manual for the Orange Pi 5 Plus development board, detailing hardware specifications, operating system installation (Linux, Android, OpenWRT), and usage guides for various features and interfaces. |
 |
Orange Pi 5 Plus User Manual - Comprehensive Guide for Developers and Makers Discover the Orange Pi 5 Plus development board with this detailed user manual. Learn about its RK3588 processor, extensive interfaces, and support for Linux, Android, and OpenWRT. Ideal for AIoT, edge computing, and embedded projects. |
 |
Orange Pi 5B 用户手册:全面指南 Orange Pi 5B 用户手册提供了关于这款强大的单板计算机的详细信息,包括硬件规格、操作系统安装(Linux、Android)、开发板使用介绍以及各种接口和功能的测试指南。 |
 |
ROCK Pi 4 User Manual and Guide A comprehensive guide to setting up and using the ROCK Pi 4, including hardware requirements, features, and boot procedures for both Model A and Model B. |
 |
Radxa ROCK 5C Product Brief: 8K Credit Card-Sized Single Board Computer A comprehensive product brief for the Radxa ROCK 5C, an 8K credit card-sized Single Board Computer (SBC) featuring RK3588S2 or RK3582 processors, extensive I/O, and support for Linux and Android. This document details its hardware, interfaces, specifications, and operating conditions. |
Ask a question about this manual
Ask about setup, troubleshooting, compatibility, parts, safety, or missing instructions. Manuals+ will review the question and use this page’s manual context to help answer it.