
1. Introduction
Thank you for choosing the Tadeto Pin Type Moisture Meter WM700. This device is designed for accurate and reliable measurement of moisture content in various materials, including wood and building materials. It also features ambient temperature and humidity measurement. Please read this manual thoroughly before use to ensure proper operation and to maximize the lifespan of your device.
2. Safety Information
- The measurement pins are sharp. Handle with care to avoid injury. Always replace the protective cap when the device is not in use.
- Do not attempt to measure live electrical circuits. This device is not designed for electrical testing.
- Keep the device away from water and high humidity environments to prevent damage, except during intended moisture measurement.
- Do not expose the device to extreme temperatures or direct sunlight for extended periods.
- Dispose of batteries according to local regulations. Do not mix old and new batteries.
3. Product Overview
3.1 Components
Familiarize yourself with the main components of your Tadeto WM700 moisture meter:
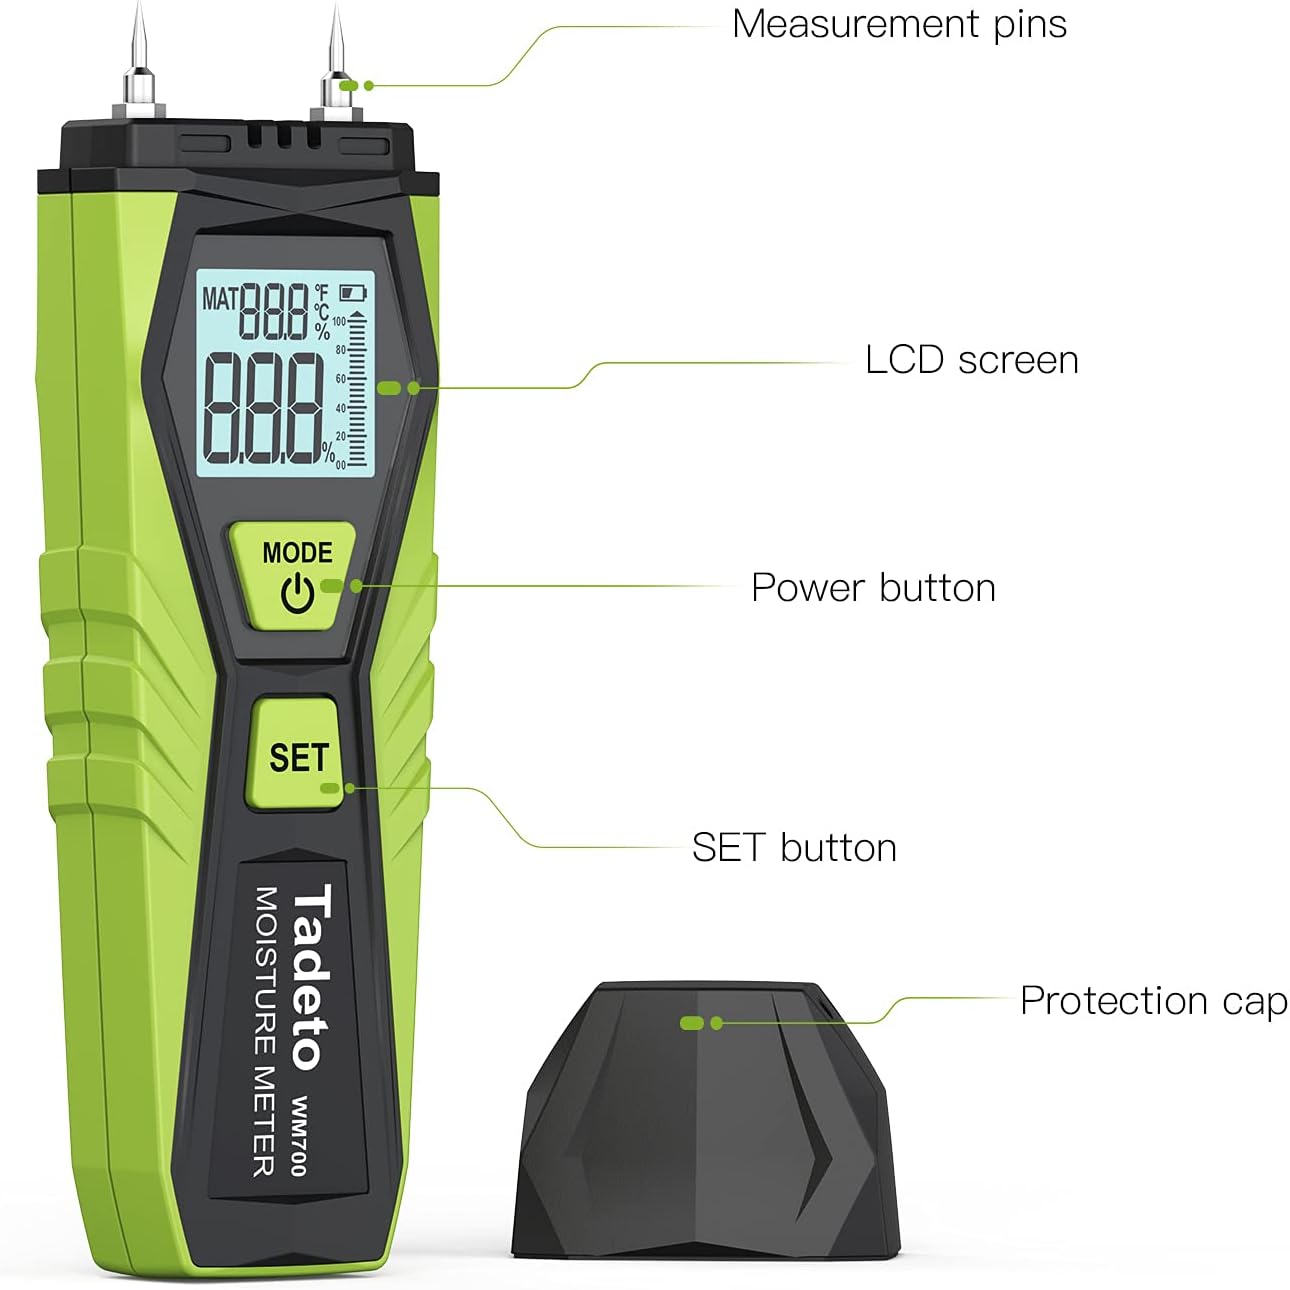
Image: Labeled diagram of the Tadeto WM700 moisture meter, showing the measurement pins, LCD screen, Power button, SET button, and Protection cap.
- Measurement Pins: Used to penetrate the material for moisture content detection.
- LCD Screen: Displays measurement readings, mode, temperature, humidity, and battery status.
- Power Button (MODE): Turns the device on/off and cycles through measurement modes.
- SET Button: Used to select material groups and switch temperature units.
- Protective Cap: Covers the measurement pins when not in use and serves as a calibration standard.
3.2 Key Features
- Pin-type sensor for direct moisture measurement.
- Two measurement modes: Wood (3.7% - 82%) and Building Materials (0.1% - 80%).
- Ambient temperature and humidity measurement.
- Backlit LCD display for clear readability in various lighting conditions.
- Automatic power-off after approximately 10 minutes of inactivity to conserve battery.
- Low battery indicator on the LCD screen.
- Compact and lightweight design for portability.
4. Setup
4.1 Battery Installation
The device requires two 1.5V batteries (included). To install or replace batteries:
- Locate the battery compartment on the back of the device.
- Open the battery compartment cover.
- Insert the two 1.5V batteries, ensuring correct polarity (+/-).
- Close the battery compartment cover securely.
4.2 Initial Calibration
The protective cap also functions as a calibration standard to ensure measurement accuracy. Perform this step before first use and periodically thereafter.

Image: The Tadeto WM700 moisture meter with its protective cap attached to the pins, indicating its use for calibration.
- Ensure the protective cap is securely placed over the measurement pins.
- Press the Power button to turn on the device.
- The display should show a reference value (e.g., T-52% / B-27% ±5% as indicated on the cap in some models). This confirms the device is functioning correctly.
5. Operating Instructions
5.1 Power On/Off
- To turn on: Press the Power (MODE) button. The LCD screen will light up.
- To turn off: Press and hold the Power (MODE) button for a few seconds until the display turns off. The device will also automatically power off after approximately 10 minutes of inactivity.
5.2 Selecting Measurement Mode (Material Group)
The meter has two main measurement modes: Wood and Building Materials. Each mode has several material groups for improved accuracy.

Image: A four-panel image demonstrating the usage steps: 1. Pressing the power button. 2. Using the test aid for calibration. 3. Setting the desired measurement mode (MAT1-3 for wood, MAT4-7 for building materials). 4. Pushing pins into the material.
- Turn on the device.
- Press the SET button repeatedly to cycle through the material groups (MAT 1, MAT 2, MAT 3 for Wood; MAT 4, MAT 5, MAT 6, MAT 7 for Building Materials).
- Select the appropriate material group for the item you are testing. Refer to the table below for guidance.
Material Group Reference:
| Group | Material Type | Measurement Range |
|---|---|---|
| MAT 1-3 | Wood | 3.7% - 82% |
| MAT 4-7 | Building Materials (e.g., concrete, plaster, brick, cement) | 0.1% - 80% |
5.3 Taking a Moisture Measurement
- Remove the protective cap from the measurement pins.
- Select the appropriate material group using the SET button.
- Carefully push the measurement pins into the surface of the material you wish to test. Ensure both pins penetrate the material for an accurate reading.
- Read the moisture content percentage displayed on the LCD screen.
- After measurement, gently pull the pins out and replace the protective cap.
5.4 Ambient Temperature and Humidity Measurement
The device can also display the ambient temperature and humidity.
- Turn on the device.
- Briefly press the Power (MODE) button. The display will show the current ambient temperature and humidity.
- To switch between Celsius (°C) and Fahrenheit (°F) for temperature, press the SET button while the ambient temperature/humidity is displayed.
6. Maintenance
6.1 Cleaning
- Wipe the device with a soft, dry cloth.
- Do not use abrasive cleaners or solvents.
- Ensure the measurement pins are clean and free of debris for accurate readings.
6.2 Battery Replacement
When the low battery indicator appears on the LCD screen, replace the batteries as described in Section 4.1. Always use two new 1.5V batteries of the same type.
6.3 Storage
- Always replace the protective cap over the measurement pins before storing.
- Store the device in a cool, dry place, away from direct sunlight and extreme temperatures.
- If storing for an extended period, remove the batteries to prevent leakage.
7. Troubleshooting
| Problem | Possible Cause | Solution |
|---|---|---|
| Device does not turn on. | Dead or incorrectly installed batteries. | Check battery polarity or replace with new batteries. |
| Inaccurate readings. | Incorrect material group selected; pins not fully inserted; dirty pins; device not calibrated. | Ensure correct material group is selected. Push pins fully into the material. Clean pins. Perform initial calibration with the protective cap. |
| LCD display is dim or flickering. | Low battery. | Replace batteries. |
| Device turns off unexpectedly. | Auto-off feature activated; low battery. | This is normal behavior after 10 minutes of inactivity. If it happens during use, replace batteries. |
8. Specifications
| Parameter | Value |
|---|---|
| Model | WM700 |
| Brand | Tadeto |
| Color | Green |
| Product Dimensions (L x H) | 5.1 x 14.7 cm |
| Power Supply | 2 x 1.5V Batteries |
| Wood Moisture Range | 3.7% - 82% (MAT 1-3) |
| Building Material Moisture Range | 0.1% - 80% (MAT 4-7) |
| Moisture Measurement Accuracy | ±5% |
| Ambient Temperature Range | -10°C to 60°C (14°F to 140°F) |
| Temperature Measurement Accuracy | ±1.5% |
| Ambient Humidity Range | 0% - 100% RH |
| Humidity Measurement Accuracy | ±5% |
| Operating Humidity | 10% - 90% RH |
| Auto Power Off | Approx. 10 minutes |
9. Warranty and Support
Information regarding product warranty and customer support was not available in the provided data. Please refer to the product packaging or the manufacturer's official website for details on warranty coverage and how to contact customer support for assistance.