Introduction
Thank you for choosing the Sparrow Angel Motorcycle Brake Clutch Levers and Handlebar Grips. This manual provides essential information for the proper installation, operation, and maintenance of your new motorcycle accessories. Please read this manual thoroughly before installation and keep it for future reference. These components are designed for universal fitment on most motorcycles, offering enhanced control and a stylish appearance.
Safety Information
WARNING: Improper installation or maintenance of brake and clutch components can lead to serious injury or death. If you are not confident in your mechanical abilities, seek professional assistance.
- Always wear appropriate safety gear when working on your motorcycle.
- Ensure the motorcycle is stable and secure before beginning any work.
- Use only the correct tools for installation.
- Verify all connections are secure and properly torqued after installation.
- Test the brake and clutch systems thoroughly in a safe environment before riding.
- Keep children and pets away from the work area.
Product Overview
The Sparrow Angel Motorcycle Brake Clutch Levers and Handlebar Grips set includes high-quality components designed for durability and performance.
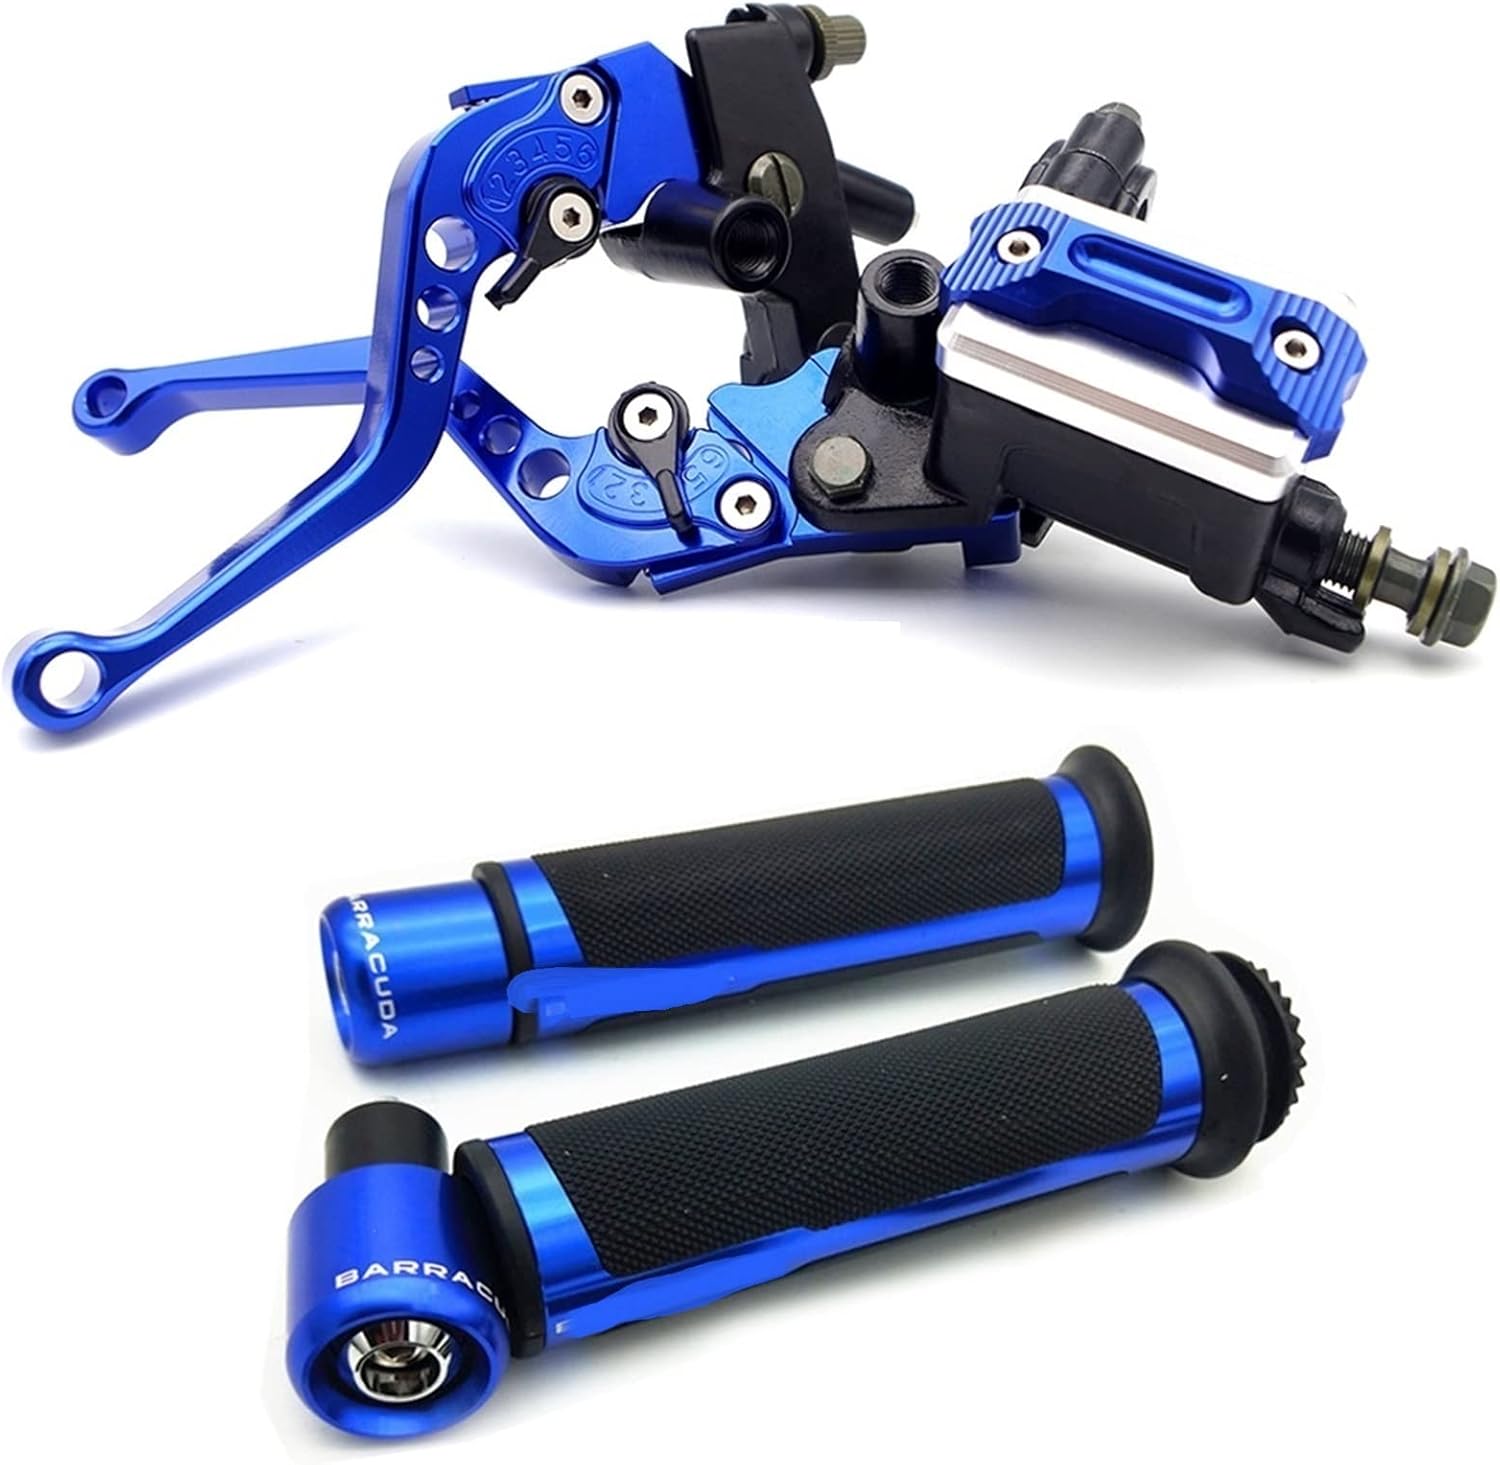
Figure 1: Complete set of blue motorcycle brake clutch levers and handlebar grips. This image displays the main components included in the package, highlighting their design and color.

Figure 2: Close-up view of the silver brake and clutch levers with the master cylinder assembly. This image shows the detailed construction of the lever and reservoir components.

Figure 3: Red handlebar grips with their end caps and mounting rings. This image illustrates the textured grip surface and the included accessories for secure fitting.
Components:
- Brake Master Cylinder Assembly: Includes the brake fluid reservoir and lever.
- Clutch Lever Assembly: Includes the clutch lever and mounting bracket.
- Handlebar Grips: Left (22mm / 7/8 inch) and Right (24mm / 1 inch) grips.
- Mounting Hardware: Various bolts and clamps for secure installation.
Setup and Installation
Installation is generally straightforward, but professional installation is recommended if you are unfamiliar with motorcycle brake and clutch systems.
Tools Required:
- Wrench set
- Hex key set
- Brake fluid (DOT 3 or DOT 4, as per your motorcycle's specification)
- Clean rags
- Torque wrench (recommended)
Installation Steps:
- Prepare the Motorcycle: Park the motorcycle on a level surface using a center stand or paddock stand to ensure stability. Turn off the engine and remove the ignition key.
- Remove Old Components:
- Carefully disconnect the brake line from the old master cylinder. Be prepared for brake fluid leakage and protect painted surfaces.
- Unbolt and remove the old brake master cylinder and clutch lever assemblies from the handlebars.
- Remove the old handlebar grips. You may need to cut them off if they are glued.
- Install New Handlebar Grips:
- Clean the handlebar surface thoroughly.
- Slide the new grips onto the handlebars. For the throttle side, ensure the grip rotates freely with the throttle tube.
- Secure the grips using the provided clamps or adhesive if necessary.
- Install Brake Master Cylinder Assembly:
- Mount the new brake master cylinder assembly onto the right handlebar.
- Connect the brake line to the new master cylinder. Ensure a tight, leak-free connection.
- Fill the reservoir with fresh brake fluid (refer to your motorcycle's manual for the correct type).
- Bleed the brake system until all air bubbles are removed and the brake lever feels firm.

Figure 4: Detail of the oil cup on the brake master cylinder. Ensure the fluid level is correct and the cap is securely fastened.
- Install Clutch Lever Assembly:
- Mount the new clutch lever assembly onto the left handlebar.
- Connect the clutch cable or hydraulic line (if applicable) to the new lever.
- Adjust the clutch cable tension or bleed the hydraulic clutch system as needed to achieve proper clutch engagement and disengagement.
- Adjust Levers:
- The levers feature an adjustable regulator for reach. Rotate the regulator to find your preferred lever position.

Figure 5: Illustration of the lever regulator for adjusting reach. This mechanism allows riders to customize the distance of the lever from the handlebar.
- Final Check: Double-check all bolts and connections for tightness. Ensure the brake and clutch operate smoothly and effectively.

Figure 6: Diagram illustrating the universal adaptability of the product to most motorcycle models with 23mm-26mm handlebars. This highlights the broad compatibility of the levers and grips.
Operating Instructions
Once installed, the levers and grips function as standard motorcycle controls.
- Brake Lever: Pull the right lever towards the handlebar to engage the front brake. The sensitivity and quick response of these levers provide precise braking control.
- Clutch Lever: Pull the left lever towards the handlebar to disengage the clutch, allowing for gear changes.
- Handlebar Grips: Provide a secure and comfortable grip for steering and throttle control. The durable material ensures long-lasting performance.
- Adjustability: Utilize the lever regulator to fine-tune the lever's distance from the handlebar for optimal comfort and control during riding.
Maintenance
Regular maintenance ensures the longevity and safe operation of your brake and clutch components.
- Cleaning: Clean the levers and grips regularly with a mild soap and water solution. Avoid harsh chemicals that may damage the anodized finish or rubber.
- Lubrication: Periodically apply a small amount of appropriate lubricant to the pivot points of the levers to ensure smooth operation.
- Brake Fluid Check: Regularly check the brake fluid level in the master cylinder reservoir. Top up or replace fluid as per your motorcycle manufacturer's recommendations.
- Inspection: Inspect the levers and grips for any signs of wear, damage, or corrosion. Ensure all bolts are tight and there is no excessive play. The anodized aluminum is resistant to fading and corrosion, but regular inspection is still advised.
Troubleshooting
If you encounter issues, refer to the following common problems and solutions.
| Problem | Possible Cause | Solution |
|---|---|---|
| Brake lever feels spongy | Air in the brake line, low brake fluid | Bleed the brake system, top up brake fluid |
| Clutch not fully disengaging | Incorrect cable tension, air in hydraulic clutch | Adjust clutch cable, bleed hydraulic clutch |
| Levers feel stiff or sticky | Lack of lubrication, dirt accumulation | Clean and lubricate pivot points |
| Grips slipping on handlebar | Improper installation, loose clamps | Re-secure grips, ensure clamps are tight |
If the problem persists after attempting these solutions, consult a qualified motorcycle mechanic.
Specifications
| Feature | Detail |
|---|---|
| Brand | Sparrow Angel |
| Model | AB 001 LAN |
| Material | Aluminum, Rubber, Plastic, Alloy Steel |
| Color (Current Variant) | Blue (AB 001 LAN) |
| Item Weight | Approx. 300 grams (0.66 lbs) |
| Handlebar Grip Size (Left) | 22mm / 7/8 inch |
| Handlebar Grip Size (Right) | 24mm / 1 inch |
| Brake Fuel Tube Diameter | 10mm |
| Finish | Anodized Aluminum |
| Compatibility | Universal to most motorcycles (23mm-26mm handlebars) |
Warranty and Support
For any questions regarding your Sparrow Angel Motorcycle Brake Clutch Levers and Handlebar Grips, please contact your retailer or the manufacturer directly.
Please refer to your purchase documentation for specific warranty terms and conditions. Keep your proof of purchase for any warranty claims.