Introduction
The AODELAN WTR-2 is a versatile wireless remote shutter release system designed for Canon EOS cameras. It functions as both a remote shutter release and a programmable timer, offering advanced control over your camera's exposure settings. This manual provides detailed instructions for setting up, operating, and maintaining your WTR-2 system.
The system operates using 2.4 GHz wireless transmission, providing a range of up to 60 meters (196.8 feet). It features an LCD screen for easy programming and monitoring of settings.
Package Contents
Please check the package contents to ensure all items are present:
- WTR-2 Transmitter (Remote Control)
- WTR-2 Receiver
- Connecting Cable (C8 type for Canon)
- 2x Lanyards
- Instruction Manual

Image: The complete package contents of the AODELAN WTR-2 wireless remote shutter release system.
Product Overview
Transmitter (Remote Control)
The transmitter features an LCD display for setting timer functions and viewing current modes. It includes a two-stage shutter release button (half-press for autofocus, full-press for shutter release), mode buttons, and navigation controls.
Receiver
The receiver connects to your camera's remote port and receives signals from the transmitter. It has a hot shoe mount for easy attachment to your camera or a cold shoe mount on a rig.

Image: Overview of the AODELAN WTR-2 Transmitter and Receiver, highlighting key features like timer, time-lapse, bulb mode, 2.4G wireless, and operating range.
Setup
1. Battery Installation
Both the transmitter and receiver require 2x AAA batteries (not included). Open the battery compartment on the back of each unit and insert the batteries, observing the correct polarity.

Image: Battery installation for the WTR-2 Transmitter and Receiver, showing the location for two AAA batteries in each unit.
2. Connecting the Receiver to your Camera
Attach the receiver to your camera's hot shoe or a cold shoe mount. Connect the C8 connecting cable to the receiver's port and then to your Canon camera's remote control terminal. Ensure the connection is secure.

Image: The C8 connecting cable being inserted into the 3-pin remote connection port of a Canon EOS camera.
3. Powering On
Turn on both the transmitter and the receiver using their respective ON/OFF buttons. The receiver's LED will blink red initially, then periodically blink green to indicate it is active and paired.
Operating Modes
The WTR-2 offers various shooting modes and timer functions. Use the MODE button on the transmitter to cycle through the main shooting modes (S, C, B, 2S) and the TIMER button to access timer settings.
Shutter Release Modes
- S (Single Shot): Takes a single photo with each full press of the shutter button.
- C (Continuous Shooting): Takes multiple photos as long as the shutter button is held down.
- B (Bulb Mode): Keeps the shutter open for as long as the shutter button is pressed, ideal for long exposures.
- 2S (2-Second Delay): Takes a single photo after a 2-second delay.
Timer Functions
The WTR-2 provides advanced timer settings for precise control over your photography. Press the TIMER button to access these functions. Use the arrow keys to navigate and the SET button to confirm.
- DELAY (Self-Timer): Sets a delay before the first exposure. Adjustable in 0.1-second increments.
- LONG (Long Exposure Timer): Sets the duration of the shutter opening for long exposures, especially useful in Bulb mode. Adjustable in 0.1-second increments.
- INTVL (Interval Timer): Sets the time interval between consecutive shots for time-lapse photography. Adjustable in 0.1-second increments.
- N (Number of Exposures): Sets the total number of photos to be taken in a sequence.
- BKLN (Bracketed Exposure): Automatically triggers a sequence of 3, 5, or 7 bracketed exposures for HDR photography.
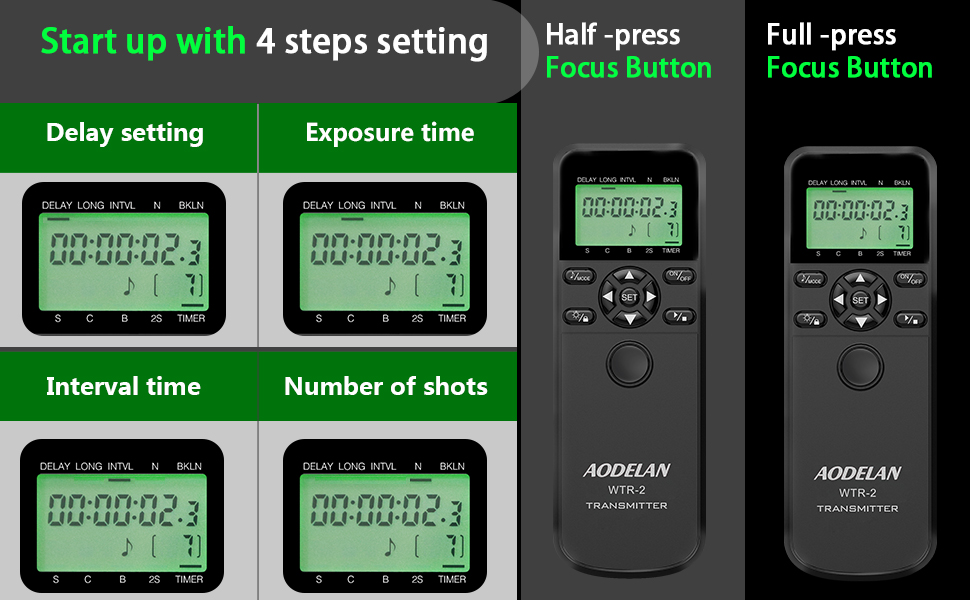
Image: The LCD display of the WTR-2 transmitter showing the settings for Delay, Long Exposure, Interval, and Number of Shots.
Example: Time-Lapse Photography
To set up a time-lapse sequence:
- Set the DELAY to your desired initial delay (e.g., 10 seconds).
- Set the LONG exposure time (if applicable, otherwise set to 0).
- Set the INTVL (interval) between shots (e.g., 10 seconds).
- Set the N (number of exposures) (e.g., 120 shots for a 1-hour time-lapse with 30-second intervals).
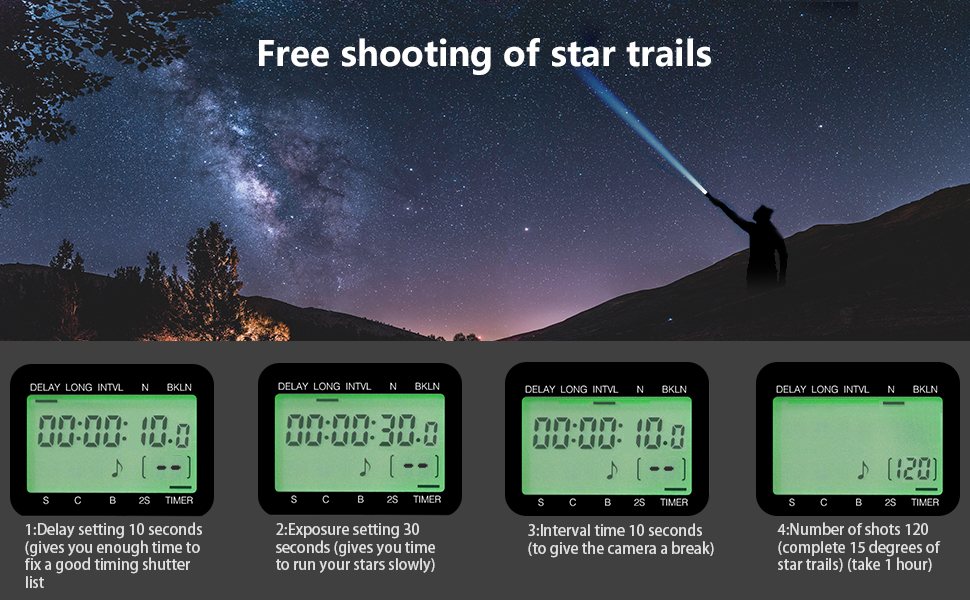
Image: An example of star trail photography, illustrating how the WTR-2's timer functions (Delay, Exposure, Interval, Number of shots) can be configured for complex sequences.
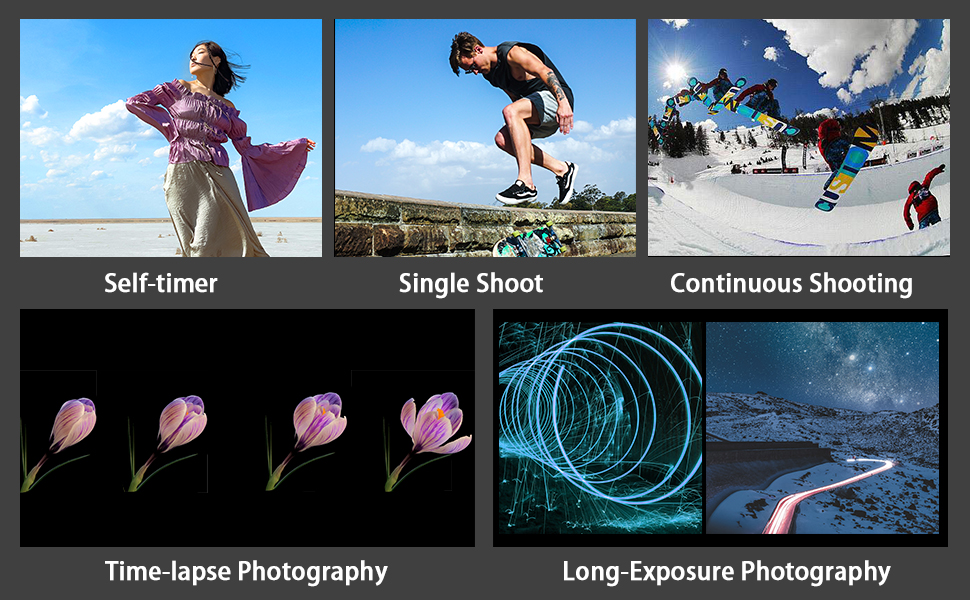
Image: Visual representations of various photography techniques achievable with the WTR-2, including self-timer, single shot, continuous shooting, time-lapse, and long exposure.
Maintenance
- Keep the device dry. Do not expose it to moisture or rain.
- Clean the unit with a soft, dry cloth. Do not use harsh chemicals or abrasive cleaners.
- Remove batteries if the device will not be used for an extended period to prevent leakage.
- Store in a cool, dry place away from direct sunlight.
Troubleshooting
| Problem | Possible Cause / Solution |
|---|---|
| Device does not power on. | Check battery installation and ensure batteries are fresh. Replace if necessary. |
| Camera does not respond to shutter release. |
|
| LCD display is dim or blank. | Replace the batteries in the transmitter. |
| Timer functions are not working as expected. | Review the timer settings on the transmitter's LCD. Ensure all parameters (Delay, Long, Interval, N) are correctly configured and activated. |
Specifications
| Model Name: | WTR-2 |
| Brand: | AODELAN |
| Connectivity Technology: | 2.4 GHz Wireless |
| Maximum Range: | 60 meters (196.8 feet) |
| Compatible Devices: | Canon EOS R3, R5, R5 C, 10D, 6D Mark II, 1D X Mark III, 1D X Mark II, 1D X, 1D C, 1DS Mark III, 1DS Mark II, 1Ds, 1D Mark IV, 1D Mark III, 1D Mark II N, 1D Mark II, 1D, 5D Mark II, 5D Mark III, 5D Mark IV, 5DS, 5DS R, 6D, 7D, 7D Mark II, 50D, 40D, 30D, 20D, D2000, D60, D30, EOS-1V, EOS-3 (C8 type connection) |
| Power Source: | 2x AAA batteries for Transmitter, 2x AAA batteries for Receiver (not included) |
| Special Feature: | Digital LCD Display, Timer Functions (Delay, Long Exposure, Interval, Number of Shots, Bracketed Exposure) |
| Number of Buttons: | 3 (main control buttons, plus navigation/set) |
| Country of Origin: | China |
Warranty and Support
Specific warranty information is typically provided with your purchase documentation. For product support, technical assistance, or warranty claims, please refer to the contact information provided by your retailer or visit the official AODELAN website.
For further assistance, you may also refer to the AODELAN brand page on Amazon.