Important Safety Instructions
Read all instructions carefully before using the appliance. Keep this manual for future reference.
- Always ensure the appliance is placed on a stable, heat-resistant surface.
- Do not immerse the appliance, cord, or plug in water or other liquids.
- Supervise children closely when the appliance is in use.
- Do not operate any appliance with a damaged cord or plug, or after the appliance malfunctions or has been damaged in any manner.
- Avoid contact with hot surfaces. Use oven mitts or gloves when handling hot components.
- Ensure adequate ventilation around the appliance during operation.
- Unplug from outlet when not in use and before cleaning. Allow to cool before putting on or taking off parts.
- Do not use accessories not recommended by the manufacturer.
- This appliance is for household use only.
- The appliance features an automatic shut-off function for safety.
- The single anti-heat glass door and microswitch on the door enhance safety during operation.
Product Overview
The Necchi NK021 is a versatile 2-in-1 appliance combining an air fryer and an oven, designed for various cooking functions including Air Fry, Toast, Broil, Bake, and Rotisserie.
Components and Controls

Image 1: Front view of the Necchi NK021 Air Fryer Oven, showing the control panel with three rotary knobs and the glass door. The appliance is silver-colored.

Image 2: Close-up of the control panel on the Necchi NK021, highlighting the function, temperature, and timer knobs. The function knob includes settings for Air Fry, Toast, Broil, Bake, and Rotisserie.
Control Knobs:
- Function Knob: Selects the cooking mode (Air Fry, Toast, Broil, Bake, Rotisserie).
- Temperature Knob: Adjusts the cooking temperature from 90°C to 230°C.
- Timer Knob: Sets the cooking time up to 60 minutes. Features automatic shut-off.
Included Accessories
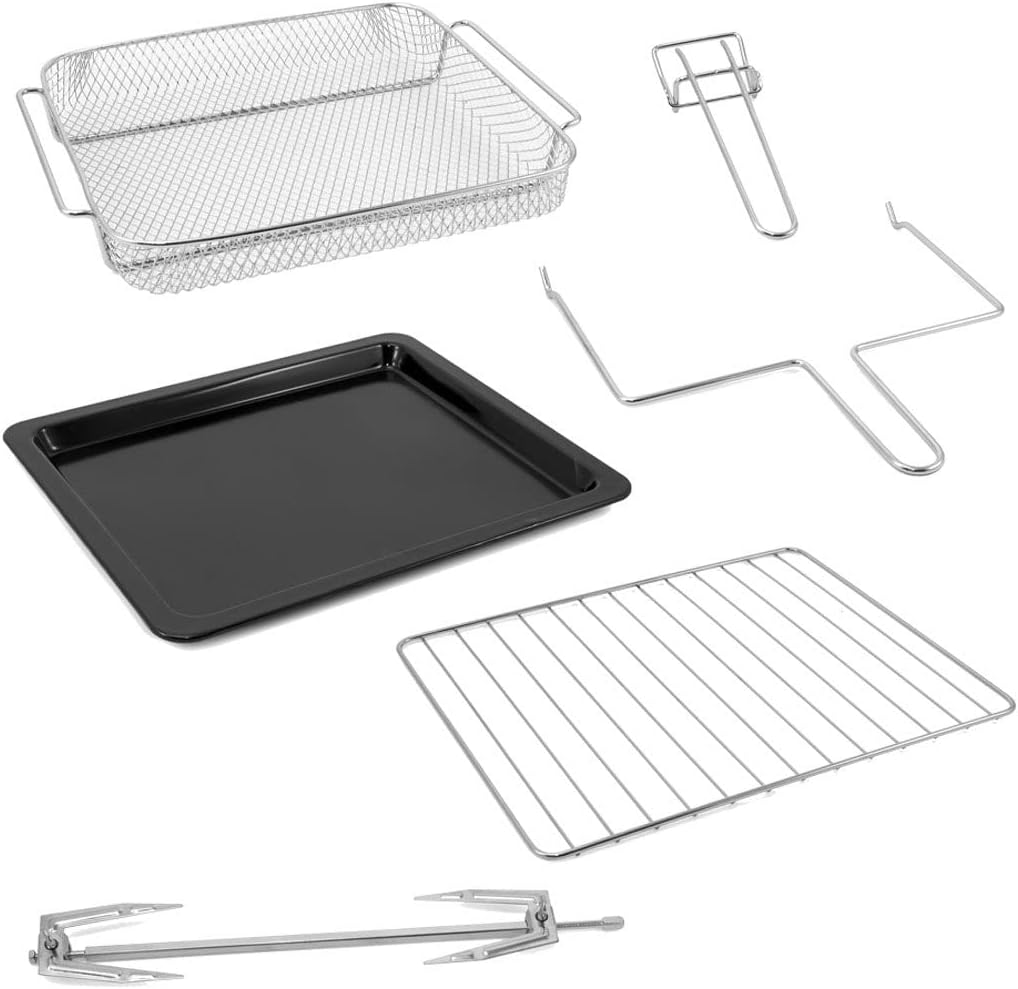
Image 3: A collection of accessories for the Necchi NK021, including an air fry basket, baking pan, wire rack, rotisserie spit, and rotisserie handle.
- Air Fry Basket: For air frying foods like fries, chicken wings.
- Baking Pan: For baking, roasting, or collecting drips.
- Wire Rack: For toasting, baking, or broiling.
- Rotisserie Spit: For roasting whole chickens or other meats.
- Rotisserie Handle: For safely inserting and removing the rotisserie spit.
Setup
- Unpacking: Carefully remove the appliance and all accessories from the packaging. Retain packaging for storage or transport if needed.
- Initial Cleaning: Before first use, wipe the exterior of the appliance with a damp cloth. Wash all removable accessories (air fry basket, baking pan, wire rack, rotisserie spit, rotisserie handle) in warm, soapy water. Rinse thoroughly and dry completely.
- Placement: Place the appliance on a flat, stable, heat-resistant surface. Ensure there is at least 10-15 cm (4-6 inches) of clear space on all sides and above the appliance for proper ventilation. Do not place near flammable materials.
- First Use Burn-Off: It is recommended to run the appliance empty for about 15-20 minutes on the "Bake" function at 200°C (390°F) before cooking food. This helps to burn off any manufacturing residues and odors. Ensure the area is well-ventilated during this process.
Operating Instructions
General Operation
- Prepare Food: Place your food on the appropriate accessory (e.g., air fry basket, baking pan, wire rack).
- Insert Accessory: Carefully slide the accessory with food into the desired rack position inside the oven.
- Select Function: Turn the Function Knob to select the desired cooking mode (Air Fry, Toast, Broil, Bake, Rotisserie).
- Set Temperature: Turn the Temperature Knob to the desired temperature (90°C - 230°C).
- Set Timer: Turn the Timer Knob to the desired cooking time (up to 60 minutes). The appliance will begin heating. The heating indicator light will illuminate.
- Monitor Cooking: You can observe the cooking process through the glass door.
- Completion: When the timer reaches zero, the appliance will automatically shut off, and a bell will sound. The heating indicator light will turn off.
- Remove Food: Using oven mitts, carefully remove the cooked food and accessories from the oven.
Specific Cooking Functions
- Air Fry: Use the air fry basket. This function uses rapid hot air circulation for crispy results with little to no oil. Ideal for fries, chicken nuggets, vegetables.
- Toast: Use the wire rack. Place bread slices directly on the rack. Adjust time based on desired browning.
- Broil: Use the wire rack or baking pan. Position food closer to the top heating elements for grilling/browning. Monitor closely to prevent burning.
- Bake: Use the baking pan or wire rack. Suitable for cakes, cookies, casseroles, and general oven cooking.
- Rotisserie: For roasting whole chickens or larger cuts of meat.
- Secure the food onto the rotisserie spit using the forks.
- Insert the rotisserie spit into the designated slots inside the oven.
- Select the "Rotisserie" function.
- Set temperature and time as required for your recipe.
Maintenance and Cleaning
Regular cleaning ensures optimal performance and extends the lifespan of your appliance.
- Always Unplug: Before cleaning, always unplug the appliance from the power outlet and allow it to cool completely.
- Exterior: Wipe the exterior with a soft, damp cloth. Do not use abrasive cleaners or scouring pads.
- Interior: Wipe the interior walls with a damp cloth and mild detergent. For stubborn stains, a non-abrasive sponge can be used. Ensure the interior is dry before next use.
- Accessories: Wash the air fry basket, baking pan, wire rack, rotisserie spit, and handle in warm, soapy water. These accessories are generally dishwasher safe, but hand washing is recommended for longevity.
- Glass Door: Clean the glass door with a soft cloth and glass cleaner. Avoid harsh chemicals.
- Do Not Immerse: Never immerse the main unit of the appliance in water or any other liquid.
Troubleshooting
If you encounter issues, refer to the following common problems and solutions:
| Problem | Possible Cause | Solution |
|---|---|---|
| Appliance does not turn on. | Not plugged in; power outlet malfunction; timer not set. | Ensure the appliance is securely plugged into a working outlet. Set the timer knob to the desired cooking duration. |
| Food is not cooking evenly. | Overcrowding the basket/pan; incorrect temperature/time; food not flipped/stirred. | Do not overcrowd. Cook in smaller batches if necessary. Adjust temperature and time. Flip or stir food halfway through cooking. |
| White smoke coming from the appliance. | Grease or food residue on heating elements; fatty food cooking. | Unplug and let cool. Clean the interior and heating elements. For fatty foods, ensure the drip tray is clean and in place. |
| Appliance emits a burning smell during first use. | Manufacturing residues burning off. | This is normal for the first few uses. Ensure good ventilation. The smell should dissipate. |
| Door leaks steam or liquid. | Normal condensation; seal issue. | Some steam is normal. If excessive liquid leakage occurs, contact customer support. |
Specifications
| Brand: | Necchi |
| Model: | NK021 |
| Capacity: | 21 Liters |
| Power: | 1800 W |
| Voltage: | 240 Volts |
| Temperature Range: | 90°C - 230°C |
| Timer: | Up to 60 minutes with automatic shut-off |
| Dimensions (Package): | 43.4 x 41.8 x 28 cm |
| Item Weight: | 21 Kilograms |
| Special Features: | Temperature control, Automatic shut-off, Anti-heat glass door, 6 stainless steel heating elements |
Warranty and Support
For warranty information or technical support, please refer to the official Necchi website or contact their customer service directly.
While specific warranty details are not provided in this manual, Necchi products typically come with a manufacturer's warranty covering defects in materials and workmanship.
Contact Information: Please visit the Necchi Store on Amazon or the official Necchi website for the most up-to-date support information.