
1. Introduction
This manual provides comprehensive instructions for the installation, operation, and maintenance of your Hendun Power Failure Alarm, Model hnfpa. This device is designed to alert you to power outages, GFCI circuit trips, and voltage abnormalities, helping to protect critical appliances and equipment such as freezers, refrigerators, CPAP machines, and pumps.
Please read this manual thoroughly before using the device to ensure proper function and safety.
2. Product Overview
2.1 Key Features
- Easy Plug-and-Play Operation: Simply plug into any standard 100-240V AC outlet.
- Multiple Alarm Methods: Features a loud 108 dB audible alarm and a bright tri-color flashing light.
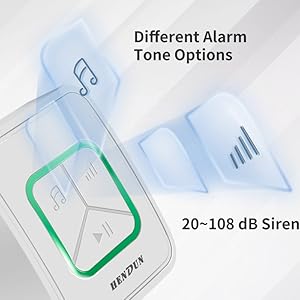
- Adjustable Settings: Customizable alarm tones and volume levels.
- Voltage Monitoring: LED strip indicates normal, high, or low voltage conditions.
- Battery Backup: Operates on AAA batteries during power outages (batteries not included).
- Rechargeable Battery Support: Can charge installed rechargeable AAA batteries when AC power is present.
2.2 Components
The Hendun Power Failure Alarm consists of the following main components:
- AC Plug: For connecting to a standard wall outlet.
- Control Panel: Features buttons for tone, volume, and pause/silence.
- Flashing Strip: Multi-color LED indicator for visual alerts and voltage status.
- Horn: Emits audible alarm sounds.
- Battery Compartment: Located on the back for AAA backup batteries.


3. Setup
3.1 Battery Installation (Optional for Backup)
The alarm can function without backup batteries when connected to AC power. However, for continuous monitoring during a power outage, install 3 AAA batteries (not included) into the battery compartment located on the back of the device. Ensure correct polarity (+/-) when inserting batteries.
If using rechargeable AAA batteries, the device will charge them when connected to AC power.

3.2 Connecting to Power
Plug the Hendun Power Failure Alarm directly into any standard 100-240V AC wall outlet that you wish to monitor. For example, plug it into an outlet near your freezer, refrigerator, CPAP machine, or other critical equipment.

4. Operating Instructions
4.1 Normal Operation
Once plugged in, the device will continuously monitor the power supply. The LED strip will indicate the current voltage status (see Section 4.3 Voltage Monitoring).
4.2 Power Failure Alert
In the event of a power outage or GFCI trip, the device will activate its alarm. This includes a loud audible alert (up to 108 dB) and a flashing light (typically red for power failure).

4.3 Silencing the Alarm
To temporarily silence the audible alarm, press the 'Pause' button (represented by the play/pause icon) on the front panel. The visual alert will continue until power is restored or the device is unplugged.
5. Alarm Settings
The Hendun Power Failure Alarm allows for customization of its alert tones and volume levels.
5.1 Adjusting Alarm Tone
Press the 'Tone' button (represented by the music note icon) on the front panel to cycle through different alarm tones. Select the tone that is most suitable for your environment.
5.2 Adjusting Volume
Press the 'Volume' button (represented by the volume bars icon) on the front panel to adjust the alarm's loudness. The alarm offers a range from 20 dB to 108 dB.

6. Voltage Monitoring
The integrated LED strip on the front of the alarm provides visual feedback on the voltage status of the connected outlet:
- Green Light: Indicates normal voltage.
- Red Light: Indicates higher than standard voltage (over-voltage).
- Blue Light: Indicates lower than standard voltage (under-voltage).

7. Battery Information
The Hendun Power Failure Alarm uses 3 AAA batteries for backup power during an outage. These batteries are not included with the product.
- Battery Type: Alkaline AAA batteries are recommended.
- Standby Lifetime: With fresh batteries, the device has a standby lifetime of over 2 years.
- Alarm Duration: Can provide over 72 hours of continuous alarm time on battery power.
- Rechargeable Batteries: The device can charge rechargeable AAA batteries when connected to AC power.

8. Maintenance
- Cleaning: Wipe the device with a soft, dry cloth. Do not use abrasive cleaners or solvents.
- Battery Check: If using non-rechargeable batteries, replace them periodically (e.g., annually) to ensure reliable backup power.
- Testing: Periodically test the alarm by temporarily unplugging it from the wall outlet to ensure the battery backup and alarm functions are working correctly.
9. Troubleshooting
- Alarm Not Sounding During Outage:
- Ensure the device is securely plugged into a live outlet.
- Check if backup batteries are installed and are fresh/charged.
- Verify the volume setting is not at its lowest level.
- False Alarms:
- Ensure the outlet provides stable power. Fluctuations might trigger the alarm.
- Check for loose connections.
- LED Indicator Not Lighting Up:
- Confirm the device is plugged into a live AC outlet.
- If the device is completely unresponsive, contact customer support.
10. Specifications
| Specification | Value |
|---|---|
| Model Number | hnfpa |
| Input Voltage | 100-240V AC |
| Battery Type (Backup) | 3 x AAA (Alkaline recommended, not included) |
| Alarm Loudness | 20 - 108 dB |
| Product Dimensions | 2.3 x 2.3 x 2.8 inches |
| Item Weight | 3.2 ounces |
| Control Method | Touch buttons |
| Sensor Technology | Voltage Sensor |
| Mounting Type | Wall outlet plug-in |
11. Warranty and Support
For warranty information or technical support, please refer to the product packaging or contact Hendun customer service directly. Keep your purchase receipt as proof of purchase.