1. Introduction
The TerraMaster F4-223 is a high-performance 4-bay Network Attached Storage (NAS) device designed for Small and Medium Businesses (SMBs) and advanced home users. It offers robust data storage, backup solutions, and various commercial applications. This manual provides essential information for setting up, operating, and maintaining your F4-223 NAS.

The TerraMaster F4-223 is a 4-bay NAS unit, featuring a sleek silver design with four front-loading drive bays. It is equipped with multiple indicator lights for power, LAN activity, and individual drive status, along with a power button on the front panel. The device is designed for efficient and reliable data storage.
Product Overview Video
Video 1: TerraMaster F4-423 Product Overview. This video highlights the features and benefits of the TerraMaster F4-423, a similar model to the F4-223, showcasing its suitability for SMB users seeking high-performance storage solutions.
2. Key Features
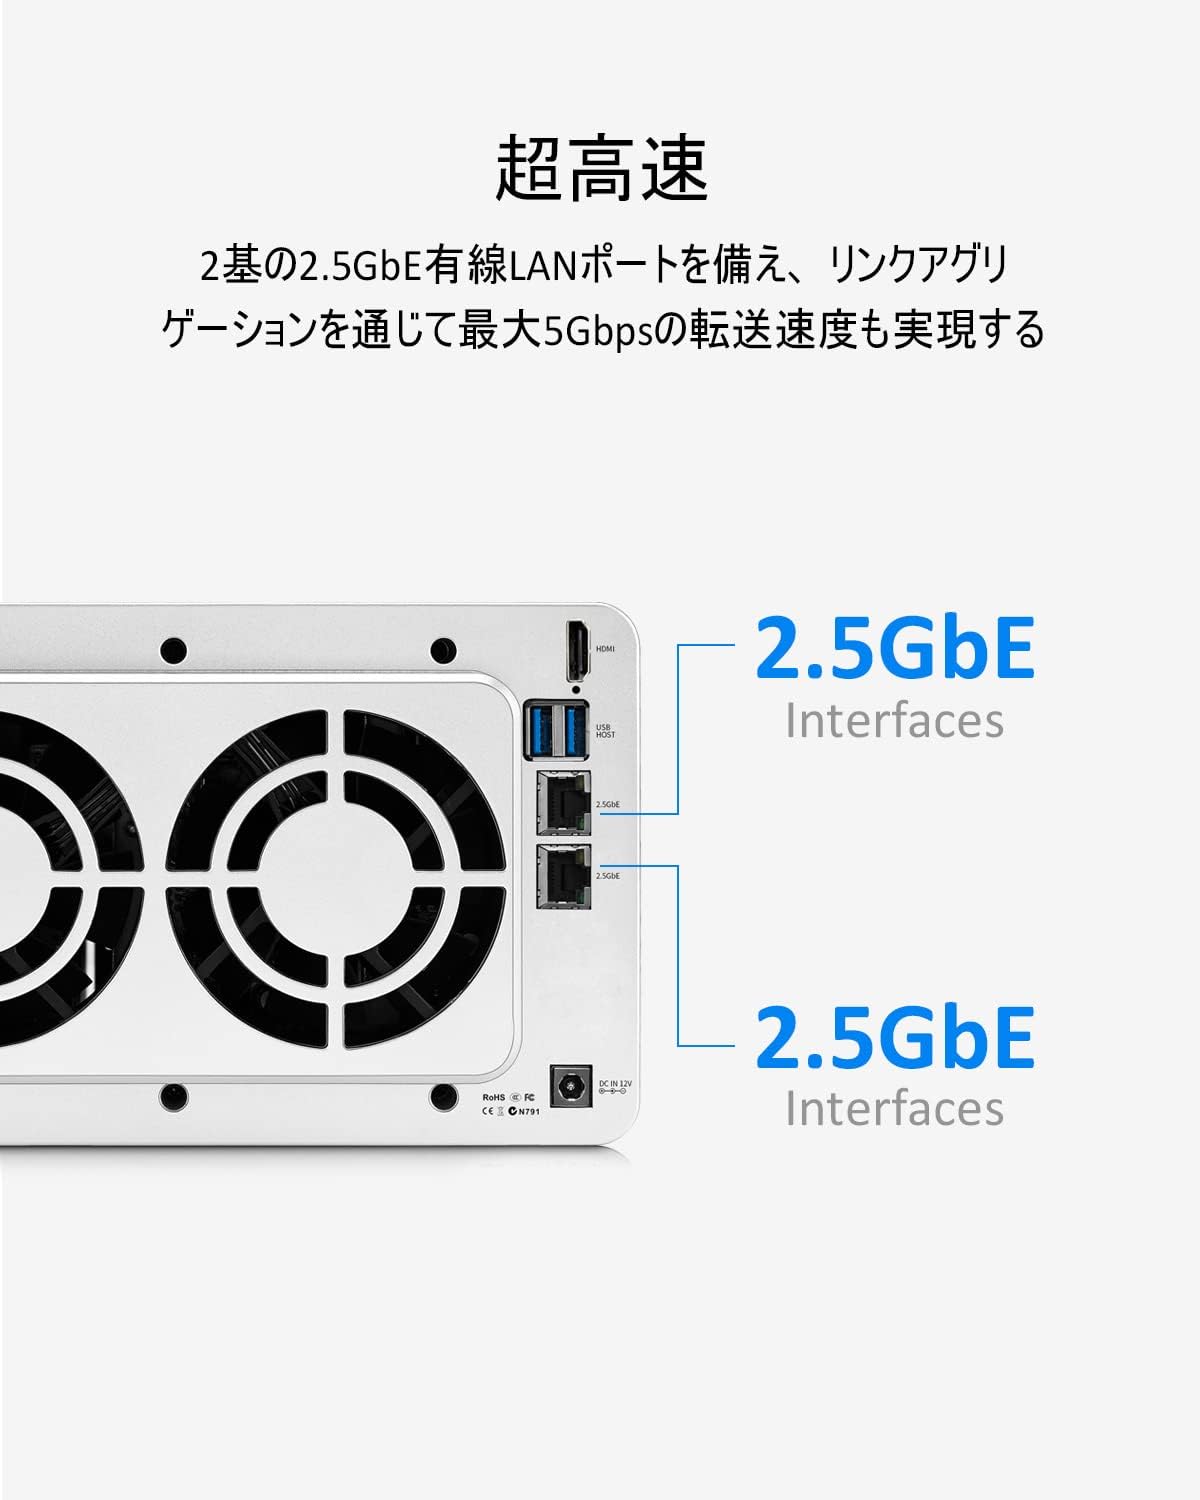
- Superior Performance: Equipped with a Celeron N4505 dual-core processor (base clock 2GHz, turbo up to 2.9GHz) and 4GB DDR4 RAM (expandable up to 32GB). Features two 2.5GbE wired LAN ports, supporting link aggregation for transfer speeds up to 5Gbps.
- Large Capacity: Supports up to four 20TB hard drives, totaling a maximum storage capacity of 80TB (20TB x 4). Compatible with 3.5" and 2.5" SATA HDDs, and 2.5" SATA SSDs. Offers RAID 0/1/JBOD/Single options with online capacity expansion and mode changes to protect critical data. Includes two M.2 2280 NVMe SSD slots for SSD caching to improve RAID array transfer efficiency.
- Rich Backup Solutions: Supports dual backup, snapshots, and cloud synchronization. Various backup functions ensure reliable data storage and protection.
- Extensive Commercial Applications: The F4-223 can easily be configured as a file server, mail server, web server, or FTP server. It also provides services such as MySQL databases, CRM, Node.js, and Java virtual machines.
- Excellent Quietness: Features an aluminum alloy casing and an intelligent temperature-controlled ultra-quiet fan. This design effectively reduces the operating temperature of the HDD array and suppresses resonance between HDDs, ensuring quiet operation even under full load.


3. Setup
3.1 Hardware Installation
Before powering on your TerraMaster F4-223, you need to install the storage drives (HDDs/SSDs) and optionally upgrade RAM or install M.2 NVMe SSDs for caching.


3.1.1 HDD/SSD Installation
The F4-223 supports tool-free installation for 3.5-inch HDDs. For 2.5-inch HDDs/SSDs, screws are required.
- Press the release button on the drive tray to eject it from the NAS.
- For 3.5-inch HDDs: Gently spread the side panels of the tray and insert the HDD. The pins on the tray will secure the drive.
- For 2.5-inch HDDs/SSDs: Place the drive into the tray and secure it with the provided screws through the bottom of the tray.
- Slide the loaded drive tray back into the empty bay until it clicks into place.
Video: D8-Hybrid HDD Installation
Video 2: This video demonstrates the installation process for HDDs in a TerraMaster D8-Hybrid device. The steps for installing drives into the trays are similar for the F4-223 model.
3.1.2 M.2 NVMe SSD and RAM Installation
The F4-223 features two M.2 2280 NVMe SSD slots for caching and supports RAM upgrades up to 32GB. These components are typically installed by opening the device casing.
- Ensure the NAS is powered off and disconnected from the power source.
- Carefully open the device casing according to the product's detailed manual (usually involves unscrewing the rear panel).
- Locate the M.2 slots and RAM slots on the motherboard.
- Insert the M.2 NVMe SSDs into their respective slots and secure them with the provided screws.
- Insert the RAM modules into the available slots, ensuring they are properly seated.
- Close the device casing and secure it with screws.
Video: WTR PRO Installation and PC Description (M.2 SSD and RAM)
Video 3: This video demonstrates the installation of M.2 SSDs and RAM in a WTR PRO Mini PC. While the device is different, the general procedure for installing these components on a motherboard is applicable to the TerraMaster F4-223.
3.2 Software Setup (TNAS Mobile App)
The TerraMaster NAS can be managed via the TNAS Mobile app on your smartphone or tablet.
- Download and install the TNAS Mobile app from your device's app store.
- Ensure your NAS is powered on and connected to your network.
- Open the TNAS Mobile app and follow the on-screen instructions to discover and connect to your F4-223 NAS.
- You may need to create an administrator account and set a password for your NAS.
Video: TDAS Usage: D5-310 and Smartphone Data Transfer
Video 4: This video demonstrates how to use the TDAS mobile app for data transfer with a D5-310 device. The process for connecting and managing your TerraMaster F4-223 NAS via the TNAS Mobile app will be similar.
4. Operating the NAS
The TerraMaster F4-223 runs on the TerraMaster Operating System (TOS), which provides a user-friendly interface for managing your data and applications.
4.1 File Management and Access
You can access and manage your files on the F4-223 through various methods:
- Web Interface: Access the TOS web interface via a web browser on your computer. This provides a comprehensive dashboard for all NAS functions.
- Network Shares: Map network drives on your Windows, macOS, or Linux computers to access shared folders directly.
- TNAS Mobile App: Use the mobile app for convenient file browsing, uploads, and downloads on the go.
- FTP/SFTP: For advanced users, FTP/SFTP services can be configured for secure file transfers.
4.2 Data Backup and Synchronization
Leverage the F4-223's robust backup features to protect your data:
- Centralized Backup: Consolidate backups from virtual machines, PCs, and file servers.
- Dual Backup: Create redundant backups to another NAS or external storage.
- Snapshots: Create point-in-time copies of your data for quick recovery from accidental deletions or ransomware attacks.
- Cloud Sync: Synchronize data with popular cloud storage services for off-site backup and accessibility.
4.3 Multimedia Services
The F4-223 can serve as a powerful multimedia hub:
- Media Server: Stream videos, music, and photos to various devices on your network using applications like Emby, Plex, and DLNA.
- 4K Video Transcoding: Enjoy smooth playback of high-resolution media on devices that may not natively support the original format.

5. Maintenance
Regular maintenance ensures the longevity and optimal performance of your TerraMaster F4-223 NAS.
- Keep Clean: Regularly clean the exterior of the NAS and ensure ventilation openings are free from dust and obstructions.
- Proper Ventilation: Place the NAS in a well-ventilated area to prevent overheating.
- Software Updates: Keep your TerraMaster Operating System (TOS) updated to the latest version to benefit from new features, security patches, and performance improvements. You can configure automatic updates or perform them manually through the TOS web interface.
- Drive Health Monitoring: Utilize the tools within TOS to monitor the health status of your installed drives. Replace any drives showing signs of failure promptly to prevent data loss.
6. Troubleshooting
This section addresses common issues you might encounter with your TerraMaster F4-223 NAS.
6.1 Common Issues and Solutions
- NAS Not Accessible on Network:
- Check network cable connections to both the NAS and your router.
- Ensure the NAS is powered on.
- Verify your computer and NAS are on the same network segment.
- Restart your router and NAS.
- If using the TNAS Mobile app or web interface, ensure the correct IP address or hostname is used.
- Drive Not Recognized:
- Ensure the drive is properly seated in its tray and the tray is fully inserted into the NAS bay.
- Check the drive's health status via the TOS web interface.
- Try installing the drive in a different bay or testing it with another compatible device to rule out a faulty drive.
- Slow Performance:
- Verify your network connection speed (e.g., 2.5GbE connection).
- Check NAS resource utilization (CPU, RAM) in the TOS web interface.
- Ensure drives are healthy and not experiencing high I/O.
- Consider enabling SSD caching if M.2 NVMe SSDs are installed.
6.2 Further Support
If you encounter issues that cannot be resolved using the above steps, please refer to the following resources:
- TerraMaster Official Website: Visit the official TerraMaster website for detailed FAQs, knowledge base articles, and firmware downloads.
- TerraMaster Forums: The TerraMaster community forums can be a valuable resource for solutions and peer support.
- Customer Support: Contact TerraMaster customer support directly for technical assistance.
7. Specifications
| Feature | Description |
|---|---|
| Brand | TERRAMASTER |
| Model | F4-223 |
| Color | Silver |
| Dimensions (D x W x H) | 13.6 x 22.5 x 22.7 cm |
| CPU | Intel Celeron N4505 Dual-Core (2.0GHz base, up to 2.9GHz turbo) |
| RAM | 4GB DDR4 (expandable up to 32GB) |
| LAN Ports | 2 x 2.5GbE (supports Link Aggregation up to 5Gbps) |
| Drive Bays | 4 |
| Drive Compatibility | 3.5" SATA HDD, 2.5" SATA HDD, 2.5" SATA SSD |
| Max Internal Capacity | 80TB (20TB x 4) |
| M.2 NVMe SSD Slots | 2 x M.2 2280 NVMe (for SSD caching) |
| RAID Support | RAID 0, RAID 1, JBOD, Single |
| Compatible OS | Windows OS, Mac OS, Linux OS, iOS 14.0+, Android 10.0+ |
| Mounting Type | Tabletop, Rackmount |
| Origin | China |
8. Warranty and Support
8.1 Warranty Information
The TerraMaster F4-223 comes with a 2 Year Limited Warranty. Please retain your proof of purchase for warranty claims. For detailed terms and conditions, refer to the warranty policy available on the official TerraMaster website.
8.2 Customer Support
For any technical assistance, product inquiries, or warranty claims, please contact TerraMaster customer support through the following channels:
- Official Website: Visit www.terra-master.com for support resources, FAQs, and contact information.
- Online Forums: Engage with the TerraMaster community and find solutions at their official forums.
- Email Support: Refer to the contact section on the TerraMaster website for email support options.