sainlogic WS-089
Sainlogic Weather Station User Manual
Model: WS-089
1. Introduction
Thank you for choosing the Sainlogic Wireless Weather Station. This device provides comprehensive indoor and outdoor weather data, including temperature, humidity, wind speed and direction, rainfall, air pressure, moon phase, and forecast. This manual will guide you through the setup, operation, and maintenance of your weather station to ensure optimal performance and longevity.
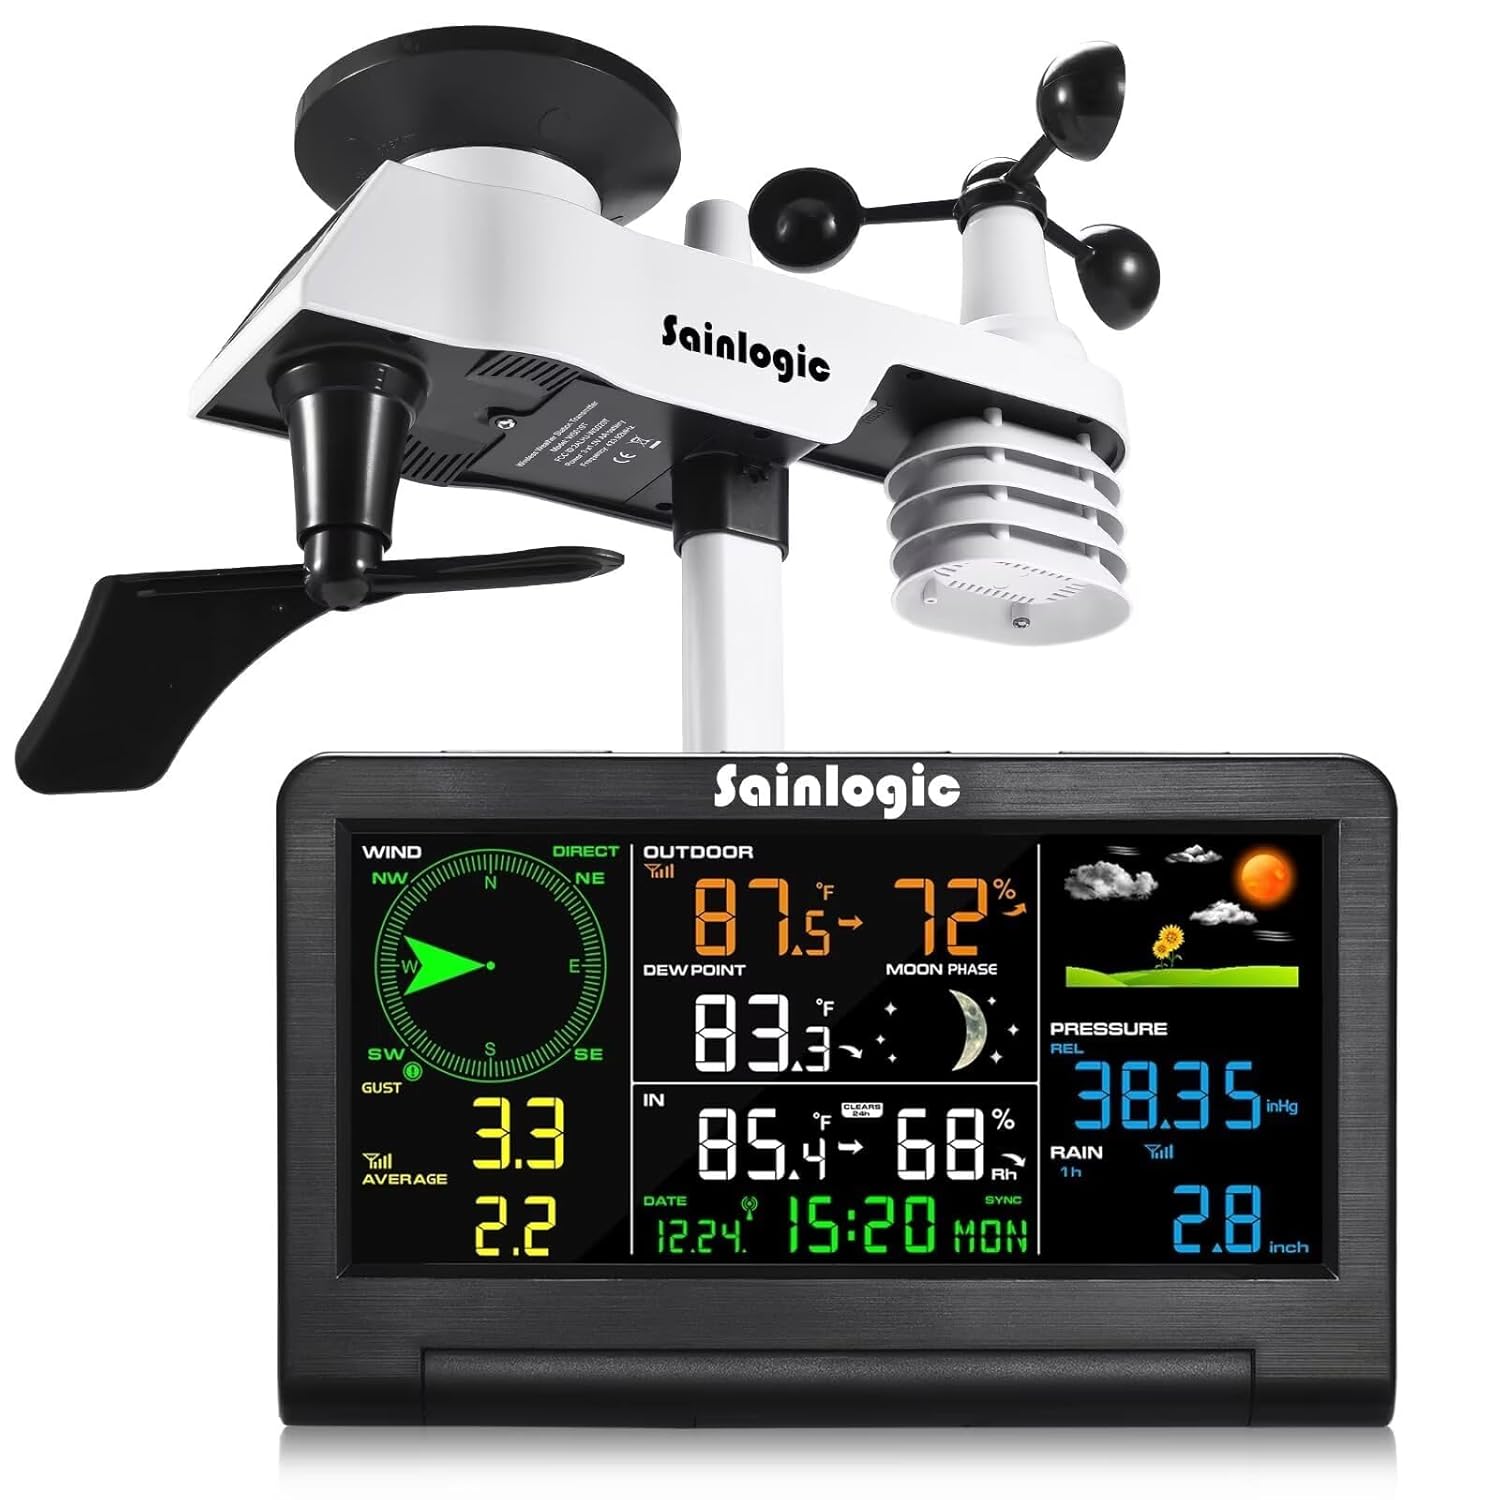
Figure 1: Sainlogic Weather Station, showing the outdoor sensor array and the indoor color display console.
2. Package Contents
- Display Console
- Outdoor Transmitter (6-in-1 Sensor)
- Stand mount with pole insert
- Pole mounting nuts (M3) / bolts (Ø3)
- Mounting bracket back plate (pole mount)
- Pole mount nuts (M5) / bolts (Ø5)
- Mounting post (300 x 300 x 20 mm)
- Instruction Manual (this document)
- Power adapter
- Batteries NOT included (requires 2 AA batteries)

Figure 2: All components included in the Sainlogic Weather Station package.
3. Setup
3.1 Outdoor Sensor Assembly
The 6-in-1 outdoor sensor combines multiple measurement components into one unit. Follow these steps for assembly:
- Attach the wind vane to its designated slot, ensuring it can rotate freely.
- Secure the wind cups to the top spindle.
- Ensure the rain collector is clear of debris.
- Mount the sensor unit onto the mounting post using the provided nuts and bolts.

Figure 3: Detailed view of the 6-in-1 outdoor sensor, highlighting its components: wind vane, solar panel, rain collector, level indicator, wind-cups, and thermohygrometer radiation shield.
3.2 Display Console Power
The display console can be powered by the included power adapter or by 2 AA batteries (not included). For continuous operation and adjustable backlight, it is recommended to use the power adapter.
- Insert 2 AA batteries into the battery compartment on the back of the display console, observing polarity.
- Connect the power adapter to the DC IN port on the display console and plug it into a wall outlet.
3.3 Sensor Placement and Pairing
For accurate readings, place the outdoor sensor in an open area, away from obstructions that could block wind or rain, and where it receives direct sunlight for the solar panel. The maximum transmission range between the sensor and display is up to 328 feet (100 meters) in open field conditions.
- Once both the sensor and display console are powered on, they will automatically attempt to pair. This may take a few minutes.
- Ensure the sensor is within range of the display console.
- If pairing fails, try resetting both units (refer to Troubleshooting section).

Figure 4: Examples of suitable outdoor sensor placement for accurate measurements, emphasizing open areas and clear line of sight to the display console.
4. Operating Instructions
4.1 Display Console Overview
The LCD color display provides a clear interface for all weather data. It features a rotatable back bracket for optimal viewing angles.
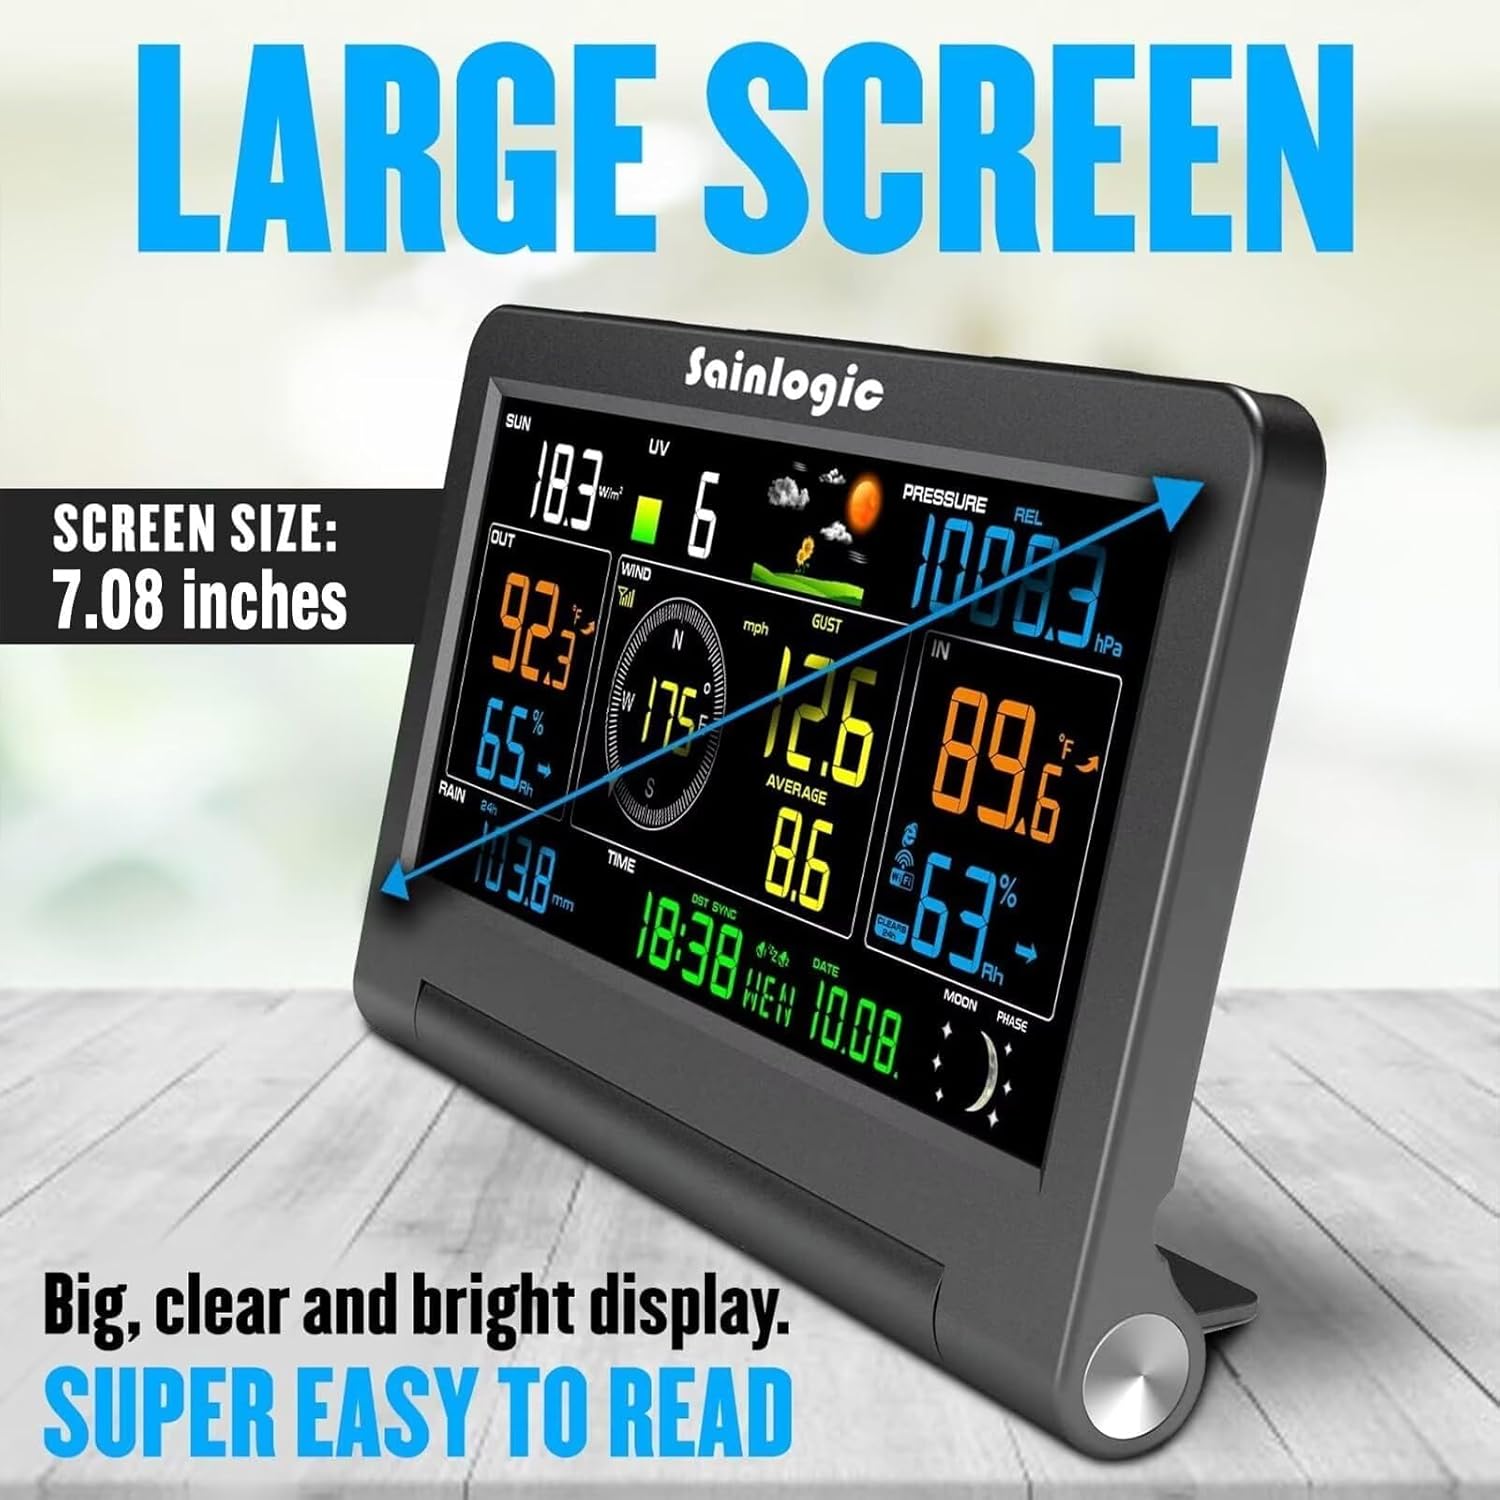
Figure 5: The 7.08-inch large screen display console, showing various weather parameters for easy readability.

Figure 6: Front and back profile of the display console, indicating the location of various data points and control buttons (Min/Max, Snooze/Light, Channel/+, Hanging holes, DC in, Tabletop support).
4.2 Reading Weather Data
The display shows the following information:
- Indoor/Outdoor Temperature & Humidity: Current readings for both environments.
- Wind Speed & Direction: Real-time wind data, including gust and average speeds.
- Rainfall: Daily, weekly, or monthly rainfall accumulation.
- Air Pressure: Current barometric pressure.
- Dew Point: Calculated dew point (may require manual setting).
- Moon Phase: Graphical representation of the current moon phase.
- Weather Forecast: Icons indicating predicted weather conditions.
- Time & Calendar: Current time and date.
4.3 Adjusting Brightness
The display console features an adjustable 3-level backlight. Press the 'SNOOZE/LIGHT' button to cycle through brightness levels (100%, 80%, 60%). This feature is most effective when the unit is powered by the AC adapter.

Figure 7: Illustration of the three adjustable brightness levels (100%, 80%, 60%) for the display console.
4.4 Setting Time, Date, and Alarm
Refer to the specific button labels on the back of the display console (e.g., 'SET', 'MODE', '+', '-') to enter setting modes for time, date, and alarm. Follow the on-screen prompts to adjust values.
5. Maintenance
5.1 Cleaning
- Display Console: Wipe with a soft, damp cloth. Avoid abrasive cleaners.
- Outdoor Sensor: Periodically check the rain collector for debris (leaves, insects) and clear it. Ensure wind cups and wind vane rotate freely. Clean the solar panel gently to maintain charging efficiency.
5.2 Battery Replacement
When the low battery icon appears on the display, replace the 2 AA batteries in the display console. For the outdoor sensor, the solar panel primarily powers it, but it may have a backup battery that needs occasional checking or replacement as per the full product manual.
6. Troubleshooting
- No outdoor data: Ensure the outdoor sensor is powered on and within range. Try resetting both the sensor and display console by removing batteries/power, waiting 30 seconds, and then re-powering.
- Inaccurate readings: Verify the outdoor sensor's placement. It should be in an open area, away from heat sources, reflective surfaces, or obstructions that could affect wind or rain measurements. Calibration options may be available in the settings.
- Display not turning on: Check power adapter connection or replace batteries.
- Rain gauge not working: Check for blockages in the rain collector funnel.
7. Specifications
| Measurement | Range | Accuracy | Resolution |
|---|---|---|---|
| Indoor Temperature | 0 to 60°C (32 to 140°F) | ± 1°F (± 2°C) | 0.1°C(°F) |
| Outdoor Temperature | -40 to 60°C (-40 to 140°F) | ± 1°F (± 2°C) | 0.1°C(°F) |
| Indoor Humidity | 10 to 99% | ± 5% (guaranteed between 20 to 90%) | 1 % |
| Outdoor Humidity | 10 to 99% | ± 5% (guaranteed between 20 to 90%) | 1 % |
| Rain | 0 to 396in | <0.6in: ±0.4in, 0.6in to 396in:±7% | <39.4in(0.012in), >39.4in(0.04in) |
| Wind Direction | 0 - 360° | ±10° (8 point compass) | ±1° (8 point compass) |
| Wind Speed | 0 to 112mph | Accuracy: 4.5mph ~ 22.4mph: +6.7mph, 22.4mph ~ 112mph: +10% (whichever is greater) | 0.1mph |
| Barometric Pressure | 8.85 to 32.50inHg | ±0.08inHg | 0.1hPa |

Figure 8: Detailed measurement specifications for the Sainlogic Weather Station.
General Specifications:
- Model Number: WS-089
- Product Dimensions: 2.01 x 19.2 x 12.09 cm; 2.03 kg
- Power Source: Battery Powered (2 AA batteries required for display), Solar for outdoor sensor
- Special Features: Wireless, Large Display, Adjustable Brightness, Alarm, Clock
8. Warranty and Support
Sainlogic is committed to providing reliable products. While specific warranty details are not provided in this manual, please retain your purchase receipt for any warranty claims. If you encounter any problems or have questions regarding your weather station, please feel free to contact Sainlogic customer support for assistance.
Contact information can typically be found on the product packaging or the official Sainlogic website.
Ask a question about this manual
Ask about setup, troubleshooting, compatibility, parts, safety, or missing instructions. Manuals+ will review the question and use this page’s manual context to help answer it.