
1. Introduction
This instruction manual provides essential information for the proper installation, operation, and maintenance of your new Generic Carburetor Assembly, model 1254-231. This carburetor is designed as a replacement part for Cub Cadet Lawn Mower model 25A-26SD710. Please read this manual thoroughly before attempting any installation or operation to ensure safe and efficient use of your equipment.
2. Safety Information
Always prioritize safety when working with fuel systems and power equipment. Failure to follow safety instructions can result in serious injury or property damage.
- Fuel Handling: Gasoline is highly flammable. Always work in a well-ventilated area, away from open flames, sparks, or other ignition sources. Do not smoke.
- Eye Protection: Wear safety glasses or goggles to protect your eyes from fuel splashes or debris.
- Gloves: Wear appropriate gloves to protect your hands from fuel and other chemicals.
- Engine Off: Ensure the lawn mower engine is completely off and cool before beginning any work. Disconnect the spark plug wire to prevent accidental starting.
- Battery Disconnection: For electric start models, disconnect the battery to prevent electrical hazards.
- Ventilation: Ensure adequate ventilation when working with fuel or cleaning agents.
- Disposal: Dispose of old fuel and parts according to local regulations.
3. Product Overview
The carburetor is a vital component of your lawn mower's engine, responsible for mixing air and fuel in the correct proportions for combustion. This replacement assembly is designed to restore optimal engine performance.

Figure 3.1: Generic Carburetor Assembly. This image displays the main carburetor unit, featuring a metallic body, various ports, and a golden-colored fuel bowl at the bottom. Two gray gasket seals are shown separately to the right of the carburetor.
The assembly includes the main carburetor body, float bowl, and necessary gaskets for installation. It is pre-calibrated for the specified Cub Cadet lawn mower model.
4. Setup and Installation
Before beginning installation, ensure you have the necessary tools: a screwdriver set, wrench set, pliers, and a fuel-safe container for draining old fuel. Refer to your lawn mower's original service manual for specific torque specifications and additional model-specific instructions.
4.1. Preparation
- Park the lawn mower on a level surface.
- Ensure the engine is cool.
- Disconnect the spark plug wire.
- Turn off the fuel supply valve, if equipped.
- Drain the fuel tank into a suitable container.
- Remove the air filter assembly to access the carburetor.
4.2. Removing the Old Carburetor
- Carefully disconnect the fuel line from the old carburetor. Be prepared for residual fuel leakage.
- Disconnect any throttle linkage, choke linkage, or governor springs attached to the carburetor. Note their positions for reassembly. Taking photos can be helpful.
- Unbolt the carburetor from the engine manifold. There are typically two nuts holding it in place.
- Remove the old carburetor and any old gaskets. Inspect the manifold and engine intake for debris or damage.
4.3. Installing the New Carburetor
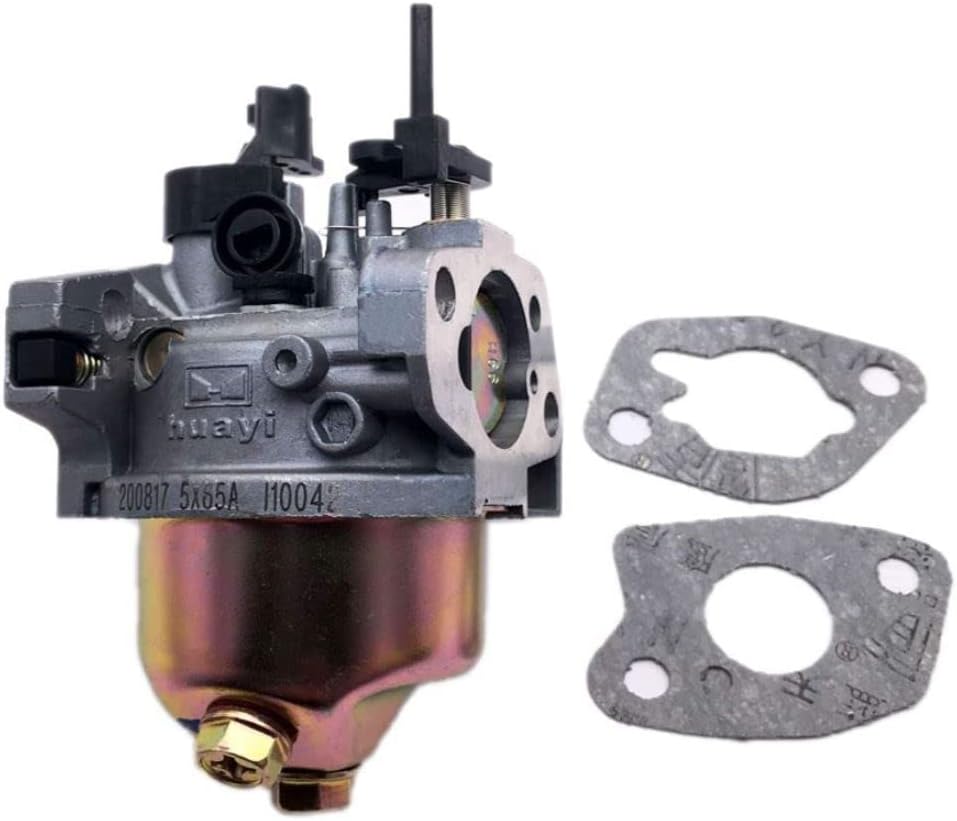
Figure 4.1: Carburetor and Gaskets. This image provides a closer view of the carburetor, highlighting its metallic body and the golden fuel bowl. Two gray gaskets, essential for sealing, are positioned next to the carburetor, ready for installation.
- Ensure the mating surfaces on the engine and air filter housing are clean and free of old gasket material.
- Place the new gaskets in their correct positions between the carburetor and the engine manifold, and between the carburetor and the air filter housing. Refer to Figure 4.1 for gasket appearance.
- Mount the new carburetor onto the engine studs. Hand-tighten the nuts initially.
- Reconnect the throttle linkage, choke linkage, and governor springs to their original positions. Double-check that all connections move freely.
- Reconnect the fuel line to the carburetor. Ensure the connection is secure and free of leaks.
- Tighten the carburetor mounting nuts evenly to the manufacturer's specified torque. Do not overtighten.
- Reinstall the air filter assembly.
4.4. Post-Installation Checks
- Verify all fuel lines are securely connected and free of kinks or leaks.
- Confirm all linkages move smoothly and are correctly attached.
- Ensure the air filter is properly seated.
5. Operating After Carburetor Replacement
After installing the new carburetor, follow these steps to start your lawn mower:
- Refill the fuel tank with fresh, appropriate fuel for your lawn mower.
- Open the fuel supply valve (if applicable).
- Prime the Carburetor: If your mower has a primer bulb, press it several times until fuel is visible in the fuel line or the bulb feels firm. If no primer bulb, the engine may require more pulls to draw fuel.
- Set the choke to the "FULL CHOKE" position.
- Reconnect the spark plug wire.
- Start the engine according to your lawn mower's manufacturer instructions (e.g., pull starter cord or engage electric start).
- Once the engine starts, gradually move the choke to the "RUN" position as the engine warms up.
- Allow the engine to run for a few minutes to ensure proper operation and check for any fuel leaks.
6. Maintenance
Regular maintenance ensures the longevity and optimal performance of your carburetor and lawn mower.
- Fuel Quality: Always use fresh, clean gasoline. Stale fuel can cause deposits and clog the carburetor. Consider using a fuel stabilizer if storing the mower for extended periods.
- Air Filter: Regularly inspect and clean or replace the air filter. A dirty air filter restricts airflow, leading to a rich fuel mixture and poor engine performance.
- Carburetor Cleaning: If performance issues arise, the carburetor may need cleaning. This typically involves disassembling the carburetor, cleaning jets and passages with carburetor cleaner, and replacing gaskets. This procedure should only be performed by individuals with mechanical experience.
- Storage: Before long-term storage, either run the engine until it runs out of fuel or drain the fuel tank and carburetor bowl to prevent fuel degradation and gumming.
7. Troubleshooting
This section addresses common issues you might encounter after carburetor replacement.
| Problem | Possible Cause | Solution |
|---|---|---|
| Engine won't start | No fuel reaching carburetor; incorrect choke setting; spark plug issue. | Check fuel level and fuel valve. Ensure primer bulb is pressed (if applicable). Verify choke is set correctly. Check spark plug for fouling or damage. |
| Engine runs rough or stalls | Air leak around carburetor gaskets; clogged fuel filter; dirty carburetor jets; incorrect idle adjustment. | Inspect gaskets for proper sealing. Replace fuel filter. Clean carburetor (advanced users). Adjust idle screw if necessary. |
| Fuel leaks from carburetor | Improperly seated fuel line; damaged float bowl gasket; stuck float needle. | Check fuel line connections. Replace float bowl gasket. Inspect float and needle valve for proper operation and cleanliness. |
| Engine lacks power | Dirty air filter; partially clogged carburetor; incorrect governor setting. | Clean or replace air filter. Clean carburetor. Consult mower's service manual for governor adjustment. |
If troubleshooting steps do not resolve the issue, it is recommended to consult a qualified service technician or contact the seller for further assistance.
8. Specifications
- Product Type: Carburetor Assembly
- Brand: Generic
- Model Number: 1254-231
- Compatibility: Cub Cadet Lawn Mower 25A-26SD710
- Manufacturer: BMotorParts
- Number of Items: 1 (Carburetor with gaskets)
- Recommended Use: Replacement part for Lawn Mower
9. Warranty and Support
For warranty information regarding this Generic Carburetor Assembly, please refer to the terms and conditions provided by the original seller at the time of purchase. Any claims or inquiries related to product defects or performance should be directed to the seller or manufacturer, BMotorParts.
Keep your purchase receipt or order confirmation as proof of purchase for any warranty claims.