1. Introduction
This manual provides comprehensive instructions for the installation, operation, and maintenance of the LiebeWH TM-163 Three Phase Programmable Digital Timer Switch. This high-performance timer switch is designed for three-phase systems (380V) and features three-wire input and output, simplifying wiring in installations where a neutral wire may not be readily available. It is suitable for a wide range of applications, including controlling three-phase motors, fish pond oxygenation systems, rice steaming machines, water heaters, billboards, neon lamps, and exhaust fans.
The TM-163 allows for automated management of electrical equipment with reliable and stable performance. It includes a built-in rechargeable battery for power-off memory, ensuring that programmed settings are retained without the need for reprogramming after a power interruption.
2. Safety Information
- High Voltage Warning: This device operates with 380V three-phase power. Installation and wiring must be performed by a qualified electrician in accordance with local electrical codes and regulations.
- Power Disconnection: Always disconnect power to the circuit before installing, wiring, or performing any maintenance on the timer switch.
- Proper Grounding: Ensure the device and connected equipment are properly grounded to prevent electrical shock.
- Environmental Conditions: Do not expose the device to moisture, extreme temperatures, or corrosive environments.
- Load Capacity: Do not exceed the maximum rated current of 16A per phase. Overloading can cause damage to the device and connected equipment, and poses a fire hazard.
3. Product Overview
The LiebeWH TM-163 is a compact and robust digital timer switch designed for industrial and commercial applications requiring precise control of three-phase electrical loads. It features a clear LCD display for time and program status, along with intuitive buttons for setting the clock and programming ON/OFF cycles.

Figure 3.1: Front view of the LiebeWH TM-163 Digital Timer Switch, showing the display and control buttons. Note: The image displays 'TM-613', but the product model is TM-163.
The device supports both screw and 35mm DIN rail mounting methods, offering flexibility for various installation environments. Its internal rechargeable battery provides power failure memory for up to 180 days, ensuring program integrity.

Figure 3.2: Dimensions of the LiebeWH TM-163 Timer Switch, measuring approximately 4.7 inches (120mm) in width, 4.7 inches (120mm) in height, and 2 inches (52mm) in depth.
4. Specifications
| Parameter | Value |
|---|---|
| Model | TM-163 |
| Operating Voltage | 380V AC / 50-60Hz |
| Control Output | 16A (Three-phase direct output) |
| Programmable Settings | 17 ON/OFF cycles (daily/weekly) |
| Minimum Set Time | 1 minute |
| Maximum Set Time | 168 hours (1 week) |
| Time Error | ±1 second / 24 hours |
| Power Failure Memory | 180 days (built-in 1.2V rechargeable battery) |
| Installation Dimensions | 120mm x 120mm x 52mm (4.7" x 4.7" x 2") |
| Installation Method | Screw mounting, 35mm DIN rail mounting |
| Weight | Approx. 467g (1.03 lbs) |
| Material | Plastic |
5. Installation and Wiring
Proper installation and wiring are crucial for the safe and correct operation of the TM-163 timer switch. Refer to the wiring diagram below and ensure all connections are secure.
5.1 Mounting the Device
The TM-163 offers two primary mounting options:
- Screw Mounting: Use the designated hook holes on the back of the device to secure it to a flat surface with screws.
- DIN Rail Mounting: Attach the device to a standard 35mm DIN rail. Ensure the rail clip is properly engaged.

Figure 5.1: Rear view of the timer switch illustrating screw fixing points and the 35mm DIN rail mounting mechanism.
5.2 Wiring Instructions
The TM-163 is designed for three-phase systems without requiring a neutral wire for its internal operation, simplifying installation. Connect the input and output phases as shown in the diagram. Ensure all connections are tight and insulated.
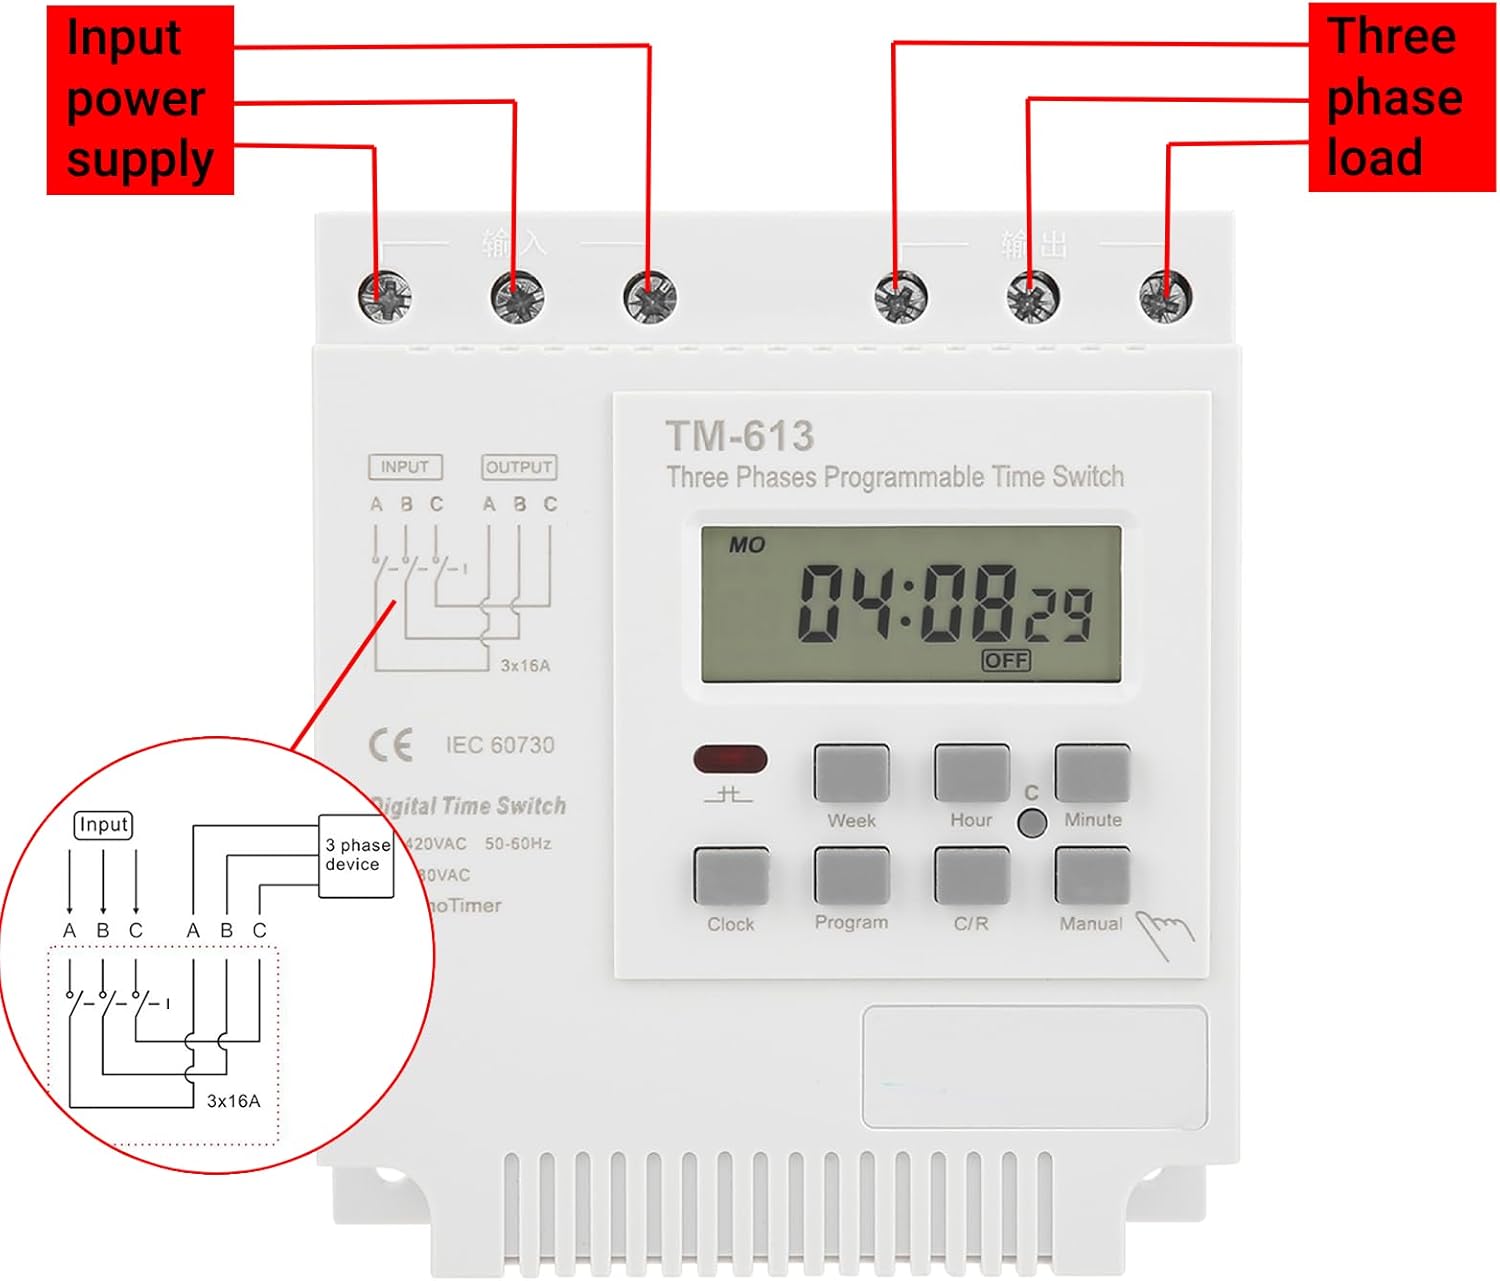
Figure 5.2: Wiring diagram for the TM-163. Connect the three-phase input power supply to the 'INPUT' terminals (A, B, C) and the three-phase load to the 'OUTPUT' terminals (A, B, C).
- Connect the three-phase power supply lines to the terminals labeled INPUT A, B, C.
- Connect the three-phase load lines to the terminals labeled OUTPUT A, B, C.
- Verify all connections are correct and secure before restoring power.
6. Operation
The TM-163 timer switch allows for precise scheduling of electrical loads. Familiarize yourself with the control buttons:
- Clock: Used to set the current time and day.
- Program: Enters program setting mode.
- Week: Selects the day(s) of the week for programming.
- Hour: Adjusts the hour.
- Minute: Adjusts the minute.
- C/R (Cancel/Recall): Clears or recalls program settings.
- Manual: Provides temporary manual override of the programmed state.
6.1 Setting the Current Time and Day
- Press the Clock button.
- While holding Clock, press Week to set the current day of the week.
- While holding Clock, press Hour to set the current hour.
- While holding Clock, press Minute to set the current minute.
- Release the Clock button to save the settings.
6.2 Programming ON/OFF Times
The timer supports up to 17 ON/OFF program settings. Each setting can be programmed for specific days of the week, with a minimum interval of one minute and a maximum duration of 168 hours (one week).
- Press the Program button once to enter the first ON setting (display shows "1 ON").
- Press Week to select the desired day(s) for this program (e.g., MO, TU, WE, TH, FR, SA, SU, or combinations like MO-FR, SA-SU, MO-SA, etc.).
- Press Hour to set the desired ON hour.
- Press Minute to set the desired ON minute.
- Press Program again to enter the first OFF setting (display shows "1 OFF").
- Repeat steps 2-4 to set the desired OFF time for the first program.
- Continue pressing Program to cycle through the remaining 16 ON/OFF settings, repeating the setting process for each. If fewer than 17 programs are needed, press Clock to exit programming mode.
- To clear a specific program setting, navigate to that setting using the Program button and then press C/R.
6.3 Manual Override
The Manual button allows you to temporarily override the current programmed state (ON or OFF) without affecting the stored programs. Pressing Manual will cycle through ON, AUTO, and OFF modes. In AUTO mode, the timer follows the programmed schedule.
7. Maintenance
The LiebeWH TM-163 timer switch is designed for minimal maintenance. Follow these guidelines to ensure longevity:
- Cleaning: Periodically wipe the exterior of the device with a soft, dry cloth. Do not use abrasive cleaners or solvents. Ensure no liquids enter the device.
- Battery: The built-in rechargeable battery provides power-off memory. This battery is not user-serviceable. If the power-off memory function degrades significantly, the unit may require professional servicing or replacement.
- Connections: Occasionally check wiring connections to ensure they remain tight and free from corrosion.
8. Troubleshooting
If you encounter issues with your TM-163 timer switch, refer to the following common problems and solutions:
| Problem | Possible Cause | Solution |
|---|---|---|
| Display is blank or dim. | No power supply; internal battery depleted. | Check power connections. If power is present, allow the unit to charge its internal battery for several hours. |
| Timer does not switch ON/OFF at programmed times. | Incorrect program settings; manual override engaged; incorrect current time. | Verify program settings (ON/OFF times, days). Ensure the timer is in AUTO mode (not manual ON/OFF). Check and correct the current time and day. |
| Load does not turn ON/OFF. | Faulty wiring; overloaded circuit; faulty load. | Inspect wiring connections for looseness or damage. Ensure the load current does not exceed 16A per phase. Test the load independently to confirm it is functional. |
| Program settings are lost after power outage. | Internal rechargeable battery is depleted or faulty. | The internal battery may need charging (allow unit to be powered for 24 hours) or may be at the end of its life. If the issue persists, contact support. |
9. Warranty and Support
For warranty information or technical support, please refer to the product packaging or contact LiebeWH customer service. You can also visit the official LiebeWH store for additional resources and contact options.
LiebeWH Official Store: Visit the LiebeWH Store on Amazon