Introduction
This manual provides detailed instructions for the installation, operation, and maintenance of your Soundstream VM-26BP Digital Audio Head Unit. Please read this manual thoroughly before using the product to ensure proper operation and to prevent damage.
Safety Information
- Ensure proper wiring connections to avoid short circuits or electrical damage.
- Do not attempt to disassemble or modify the unit. This may void the warranty and cause damage.
- Consult a qualified professional for installation if you are unsure about any steps.
- Keep the unit away from moisture and extreme temperatures.
- Always operate your vehicle safely. Adjust audio settings only when it is safe to do so.
Package Contents
Verify that all items are present in the package:
- Soundstream VM-26BP Digital Audio Head Unit
- Mounting sleeve
- Wiring harness
- Remote control
- Instruction Manual (this document)
- Other accessories (screws, removal keys, etc.)
Setup and Installation
Mounting the Head Unit
- Remove the existing head unit from your vehicle's dashboard.
- Insert the provided mounting sleeve into the dashboard opening. Bend the tabs to secure it.
- Connect the wiring harness to the vehicle's electrical system and the VM-26BP unit. Ensure all connections are secure and correctly matched (refer to the wiring diagram below).
- Slide the VM-26BP head unit into the mounting sleeve until it locks into place.
- Test all functions before reassembling the dashboard trim.
Wiring Diagram
A typical wiring diagram for the VM-26BP is provided below. Colors and functions may vary slightly by vehicle. Always consult your vehicle's service manual for specific wiring details.
- Yellow: Constant 12V (Battery)
- Red: Switched 12V (Accessory/Ignition)
- Black: Ground
- Blue: Remote Turn-On (for amplifier/power antenna)
- Orange: Illumination
- Speaker Wires:
- White/White-Black: Front Left Speaker
- Gray/Gray-Black: Front Right Speaker
- Green/Green-Black: Rear Left Speaker
- Purple/Purple-Black: Rear Right Speaker
- RCA Outputs: Front Left, Front Right, Subwoofer (connect to external amplifiers if used).
Operating Instructions
Front Panel Controls
The VM-26BP features a user-friendly front panel with illuminated keys. Refer to the image below for key identification.
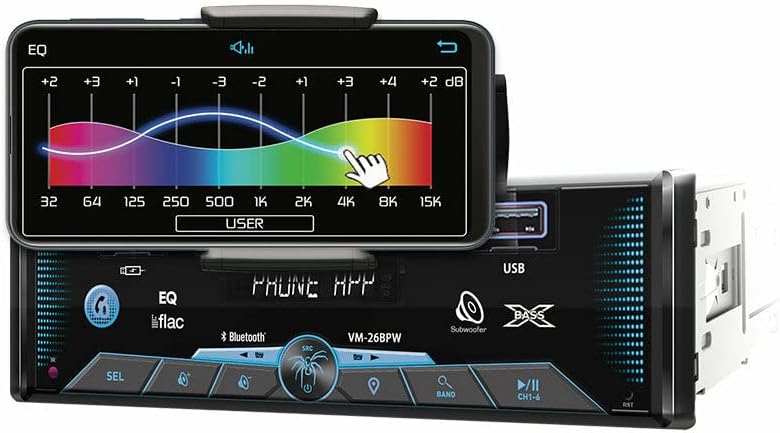
Image Description: A front view of the Soundstream VM-26BP head unit. A smartphone is mounted in the integrated phone holder, displaying an equalizer interface from the Soundstream Commander App. The head unit's front panel shows various buttons, a USB port, and the brand logo. The display area indicates "PHONE APP" and "Bluetooth".
- Power/Mode Button: Press to turn on/off, short press to cycle through sources (Radio, USB, SD, Bluetooth, AUX).
- Volume Knob: Rotate to adjust volume. Press to access audio settings (Bass, Treble, Balance, Fader, EQ).
- USB Port (Front): For digital audio playback and 2A/5V charging.
- SD Card Slot: For digital audio playback.
- Bluetooth Button: Initiates Bluetooth pairing mode.
- Band Button: In radio mode, cycles through FM1, FM2, FM3, AM1, AM2 bands.
- Seek/Track Buttons: Short press to change radio stations or tracks. Long press for fast forward/rewind.
- Phone Holder: Adjustable cradle to secure most smartphones.
Bluetooth Operation
- Pairing:
- Ensure Bluetooth is enabled on your mobile device.
- On the VM-26BP, select Bluetooth as the source. The unit will enter pairing mode.
- Search for "Soundstream" or "VM-26BP" on your mobile device's Bluetooth settings.
- Select the unit to pair. A confirmation tone will sound upon successful pairing.
- Phone Calls:
- Answer incoming calls by pressing the phone button on the unit or remote.
- End calls by pressing the phone button again.
- Use the built-in microphone for hands-free communication.
- Audio Streaming (A2DP):
- Once paired, audio from your mobile device will stream wirelessly to the VM-26BP.
- Use the seek/track buttons to control playback (play/pause, next/previous track).
- Push-To-Talk (AI Assistant):
- Press and hold the designated button (often the phone button) to activate your smartphone's AI assistant (e.g., Siri, Google Assistant).
USB/SD Playback
- Insert a USB drive into the front USB port or an SD card into the SD card slot.
- The unit will automatically switch to USB/SD source and begin playback. If not, press the Mode button to select.
- Supported formats include FLAC, WMA, AAC, and APE.
- Use the seek/track buttons to navigate through files and folders.
Radio Operation
- Press the Mode button to select FM or AM radio.
- Press the Band button to cycle through FM1, FM2, FM3, AM1, AM2.
- Auto Seek: Long press the seek buttons to automatically scan for the next strong station.
- Manual Seek: Short press the seek buttons to fine-tune the frequency.
- Preset Stations: Long press a numbered preset button (1-6) to save the current station. Short press to recall a saved station.
Soundstream Commander App
The Soundstream Commander App enhances control and customization of your VM-26BP unit. Download the app from your smartphone's app store.
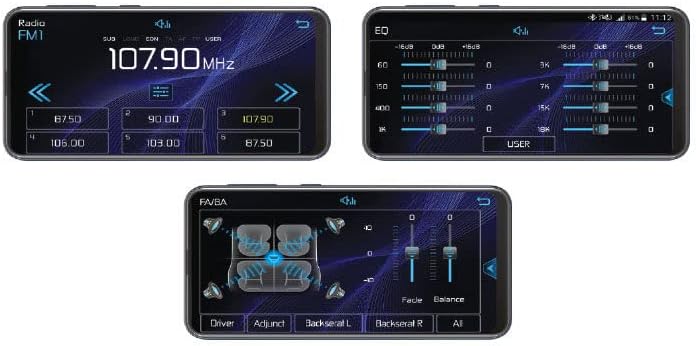
Image Description: Three smartphone screen captures showing the Soundstream Commander App interface. The top left shows a radio tuner at 107.90 MHz with preset buttons. The top right displays a 10-band graphic equalizer with sliders for frequency adjustment. The bottom image shows fader and balance controls, allowing adjustment of audio output to different speaker zones (Driver, Adjunct, Backseat L, Backseat R).
- Connection: Connect your smartphone to the VM-26BP via Bluetooth. Launch the Soundstream Commander App.
- Equalizer (EQ): The app provides a 10-band, 16dB boost/cut equalizer for precise audio tuning. Adjust frequency bands to customize your sound profile.
- Fader/Balance: Adjust the audio distribution between front/rear and left/right speakers for optimal sound staging within your vehicle.
- Radio Control: Tune stations, save presets, and switch bands directly from the app interface.
- Source Selection: Easily switch between various audio sources (Radio, USB, Bluetooth, etc.).
Specifications
| Feature | Detail |
|---|---|
| Model Number | VM-26BP |
| Chassis Type | 1-DIN ISO |
| Connectivity Technology | Bluetooth, RCA, USB |
| Bluetooth Version | 4.0 (Phone Calls + Fast A2DP Audio Streaming) |
| USB Charging Port | Front-Panel, 2A/5V |
| Supported Audio Formats | FLAC, WMA, AAC, APE |
| Equalizer | 10-Band, 16dB Boost/Cut EQ |
| Output Power | 300 Watts Max Class A/B Full Range Speaker Amplifier |
| Number of Channels | 4 |
| RCA Preamp Outputs | Front Left, Front Right, 4-Channel Subwoofer |
| Illumination | 7-Color RGB LED Illuminated Keys and Accents |
| Compatible Devices | Smartphone, Speaker |
| Special Feature | Equalizer, Phone Holder, Soundstream Commander App compatibility |
Maintenance
- Cleaning: Use a soft, dry cloth to clean the unit's surface. Do not use abrasive cleaners or solvents.
- Dust: Regularly remove dust from the front panel and ports to ensure proper function.
- Connections: Periodically check all wiring connections to ensure they are secure.
Troubleshooting
| Problem | Possible Cause | Solution |
|---|---|---|
| No power | Incorrect wiring; Blown fuse; Vehicle battery issue | Check power and ground connections. Inspect vehicle's fuse box and the unit's fuse. Verify battery voltage. |
| No sound | Volume too low; Mute activated; Incorrect speaker wiring; Amplifier not powered | Increase volume. Deactivate mute. Check speaker connections. Ensure external amplifier (if used) is powered on. |
| Bluetooth not connecting | Device not in pairing mode; Incorrect pairing procedure; Interference | Ensure both devices are in pairing mode. Delete previous pairings and try again. Move closer to the unit. |
| USB/SD not playing | Unsupported file format; Corrupt files; Drive/card not properly inserted | Ensure files are in supported formats (FLAC, WMA, AAC, APE). Reinsert the USB drive/SD card. Try a different drive/card. |
| Remote control not working | Dead battery; Obstruction; Not pointed correctly | Replace remote battery. Ensure no obstructions between remote and unit. Point remote directly at the unit's IR sensor. |
Warranty Information
Soundstream products are designed and manufactured to the highest quality standards. For specific warranty terms and conditions, please refer to the warranty card included with your product or visit the official Soundstream website. Keep your purchase receipt as proof of purchase for warranty claims.
Customer Support
If you encounter any issues not covered in this manual or require further assistance, please contact Soundstream customer support. Contact information can typically be found on the official Soundstream website or on the product packaging.
Website: www.soundstream.com (Example link, actual link may vary)