1. Important Safety Instructions
Please read all instructions carefully before using your OSTBA Electric Deli Food Slicer. Failure to follow these instructions may result in electric shock, fire, or serious personal injury.
- Child Lock Protection: The slicer is equipped with a child lock. To operate, you must press both the SAFETY LOCK and POWER BUTTON simultaneously. This prevents accidental activation.
- Blade Safety: The 7.5-inch stainless steel blade is extremely sharp. Always handle with extreme care. Use cut-resistant gloves when removing or cleaning the blade.
- Stable Placement: Ensure the slicer is placed on a stable, flat, and dry surface. The non-slip suction cup feet must be engaged to keep the machine stable during operation.
- Power Supply: Connect the appliance only to a grounded electrical outlet with the correct voltage (120V~60Hz). Do not use with an adapter or extension cord unless absolutely necessary and rated for the appliance's power.
- Supervision: Never leave the appliance unattended while in operation. Keep children and pets away from the slicer.
- Food Pusher: Always use the food pusher to guide food towards the blade. Never use your hands directly.
- Cleaning: Always unplug the slicer before cleaning. Ensure all moving parts have stopped. Refer to the 'Maintenance and Cleaning' section for detailed instructions.
- Damaged Cord/Plug: Do not operate any appliance with a damaged cord or plug. Contact customer support for assistance.
2. Setup
2.1 Unpacking and Component Identification
Carefully remove all components from the packaging. Verify that all parts are present:
- Main Slicer Unit
- 7.5-inch Serrated Stainless Steel Blade (pre-installed or separate)
- 7.5-inch Non-Serrated Stainless Steel Blade (additional)
- Food Carriage
- Food Pusher (BPA-Free)
- Slide-rod Extension
2.2 Placement and Stability
Place the slicer on a clean, dry, and stable countertop. Press down firmly on the top of the unit to engage the non-slip suction cup feet. This ensures the slicer remains secure during use.
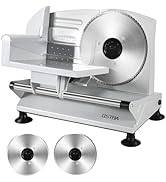
Image Description: This image highlights three key features: the BPA-Free Food Pusher for even slicing, the Child Lock Protection requiring simultaneous button presses, and the Strong Suction Feet that stabilize the slicer on the countertop.
2.3 Blade Installation (if not pre-installed)
If the blade is not already installed, align the center of the blade with the motor shaft. Gently push and turn the central knob clockwise until it locks securely into place. Ensure the blade is firmly attached before proceeding.

Image Description: A hand demonstrates the removal or installation of the stainless steel blade, emphasizing its detachable design for easy cleaning and interchangeability.
3. Operating Instructions
3.1 Powering On and Safety Lock
Plug the slicer into a grounded electrical outlet. To turn the slicer ON, simultaneously press and hold both the SAFETY LOCK button and the POWER ON/OFF button. Release the buttons once the blade begins to rotate.
3.2 Adjusting Slice Thickness
The slicer features an adjustable thickness control knob, allowing you to select slice thickness from super thin (0mm) up to approximately 3/4 inch (15mm). Turn the knob located on the side of the slicer to your desired thickness setting before starting the motor.

Image Description: This image illustrates the 'Customize Thickness' feature, showing the adjustable control knob and visual examples of meat slices at 5mm, 10mm, and 15mm thicknesses.
3.3 Loading Food and Slicing Technique
Place the food item (meat, cheese, bread, vegetables) onto the food carriage. Secure it with the food pusher, ensuring your fingers are protected. Gently push the food carriage back and forth, guiding the food against the rotating blade. Apply steady, even pressure for consistent slices.
Slicing Different Foods:
- Meat: For best results, partially freeze fresh meat for 1-3 hours before slicing. Frozen meat should be defrosted for 20-30 minutes. Do not attempt to slice completely frozen meat with bones.
- Bread: The non-serrated blade is ideal for soft items like bread. Ensure the bread is firm enough to hold its shape.
- Cheese: For softer cheeses, chilling them slightly before slicing can help achieve cleaner cuts.

Image Description: This image displays the serrated blade, suitable for slicing meat, bread, and other slightly harder foods. It shows examples of raw meat and sliced bread.

Image Description: This image features the non-serrated blade, perfect for slicing fruits, vegetables, and cheese. It shows examples of a salad with shrimp and sliced cheese.
3.4 Official Product Videos
Meat Slicer - Features and Full Demo
Video Description: A comprehensive demonstration of the OSTBA Meat Slicer, showcasing its various features and providing a full operational demo for users. This video is provided by 'The Heavenly Homestead' (Seller).
Honest Reviews and Features of OSTBA Meat Slicer
Video Description: This video offers an honest review and highlights the key features of the OSTBA Meat Slicer, demonstrating its functionality and benefits. This video is provided by 'Tina Sullivan' (Seller).
Consistent Clean Cuts No More Squished Bread!
Video Description: A demonstration focusing on the slicer's ability to produce consistent, clean cuts, particularly highlighting its performance with bread to avoid squishing. This video is provided by 'Christine Noel' (Seller).
Meat and Bread Slicer Kitchen Essential
Video Description: A short video showcasing the OSTBA Meat Slicer as a versatile kitchen essential for both meat and bread, demonstrating its ease of use. This video is provided by 'Robin' (Seller).
4. Maintenance and Cleaning
Regular cleaning is crucial for hygiene and to maintain the performance and longevity of your slicer. Always unplug the appliance before cleaning.
4.1 Disassembly for Cleaning
The OSTBA Meat Slicer is designed for easy disassembly to facilitate thorough cleaning:
- Remove the food pusher and food carriage by sliding them off the guide rod.
- To remove the blade, press the central knob and turn it counter-clockwise until the blade detaches.
- The slide-rod extension can also be removed for comprehensive cleaning.

Image Description: This image illustrates the 'Detachable Accessories' of the slicer, showing how the blade, food pusher, and food carriage can be easily removed for cleaning.
4.2 Cleaning Instructions
- Blade Care: Wipe the blade with a damp cloth and mild detergent after each use. Do not immerse the blade in water to prevent rust. Dry thoroughly immediately after cleaning. For long-term storage, lightly oil the blade with food-safe oil.
- Dishwasher Safe Parts: The stainless steel blade is dishwasher safe. Other removable parts like the food carriage and food pusher can also be washed in the dishwasher or by hand with warm, soapy water.
- Main Unit: Wipe the main unit with a damp cloth. Do not immerse the motor housing in water.

Image Description: This image provides essential 'Blade Care Tips' for your OSTBA Slicer, advising to clean after each use, avoid soaking, dry thoroughly, use food-safe oil for storage, and handle with care using cut-resistant gloves.
5. Troubleshooting
If you encounter issues with your slicer, please refer to the following common problems and solutions:
- Slicer Does Not Turn On:
- Ensure the power cord is securely plugged into a working electrical outlet.
- Remember to simultaneously press both the SAFETY LOCK and POWER ON/OFF buttons to activate the slicer.
- Inconsistent or Poor Slicing:
- Check the thickness setting and adjust as needed.
- Ensure the food item is properly positioned on the food carriage and held firmly by the food pusher.
- For meat, ensure it is partially frozen for optimal slicing. For bread and cheese, ensure they are firm enough.
- The blade may need cleaning if debris is affecting its performance.
- Slicer Moves During Operation:
- Ensure the non-slip suction cup feet are fully engaged on a clean, dry, and smooth surface.
6. Specifications
| Feature | Detail |
|---|---|
| Brand | OSTBA |
| Model Number | SL-518 |
| Power | 200W |
| Blade Material | Stainless Steel |
| Blade Length | 7.5 Inches |
| Adjustable Thickness | 0-15mm |
| Product Dimensions | 14.6"L x 9.4"W x 10.2"H |
| Item Weight | 8.6 Pounds |
| Special Features | Adjustable Thickness, Anti-Slip, Child Lock Switches, Dishwasher Safe (blade), Interchangeable Blades |
| Recommended Uses | Bread, Cheese, Fruits, Meat, Vegetable |
7. Warranty and Support
For warranty information and customer support, please refer to the documentation included with your product or visit the official OSTBA website. If you have any questions or require assistance, do not hesitate to contact OSTBA customer service.


