1. Product Overview
The ORIA LED Digital Alarm Clock (Model OUS-WA33R) features a large 6.5-inch display with clear red digits, making it easy to read from a distance. It offers multiple functionalities including time, date, temperature display, adjustable brightness, and three alarm modes with a snooze function. The clock supports dual power supply options: USB for continuous display and AAA batteries for power-saving mode with voice control.

2. Package Contents
Please verify that all items are present in your package:
- 1 x ORIA LED Digital Alarm Clock (Model OUS-WA33R)
- 1 x USB Cable (White, approximately 39.37 inches / 1 meter in length)
- 1 x User Manual

3. Controls and Display
The clock features an intuitive button layout on the back for easy operation and a clear LED display on the front.
3.1. Button Functions
- DOWN Button: Decreases values during setting, adjusts brightness.
- UP Button: Increases values during setting, adjusts brightness.
- LIGHT/SNOOZE Button: Short press to adjust brightness, long press to activate snooze during alarm.
- MODE Button: Cycles through display modes (Clock, Date, Temperature, Night Mode ON/OFF). Long press to enter setting mode for current display.
- ALARM Button: Short press to view alarm mode, short press again to turn alarm ON/OFF. Long press to enter alarm setting mode.

3.2. Display Features
- Large LED Digits: 6.5-inch display for excellent visibility.
- Time Display: Shows current time in 12-hour or 24-hour format.
- Date Display: Shows year, month, and day.
- Temperature Display: Shows ambient temperature.
- Alarm Indicator: A small icon indicates when an alarm is set.

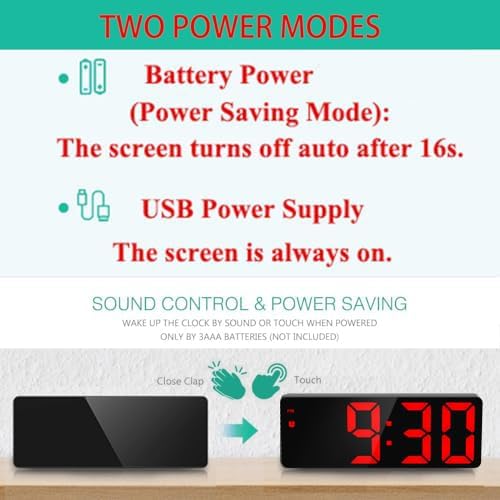
4. Power Supply
The ORIA LED Digital Alarm Clock offers flexible power options:
- USB Power Supply: Connect the provided USB cable to a 5V 1A USB power adapter (not included) or a USB port. When powered by USB, the display remains continuously on.
- AAA Batteries: Insert 3 AAA batteries (not included) into the battery compartment. In battery-only mode, the screen will automatically turn off after 16 seconds to conserve power. The display can be reactivated by sound (e.g., clap) or touch. This mode also provides a time memory function.

5. Initial Setup
5.1. Connecting Power
- Connect the small end of the provided USB cable to the DC 5V port on the back of the alarm clock.
- Connect the larger USB end to a compatible USB power adapter or a powered USB port.
- The display will light up, indicating the clock is powered on.
5.2. Inserting Batteries (Optional)
- Open the battery compartment cover on the back of the clock.
- Insert 3 new AAA batteries, ensuring correct polarity (+/-).
- Close the battery compartment cover securely.
6. Operating Instructions
6.1. Setting Time
- Press the MODE button to ensure the clock is in time display mode.
- Long press the MODE button until the 12/24 hour format starts flashing.
- Use the UP or DOWN buttons to select your preferred format (12H or 24H).
- Press MODE again to set the hour. Use UP or DOWN to adjust.
- Press MODE again to set the minute. Use UP or DOWN to adjust.
- Press MODE to confirm and exit time setting.
6.2. Setting Date
- Press the MODE button until the date (e.g., 2024-01-01) is displayed.
- Long press the MODE button until the year starts flashing.
- Use the UP or DOWN buttons to adjust the year.
- Press MODE again to set the month. Use UP or DOWN to adjust.
- Press MODE again to set the day. Use UP or DOWN to adjust.
- Press MODE to confirm and exit date setting.
6.3. Setting Alarm
- Short press the ALARM button to display the alarm time.
- Long press the ALARM button until the hour starts flashing.
- Use the UP or DOWN buttons to adjust the alarm hour.
- Press ALARM again to set the alarm minute. Use UP or DOWN to adjust.
- Press ALARM again to set the snooze duration (1-60 minutes). Use UP or DOWN to adjust. Default is 5 minutes.
- Press ALARM again to select the weekday alarm mode:
- 1-7: Alarm sounds every day (Monday to Sunday).
- 1-6: Alarm sounds Monday to Saturday.
- 1-5: Alarm sounds Monday to Friday.
- Press ALARM to confirm and exit alarm setting.
- To turn the alarm ON/OFF, short press the ALARM button when in alarm display mode. An alarm icon will appear/disappear.
The alarm ringing sequence is: first a single 'di' sound, then 'didi', then 'dididi', and finally a continuous 'di' for 1 minute.

6.4. Snooze Function
When the alarm sounds, press the LIGHT/SNOOZE button to activate the snooze function. The alarm will pause for the set snooze duration (1-60 minutes) and then sound again.
6.5. Brightness Adjustment & Night Mode
The clock offers 3 levels of brightness and an automatic night mode:
- Manual Adjustment: Short press the LIGHT/SNOOZE button to cycle through Bright, Medium, and Low brightness levels.
- Night Mode: To activate/deactivate Night Mode, press the MODE button until "Night Mode ON/OFF" is displayed. Long press MODE to toggle ON or OFF. When ON, the clock will automatically switch to low brightness between 18:00 (6 PM) and 6:00 (6 AM).

6.6. Display Modes & Cycle Display
The clock can display time, date, and temperature. You can choose to cycle through them or display only the time.
- Switching Modes: Short press the MODE button to cycle through Clock mode, Date mode, Temperature mode, and Night mode ON/OFF.
- Cycle Display Function: In Temperature mode, long press the MODE button. You will hear a 'Bi' sound. The LED will then cycle through Time (10 seconds), Date (3 seconds), and Temperature (3 seconds).
- Display Time Only: To stop the cycle display and show only the time, long press the MODE button again.
6.7. Voice Control (Battery Mode Only)
When the clock is powered by AAA batteries and the display is off (power-saving mode), you can activate the display by making a sound (e.g., a clap) or by touching the clock. The display will light up for 16 seconds.
6.8. Official Product Video Guide
For a visual demonstration of the clock's functions, please watch the official product video below.
7. Specifications
| Feature | Description |
|---|---|
| Brand | ORIA |
| Model Number | OUS-WA33R |
| Color | Black Case + Red Digit |
| Display Type | Digital LED |
| Product Dimensions | 6.3"W x 2.36"H (160mm x 60mm) |
| Item Weight | 5.3 ounces (0.15 Kilograms) |
| Power Source | Corded Electric (USB) / 3 AAA Batteries (not included) |
| Special Features | Alarm, Illuminated, Large Display, Snooze, 3 Adjustable Brightness Levels, USB Charging Ports, Night Mode, Voice Control (battery mode) |
| Time Display | 12/24 hours |
| Snooze Function | Adjustable 5-60 minutes |
| Night Mode | Auto low brightness (18:00 - 6:00) |
8. Troubleshooting
If you encounter any issues with your ORIA LED Digital Alarm Clock, please refer to the following common solutions:
- Display Not Staying On: If the display turns off after 16 seconds, the clock is likely running on battery power in power-saving mode. For a continuous display, ensure the clock is connected via the USB cable to a power source.
- Alarm Not Sounding: Verify that the alarm is set correctly and is turned ON (check for the alarm icon on the display). Ensure the volume is not set to minimum if applicable (this model has a fixed buzzer sound).
- Buttons Unresponsive: Disconnect the power and remove batteries (if inserted) for a few minutes, then reconnect. This can reset the device.
- Incorrect Time/Date: Follow the detailed instructions in Section 6.1 and 6.2 to reset the time and date accurately.
- Display Too Bright/Dim: Use the LIGHT/SNOOZE button to manually adjust brightness. Check if Night Mode is active and adjust settings if necessary (Section 6.5).
If the problem persists, please contact customer support.
9. Warranty and Support
ORIA is committed to providing high-quality products and excellent customer service. Your ORIA LED Digital Alarm Clock comes with the following:
- 1-Year Warranty: Covers manufacturing defects and malfunctions under normal use.
- 90-Day Free Replacements: For any product issues within the first 90 days.
- 30-Day Free Returns: Hassle-free returns within 30 days of purchase.
- 24/7 Customer Support: Dedicated support team available around the clock to assist you.
- Lifetime Technical Support: Ongoing technical assistance for the lifespan of your product.

For further assistance or to claim warranty services, please visit the official ORIA website or contact our customer support team directly.


