Introduction
This manual provides instructions for the safe and effective use of the Cleiscry 3W RGB LED Emitter with 20mm Star Base. This high-power LED is designed for various lighting applications, offering Red, Green, and Blue color output for dynamic illumination.
The product includes 10 individual 3W RGB LED emitters, each mounted on a 20mm star-shaped Printed Circuit Board (PCB) for easy integration into custom lighting projects.
Safety Information
- Always disconnect power before installing, wiring, or performing any maintenance on the LED emitters.
- Ensure that the power supply used matches the specified voltage and current requirements for each LED color channel to prevent damage.
- Avoid direct, prolonged eye exposure to the LED light, as it can be intense.
- Handle the LED emitters with care to prevent physical damage to the delicate components.
- Proper heat management is crucial for the longevity and performance of high-power LEDs. Always use an appropriate heatsink.
- Installation should be performed by qualified personnel if you are unfamiliar with electrical wiring.
Package Contents
Verify that all items are present upon opening the package:
- 10 x Cleiscry 3W RGB LED Emitters with 20mm Star Base

Image: Ten Cleiscry 3W RGB LED emitters on 20mm star bases, arranged in rows, showing the quantity included in the package.
Setup and Wiring
The Cleiscry 3W RGB LED emitter features a 6-pin configuration on a 20mm star PCB, designed for easy integration into custom lighting projects. Proper wiring and heat management are essential for optimal performance and longevity.
1. Heat Management
High-power LEDs generate significant heat. It is critical to mount each LED emitter onto an adequate heatsink using thermal paste or thermal adhesive. Failure to do so will result in overheating, reduced lifespan, and potential damage to the LED.
2. Wiring Connections
The 6-pin star base typically features separate positive and negative terminals for each Red, Green, and Blue LED chip. Refer to the pinout diagram for correct connections. This model uses a common anode configuration, meaning the 'B+' pin is the common positive connection for all three colors.
- R: Red LED Negative Terminal
- G: Green LED Negative Terminal
- B: Blue LED Negative Terminal
- B+: Common Positive Terminal (Anode)
Connect the 'B+' pin to the positive output of your power supply. Connect the 'R', 'G', and 'B' pins to the negative outputs of your respective constant current drivers or current-limiting resistors. Each color channel requires its own current control.

Image: Close-up view of the 3W RGB LED emitter on its star base, highlighting the pin labels for Red, Green, Blue, and the common positive (B+).
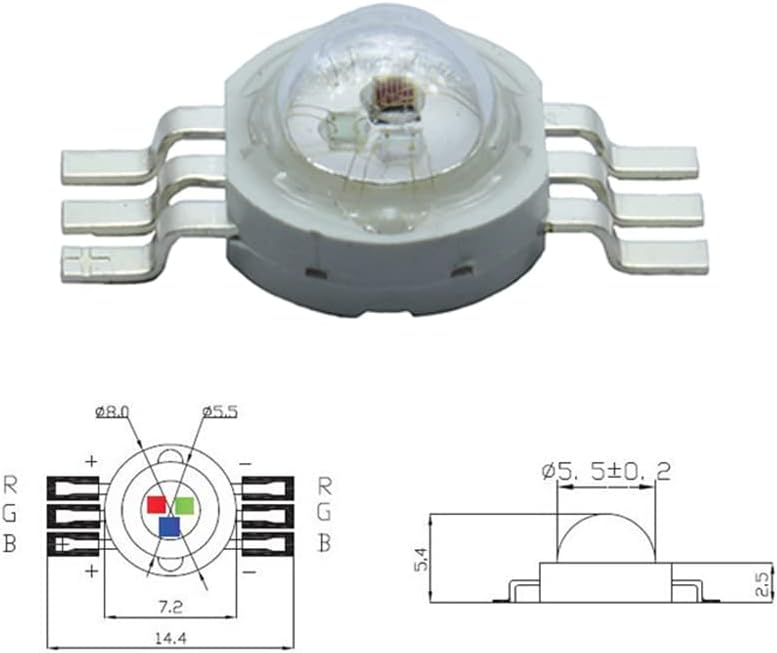
Image: Technical diagram illustrating the dimensions and pin configuration of the 3W RGB LED emitter, including the 6-pin layout.
Operating Instructions
Once properly wired and mounted to a heatsink, the Cleiscry 3W RGB LED emitter can be operated by applying the specified forward voltage and current to each color channel.
- Power On: Apply power to your constant current drivers or power supply. The LED will illuminate according to the current supplied to each R, G, and B channel.
- Color Control: To achieve different colors, you will need an external RGB LED controller that can independently adjust the current or pulse-width modulation (PWM) to the Red, Green, and Blue channels. This allows for mixing colors and creating various lighting effects.
- Voltage and Current: Ensure that the operating voltage and current for each color channel remain within the specified limits to prevent damage and ensure optimal performance.

Image: The 3W RGB LED emitter shown with examples of its individual Red, Green, and Blue light outputs.
Maintenance
The Cleiscry 3W RGB LED emitters are designed for long-term operation with minimal maintenance. However, adhering to these guidelines can help ensure their continued performance:
- Cleaning: Periodically inspect the LED surface for dust or debris. Gently clean with a soft, dry cloth. Avoid using abrasive cleaners or solvents.
- Heat Sink Inspection: Ensure that the heatsink remains free of dust buildup, which can impede heat dissipation. Clean the heatsink fins if necessary to maintain proper airflow.
- Wiring Integrity: Occasionally check wiring connections for any signs of wear, corrosion, or loose contacts.
Troubleshooting
If you encounter issues with your Cleiscry 3W RGB LED emitters, refer to the following troubleshooting guide:
| Problem | Possible Cause | Solution |
|---|---|---|
| LED does not light up. | No power, incorrect wiring, reversed polarity, faulty LED. |
|
| One or more colors are not illuminating. | Faulty wiring for specific color channel, issue with current driver for that channel. |
|
| LED is dim or flickers. | Insufficient power, overheating, loose connection. |
|
| LED emits incorrect color. | Incorrect wiring of R, G, B channels. |
|
Specifications
| Feature | Detail |
|---|---|
| Brand | Cleiscry |
| Model | 6pin RGB LED with PCB |
| Light Type | LED |
| Emitted Color | RGB (Red, Green, Blue) |
| Power | 3 Watts (per emitter) |
| DC Forward Voltage (VF) - Red | 2.0-2.5Vdc |
| DC Forward Voltage (VF) - Green | 3.2-3.6Vdc |
| DC Forward Voltage (VF) - Blue | 3.2-3.6Vdc |
| DC Forward Current (IF) - Red | 350mA |
| DC Forward Current (IF) - Green | 350mA |
| DC Forward Current (IF) - Blue | 350mA |
| Luminous Intensity - Red | 20-30LM |
| Luminous Intensity - Green | 30-40LM |
| Luminous Intensity - Blue | 10-15LM |
| Wavelength - Red | 620-625nm |
| Wavelength - Green | 520-530nm |
| Wavelength - Blue | 460-465nm |
| Star Base Diameter | 20mm |
| Material Type | Copper (for PCB) |
| Special Feature | Energy Efficient |
| Indoor/Outdoor Usage | Outdoor (as per product specifications, for suitable enclosures) |
| Quantity | 10 pcs |
Warranty and Support
For warranty information or technical support regarding your Cleiscry 3W RGB LED Emitters, please contact the manufacturer directly through their official website or the retailer from whom the product was purchased. Please have your purchase details and product model number available when contacting support.