Introduction
The NineLeaf Bike Alarm is a wireless security device designed to protect your bicycle, motorcycle, e-bike, or electric scooter from theft. Featuring a vibration motion sensor, it emits a loud 113dB alarm to deter potential thieves and alert you to unauthorized movement. This alarm is also IP55 waterproof, making it suitable for various outdoor conditions. It includes a remote control for convenient arming, disarming, and other functions.
This manual provides detailed instructions on how to set up, operate, and maintain your NineLeaf Bike Alarm.

Image: NineLeaf Bike Alarm unit and remote control.
Specifications
| Alarm Battery Type | 3 x AAA alkaline batteries (not included) |
| Alarm Standby Time | 6-10 months |
| Remote Battery Type | 1 x 12V/27A alkaline battery (included) |
| Remote Standby Time | Over 1 year |
| Wireless Range | Up to 30 meters (100 feet) |
| Working Temperature | -20°C to 60°C (-4°F to 140°F) |
| Storage Temperature | -30°C to 70°C (-22°F to 158°F) |
| Alarm Loudness | Up to 113dB |
| Waterproof Rating | IP55 |
| Adjustable Sensitivity | 7 levels |
| Adjustable Volume | 3 levels |
| Dimensions | Approximately 3.7" x 1.6" x 0.8" |
| Item Weight | 4 ounces |
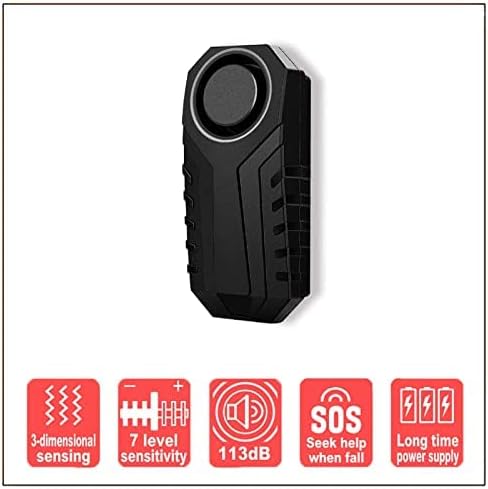
Image: Key features of the NineLeaf Bike Alarm.
Setup
1. Battery Installation
The alarm unit requires 3 AAA alkaline batteries (not included). The remote control requires 1 x 12V/27A alkaline battery (included).
- Open the battery compartment of the alarm unit.
- Insert 3 AAA alkaline batteries, ensuring correct polarity.
- Close the battery compartment.
- For the remote, ensure the pre-installed 12V/27A battery is active.
2. Powering On the Alarm
- Press and hold the Arm key on the remote control until the alarm emits a short "Bi" sound.
- Gently shake the alarm unit. You will hear three short "Bi" sounds, indicating that the alarm is powered on and ready for use.
3. Installation
The alarm can be installed using the provided double-sided sticker or strap. No screws or wiring are required.
- Using Double-Sided Sticker: Clean the desired surface on your vehicle. Apply the sticker to the back of the alarm and firmly press it onto the surface.
- Using Strap: Secure the alarm to a suitable part of your vehicle (e.g., seat post, frame) using the provided strap.

Image: Examples of the NineLeaf Bike Alarm installed on various vehicles.
Operation
Arming and Disarming
- To Arm: Press the Arm button on the remote control. The alarm will emit a confirmation sound.
- To Disarm: Press the Disarm button on the remote control. The alarm will emit a confirmation sound.
Adjusting Touch Sensitivity (7 Levels)
The alarm has 7 levels of sensitivity, from a gentle touch to a strong impact. "Do" represents the highest sensitivity.
- Long press the Disarm key on the remote control until the LED light on the remote stays lit.
- While the LED is lit, press the Arm key. Each press will cycle through the sensitivity levels from high to low.
- You will hear different tones (do, re, mi, fa, sol, la, si) corresponding to the sensitivity levels. "Do" is the highest sensitivity.
- Release the buttons to set the desired sensitivity.

Image: Visual representation of the 7 adjustable sensitivity levels.
Changing Electrical Bell Sound (3 Types)
The alarm offers 3 different bell sounds for the vehicle search function (not available in armed mode).
- Ensure the alarm is in disarm mode.
- Press the Bell button on the remote control to cycle through the available bell sounds.
Searching Vehicle
To locate your vehicle in a parking lot, press the Bell button on the remote control. The alarm will sound, helping you find your vehicle.
SOS Functions (Fall Help)
The SOS function can be activated to automatically call for help if the alarm unit detects an accidental fall (tilt more than 45 degrees). If the normal position is restored, the call for help will automatically turn off.

Image: Explanation of the SOS fall help function.
Battery Low Indication
The alarm unit will provide an indication when its batteries are low, prompting you to replace them.
Pairing Remote Controls
The NineLeaf Bike Alarm can be paired with a maximum of 8 remote controls.
1. Pairing the First Remote Control
- Remove the batteries from the alarm unit. Wait for 30 seconds.
- Reinstall the batteries into the alarm unit.
- Long press the Ringtone key (often represented by a bell icon) on the remote control.
- After the alarm emits a "Bi" sound, press the Arm key on the remote control.
- The alarm will sound "Bi...Bi" twice, confirming successful pairing.
Video: Instructions on how to pair the first remote control with the NineLeaf Bike Alarm.
2. Pairing Additional Remote Controls
You can pair additional remotes one by one. If you pair more than 8 remotes, the code of the first remote will be overwritten.
- First, disarm the alarm using an already paired remote control.
- Long press the Ringtone key (often represented by a bell icon) on the first paired remote control to enter code learning mode.
- After the alarm emits a "Bi" sound, press the Arm or Disarm key on the new remote control you wish to pair.
- The alarm will sound "Bi...Bi" twice, confirming successful pairing of the new remote.
- Repeat for any other additional remotes.
3. Deleting Pairing (Resetting All Remotes)
This procedure will delete all paired remote controls from the alarm unit.
- Ensure the bike alarm is not in arming mode.
- Press and hold the Disarm button on any learned remote control.
- After hearing a single "Bi" sound, press the Bell button on the same remote control.
- You will hear "Bi...Bi...Bi" three times. At this point, all pairing codes in the alarm will be reset.
Maintenance
- Battery Replacement: Replace the alarm's AAA batteries when the low battery indicator is active. Replace the remote's 12V/27A battery approximately once a year or when its range decreases.
- Cleaning: Wipe the alarm unit and remote with a soft, dry cloth. Avoid using harsh chemicals or abrasive cleaners.
- Storage: If storing the alarm for an extended period, remove the batteries from the alarm unit to prevent leakage.
- Water Exposure: While IP55 waterproof, avoid submerging the device in water. Ensure the battery compartment is securely closed after battery changes.

Image: The IP55 waterproof feature of the NineLeaf Bike Alarm.
Troubleshooting
| Problem | Solution |
|---|---|
| Alarm does not power on. | Ensure AAA batteries are correctly installed with proper polarity and are not depleted. Follow the "Powering On the Alarm" steps. |
| Remote control does not work. | Check the 12V/27A battery in the remote. Ensure the remote is paired with the alarm. Re-pair if necessary. |
| Alarm sensitivity is too high/low. | Adjust the sensitivity settings as described in the "Adjusting Touch Sensitivity" section. |
| Alarm sounds unexpectedly. | Check sensitivity settings. Ensure the alarm is not exposed to strong vibrations or impacts. |
| Cannot pair additional remotes. | Ensure the alarm is in disarm mode before attempting to pair. Follow the "Pairing Additional Remote Controls" steps carefully. Remember a maximum of 8 remotes can be paired. |
Warranty and Support
NineLeaf is committed to providing quality products. For any questions, technical support, or warranty inquiries, please refer to the contact information provided with your purchase or visit the official NineLeaf website.
Please retain your proof of purchase for warranty purposes.