1. Introduction
This manual provides detailed instructions for the installation, operation, and maintenance of your METEESER 8-inch Wireless Carplay Android Auto Car Stereo. Please read this manual thoroughly before use to ensure proper functionality and to maximize your experience with the product.
This car stereo is designed for various Volkswagen, Jetta, Skoda, Golf, Tiguan, Passat, and Seat models, offering an 8-inch touchscreen display with integrated wireless Carplay and Android Auto, GPS navigation, Bluetooth connectivity, and support for a backup camera.

Image: METEESER 8-inch Car Stereo featuring Android 11, 4-core processor, 1GB RAM, 16GB ROM, and plug-and-play installation. Shows a 'Before' and 'After' comparison of a car dashboard with the stereo installed.
2. Product Overview
The METEESER car stereo enhances your driving experience with its advanced features:
- 8-Inch HD Touchscreen: A responsive and clear display for easy interaction.
- Wireless Carplay & Android Auto: Seamless smartphone integration for navigation, music, and communication.
- GPS Navigation: Supports both online and offline maps for reliable guidance.
- Bluetooth Connectivity: For hands-free calling and wireless audio streaming.
- HD Rear Camera Support: Provides a clear view for safe reversing.
- Steering Wheel Control Compatibility: Retains original steering wheel button functionality.
- Hi-Fi Audio: Delivers high-fidelity sound reproduction.

Image: Display of the car stereo showing Wireless Carplay and Android Auto interfaces, highlighting both wireless and wired connection methods.

Image: A detailed list of compatible and incompatible car models for the stereo, including various VW, Skoda, and Seat models.

Image: The car stereo displaying GPS navigation with map data and icons for popular navigation and media apps.
3. Setup and Installation
3.1. Harness Compatibility
Before installation, identify the correct power harness for your vehicle. The product includes 36-pin and 40-pin harnesses. A 52-pin harness may be optional depending on your car's original wiring.
To determine your car's harness type, compare it with the images provided. The number of pins and their configuration will indicate the correct harness.

Image: Visual guide for identifying 36-pin, 40-pin, and 52-pin power harnesses and their corresponding car connectors.
3.2. Wiring Instructions
The wiring method depends on whether your car requires a Canbus module. A Canbus is typically needed if your car has original features like steering wheel buttons, door information display, or reversing tracking.
Video: Detailed guide on wiring the 36-pin, 40-pin, and 52-pin power cables, including instructions for connecting with and without a Canbus module. This video also addresses common issues like battery drain and non-functional original car features.
Wiring Method Without Canbus:
- Connect the main harness to the car stereo.
- Do not connect the Canbus module.
- Connect the ACC (Accessory) wires (A and B connectors) directly.
Wiring Method With Canbus:
- Connect the Canbus module to the main harness.
- Connect the Canbus' power cable to the designated port on the car stereo.
- Disconnect the ACC (Accessory) wires (A and B connectors) from the main harness.
- After installation, navigate to "Setting -> factory settings (password 8888) -> protocol setting" and choose "Raise - VW" to configure the Canbus.
3.3. Backup Camera Installation
To install the backup camera:
- Connect the camera's video output cable to the "CAM IN" port on the car stereo.
- Connect the camera's power wires (red for positive, black for negative) to the car's reverse light power source.
- Connect the reversing trigger line (usually pink or brown, labeled "BACK" or "REVERSE") from the car stereo's harness to the positive wire of the reverse light.
Video: Instructions for wiring the backup camera, demonstrating connections for both systems with and without a dedicated trigger cable.
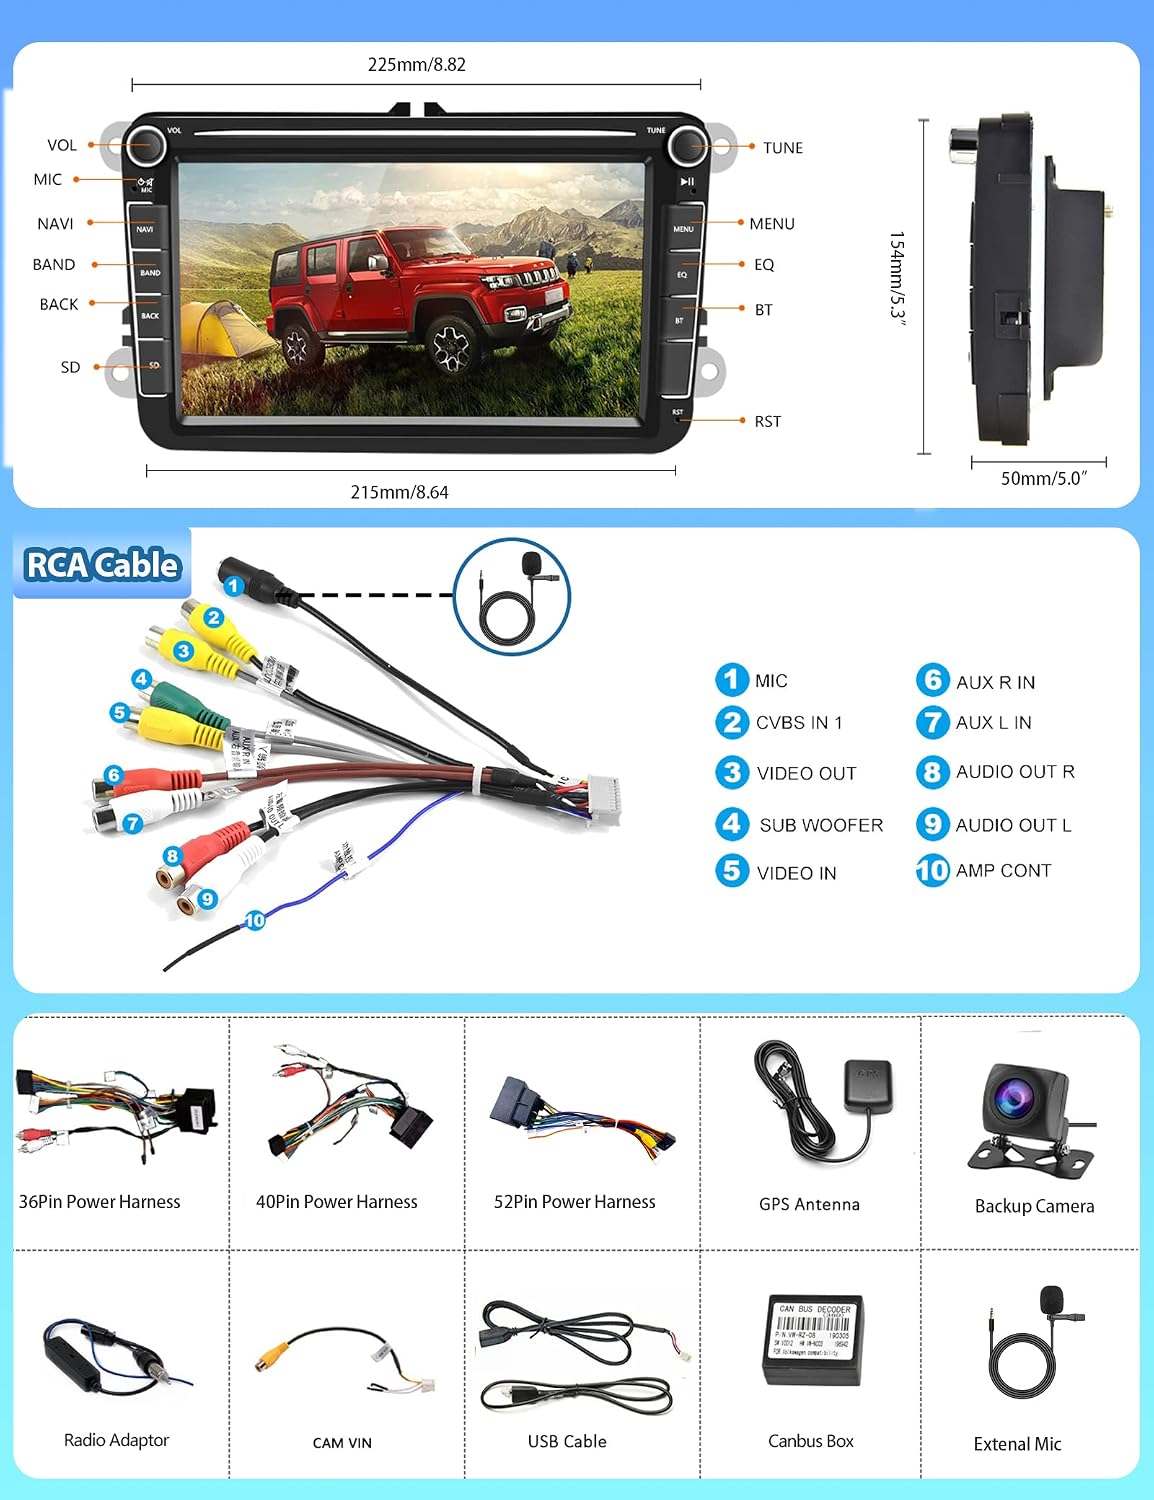
Image: Overview of the car stereo's dimensions, RCA cable connections, and a list of included accessories such as 36-pin, 40-pin, 52-pin power harnesses, GPS antenna, backup camera, radio adaptor, CAM VIN, USB cable, Canbus box, and external mic.
4. Operating Instructions
4.1. Wireless Carplay / Android Auto
Connect your smartphone wirelessly or via USB for seamless integration:
- Wireless Connection: Pair the car stereo's Bluetooth with your phone. Open the ZLINK app on the car stereo and wait a few seconds for the connection.
- Wired Connection: Turn on the ZLINK app on the car stereo. Connect your phone with the car stereo using your original data cable. The connection should be successful.

Image: Steps for connecting Wireless Android Auto/Carplay and Wired Android Auto/Carplay using the ZLINK app.
4.2. GPS Navigation
The unit supports both online and offline navigation. It comes with a built-in offline navigation app (HereWeGo). Connect to Wi-Fi or a mobile hotspot to use online maps and access real-time traffic information.

Image: The car stereo displaying GPS navigation with icons for popular mapping applications.
4.3. Bluetooth
Enjoy faster Bluetooth transmission speed and higher stability. Use Bluetooth for hands-free calls and wireless audio streaming from your smartphone.

Image: The Bluetooth interface on the car stereo, showing options for phone calls and music playback.
4.4. Steering Wheel Control
If your vehicle has original steering wheel controls and you've connected the Canbus module, you can configure the buttons to control the car stereo functions. Access the steering wheel control settings through the system menu to map functions.

Image: The car stereo's settings menu for configuring steering wheel controls, allowing users to assign functions to their vehicle's buttons.
4.5. Rear Camera Function
When the vehicle is shifted into reverse, the car stereo will automatically display the feed from the connected HD rear camera, providing a clear and sharp reverse image with parking guidelines.

Image: The car stereo screen showing a reversing image from the backup camera with dynamic parking lines.
4.6. Audio/Video Playback
The unit supports various audio and video formats, delivering high-fidelity sound. The RCA Video Output feature allows you to share movies or other video content to external screens, keeping passengers entertained.

Image: The 8-inch touchscreen playing a video, and an illustration of the RCA video output feature sharing content to an external tablet.

Image: The car stereo's music player interface, showcasing equalizer settings and Hi-Fi audio capabilities.
4.7. FM/RDS Radio
Tune into your favorite FM radio stations. The RDS (Radio Data System) feature provides additional information such as station name, song title, and traffic announcements where available.

Image: The car stereo's FM/RDS radio interface showing various station frequencies.
5. Maintenance
To ensure the longevity and optimal performance of your car stereo:
- Cleaning: Use a soft, dry cloth to clean the touchscreen and exterior. Avoid abrasive cleaners or solvents.
- Software Updates: Periodically check for software updates from the manufacturer to ensure you have the latest features and bug fixes.
- Temperature: Avoid exposing the unit to extreme temperatures.
6. Troubleshooting
If you encounter issues, refer to the following common problems and solutions:
- Radio Drains Car Battery / Won't Turn Off: This often indicates incorrect wiring, specifically related to the ACC (Accessory) and Canbus connections. Review the "Wiring Instructions" section (3.2) and ensure the Canbus is correctly installed and configured if your car requires it.
- Original Car Information (Steering Wheel Buttons, Door Info) Not Working: This is typically due to an incorrect or missing Canbus connection. Ensure the Canbus module is properly connected and configured in the system settings as described in section 3.2.
- No Sound: Check speaker connections and audio settings. Ensure the volume is not muted.
- Touchscreen Unresponsive: Try restarting the unit. If the issue persists, ensure the screen is clean and free of debris.
- GPS Not Working: Ensure the GPS antenna is properly connected and has a clear view of the sky. For online maps, verify Wi-Fi or hotspot connection.
For further assistance, please contact customer support.
7. Specifications
| Brand | METEESER |
| Screen Size | 8 Inches |
| Resolution | 1024 x 600 |
| Connectivity Technology | Wi-Fi |
| Control Method | Touch |
| Compatible Devices | Smartphone |
| Vehicle Service Type | Car |
| Map Type | Worldwide |
8. Warranty and Support
For warranty information, technical support, or any questions regarding your METEESER car stereo, please refer to the product packaging or contact the seller directly. Our customer service team is available to assist you with any issues or inquiries.