
1. Safety Information
WARNING: Read all safety warnings and instructions before using this product. Failure to follow the warnings and instructions may result in electric shock, fire, and/or serious injury.
- Do not operate the jump starter if the clamps or cables are damaged.
- Do not jump start a frozen battery.
- Ensure proper polarity connection (red to positive, black to negative) to avoid damage to the device or vehicle.
- Do not allow the red and black clamps to touch each other.
- Keep the jump starter away from children.
- Use the product in a well-ventilated area.
- Do not expose the product to rain or wet conditions.
- Store in a cool, dry place when not in use.
- Refer to your vehicle's owner's manual for specific jump starting procedures.

Image: The LC Lenercom jump starter features 8 advanced safety technologies including short circuit, reverse polarity, overcharging, overcurrent output, over temperature, overload, low voltage limits, and over voltage limits, ensuring safe operation.
2. Product Overview
The LC Lenercom 1800A Peak Car Jump Starter (Model HZ014) is a versatile and portable device designed to jump start vehicles with up to 7.0L gasoline and 4.0L diesel engines. It also functions as a power bank with PD 60W fast charging and USB QC3.0 ports, and includes a multi-functional LED light.
2.1 Components
- Jump Starter Unit
- Smart Jumper Clamps (Red for Positive, Black for Negative)
- USB-C Charging Cable
- User Manual
2.2 Key Features
- 1800A Peak Current: Capable of starting most 12V vehicles.
- PD 60W Fast Charging: For rapid charging of the unit and compatible devices.
- USB QC3.0 Output: For quick charging of smartphones, tablets, and other USB-powered devices.
- Multi-functional LED Light: Features lighting, SOS, and strobe modes for emergencies.
- Advanced Safety Protection: Built-in safeguards against short circuit, reverse polarity, overcharge, etc.
- Compact and Portable: Easy to store and carry.

Image: The LC Lenercom 1800A Peak Car Jump Starter connected to a car battery with its smart clamps, showing its compact design and digital display.
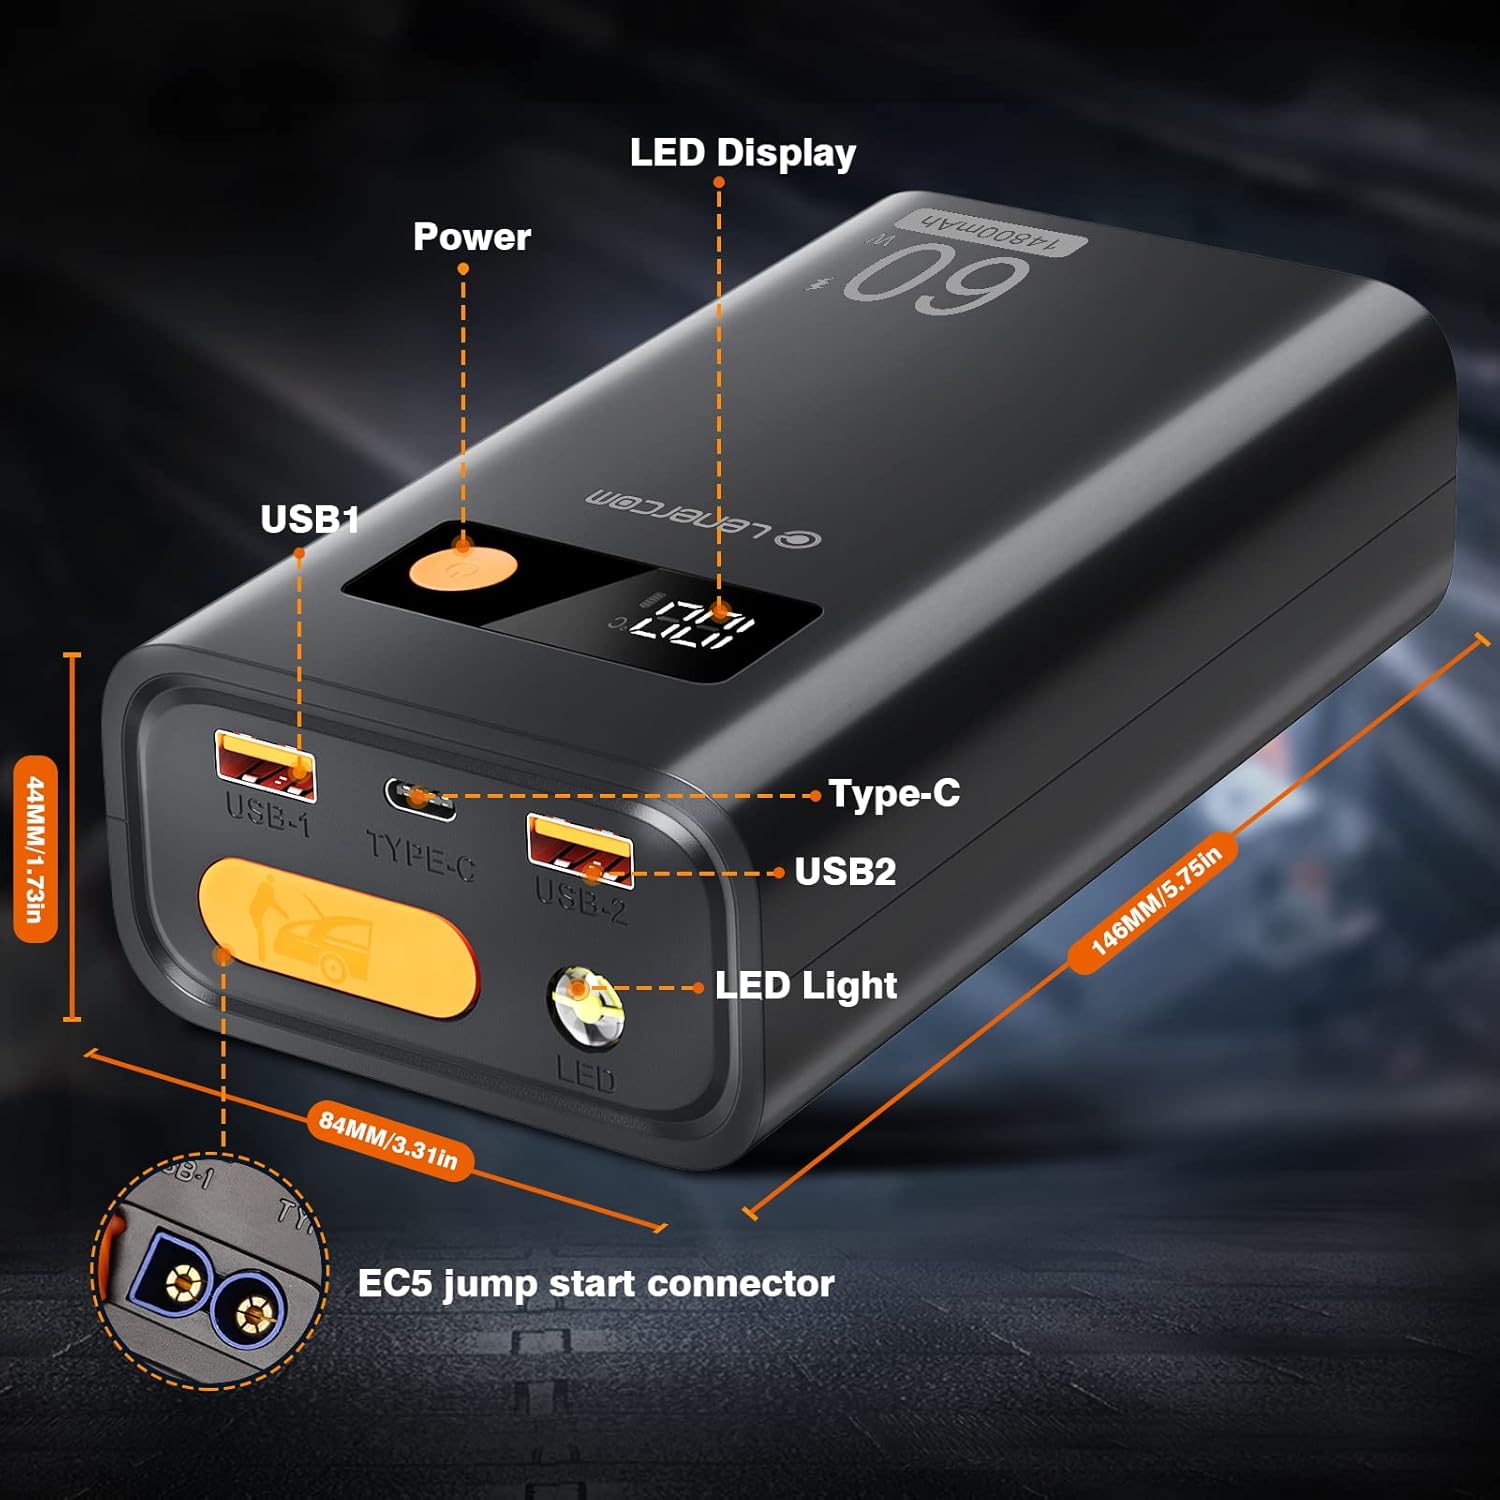
Image: A detailed diagram highlighting the LED display, power button, USB1, Type-C (input/output), USB2, LED light, and EC5 jump start connector on the LC Lenercom jump starter.
3. Setup
3.1 Initial Charging
Before first use, fully charge the jump starter. It is recommended to fully charge the unit every 3-6 months to maintain battery health.
- Connect the provided USB-C charging cable to the Type-C input/output port on the jump starter.
- Connect the other end of the USB-C cable to a compatible PD 60W wall charger or car charger (not included).
- The LED display will show the charging progress. The unit is fully charged when the display shows 100%.

Image: The LC Lenercom jump starter connected to a wall charger via a USB-C cable, illustrating the charging process. The display shows the battery percentage.

Image: The LC Lenercom jump starter connected to a car charger via a USB-C cable, demonstrating in-car charging. The display shows the battery percentage.
4. Operating Instructions
4.1 Jump Starting a Vehicle
Ensure the jump starter is fully charged before attempting to jump start a vehicle.
- Connect the smart jumper clamps to the jump starter's EC5 port. The red and green lights on the smart clamps will flash alternately.
- Connect the red (positive) clamp to the positive (+) terminal of the vehicle's battery.
- Connect the black (negative) clamp to the negative (-) terminal of the vehicle's battery.
- Once connected correctly, the green light on the smart clamps will stay on.
- Start your car immediately within 30 seconds.
- Once the car starts, remove the smart clamps from the vehicle battery, then disconnect them from the jump starter.

Image: A visual guide showing the four steps to instantly jump start a car: connect power supply, connect to car battery, wait for green light to start engine, and remove power supply.
Video: An official Lenercom video demonstrating the process of using the 1800A Car Jump Starter to start a vehicle. This video shows the step-by-step connection and successful engine start.
4.2 Using as a Power Bank
The jump starter can charge various electronic devices via its USB ports.
- Connect your device's charging cable to either the USB1, USB2 (QC3.0), or Type-C (PD 60W) output ports on the jump starter.
- The jump starter will automatically begin charging your device.
- The LED display will show the remaining battery level of the jump starter.

Image: The LC Lenercom jump starter acting as a portable power bank, simultaneously charging a tablet and a smartphone via its USB and Type-C ports.

Image: A visual representation of the LC Lenercom jump starter's power bank capabilities, showing it charging headphones, a smartphone, and a tablet with output specifications for each port.
4.3 Using the LED Light
The built-in LED light has multiple modes for various situations.
- Press and hold the LED light button for 3 seconds to turn on the steady light mode.
- Short press the LED light button to cycle through the modes: steady light > strobe light > SOS signal > off.
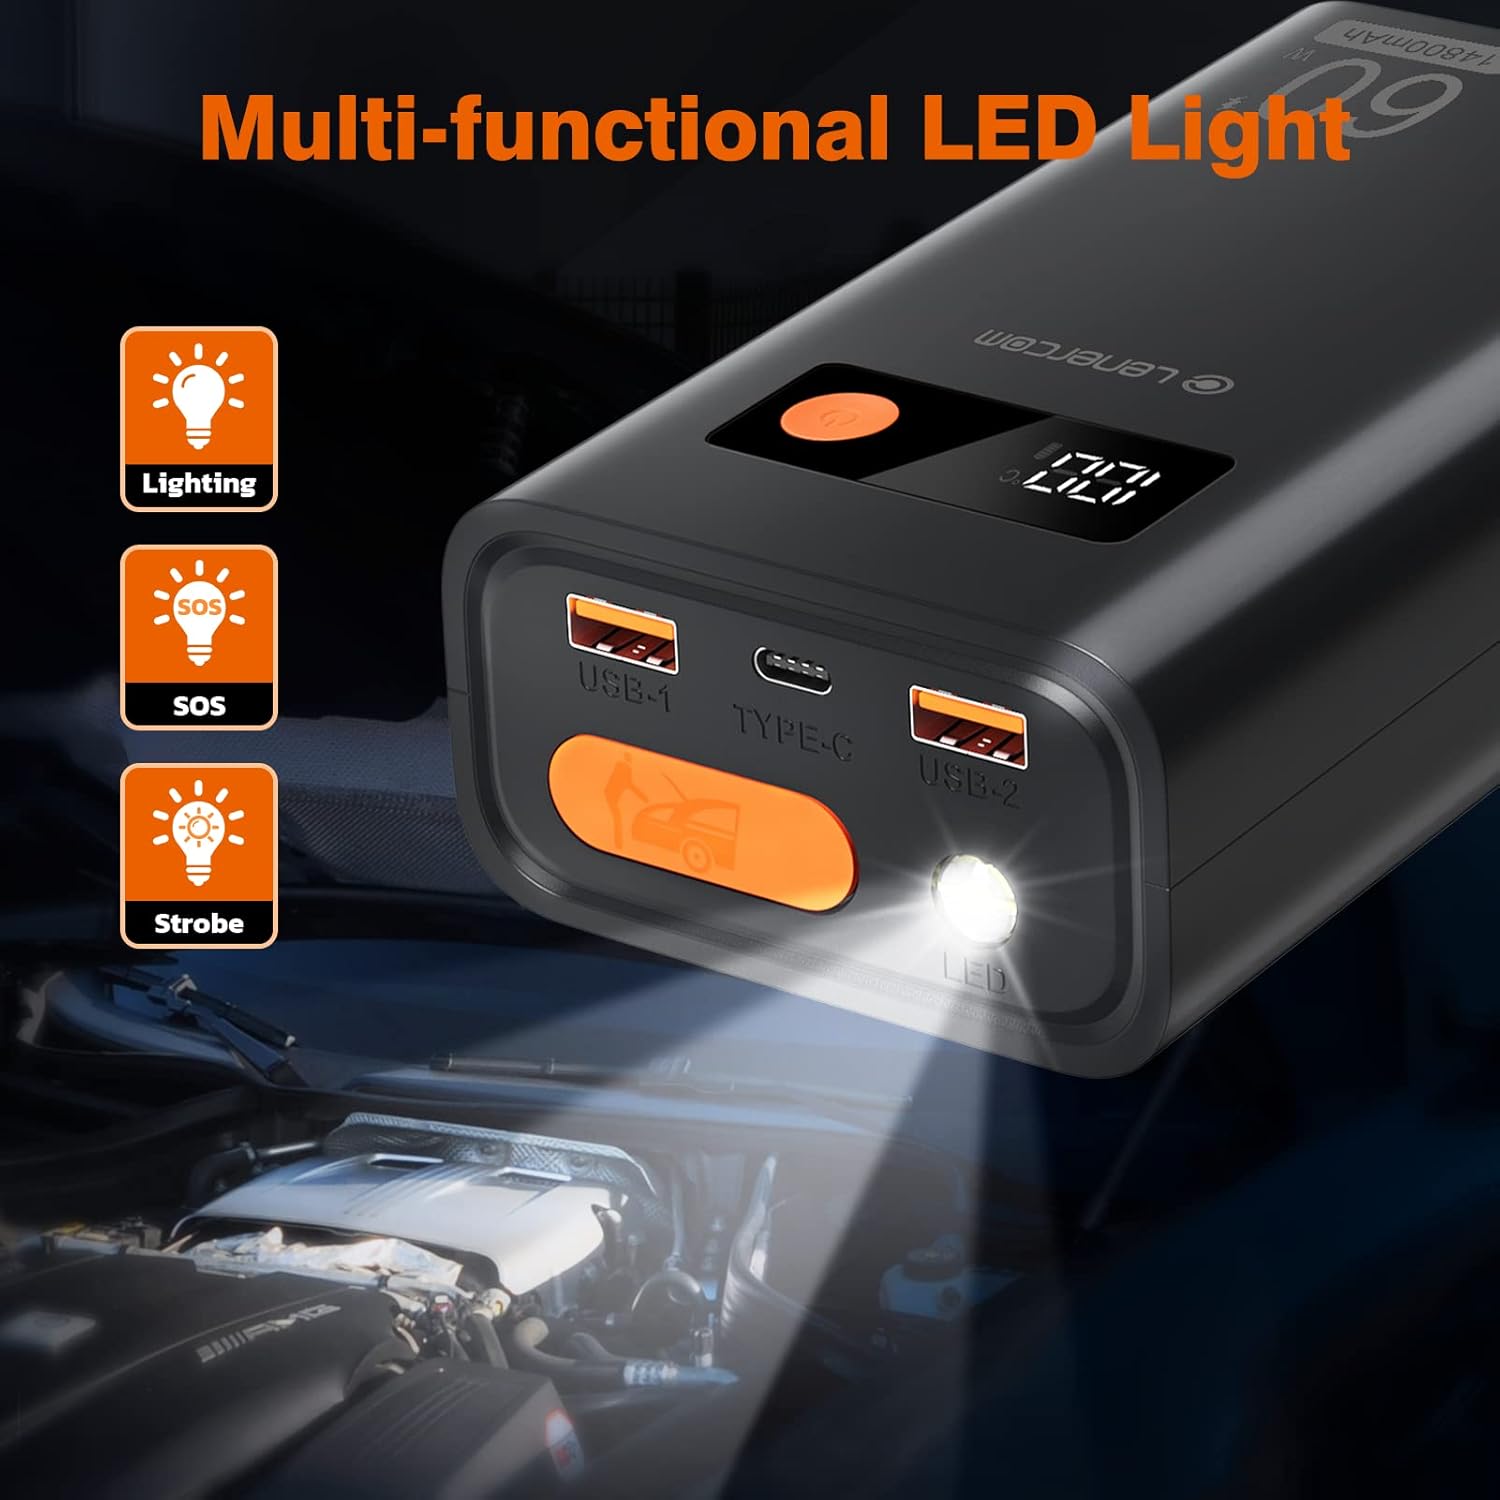
Image: The LC Lenercom jump starter showcasing its multi-functional LED light, with icons for lighting, SOS, and strobe modes. The light illuminates a car engine compartment.

Image: A visual guide of the LC Lenercom jump starter's three LED light modes (SOS, Strobe, Lighting) in various outdoor scenarios like road trips, camping, and emergencies.
5. Maintenance
5.1 Charging and Storage
- Recharge the jump starter at least once every 3-6 months to prolong battery life, even if not used.
- Store the unit in a cool, dry environment, away from direct sunlight and extreme temperatures.
- Keep the unit clean and free from dust and debris.

Image: The LC Lenercom jump starter depicted as water-proof, dust-proof, and heat-proof, suitable for use in working temperatures from -4°F to 140°F, making it a must-have in winter and summer.
6. Troubleshooting
| Problem | Possible Cause | Solution |
|---|---|---|
| Jump starter not turning on. | Battery is completely discharged. | Charge the jump starter fully. |
| Vehicle not starting. | Incorrect clamp connection. | Ensure red clamp is on positive (+), black on negative (-). |
| Vehicle not starting. | Vehicle battery is severely damaged or frozen. | Do not attempt to jump start a frozen battery. Seek professional assistance for damaged batteries. |
| Green light on smart clamps not staying on. | Poor connection or incorrect polarity. | Check connections for tightness and correct polarity. Clean battery terminals if corroded. |
| Jump starter gets warm during use. | Normal operation during high current discharge. | Allow the unit to cool down before further use. If excessively hot, disconnect and contact support. |
7. Specifications
| Brand | LC Lenercom |
| Model Number | HZ014 |
| Peak Output Current | 1800 Amps |
| Battery Cell Composition | Lithium Polymer |
| Voltage | 12 Volts |
| Product Dimensions | 3.3"D x 5.7"W x 1.7"H |
| Item Weight | 1 Pound |
| Vehicle Service Type | Passenger Car (up to 7.0L Gas / 4.0L Diesel Engines) |
8. Warranty & Support
For warranty information or technical support, please refer to the contact details provided on the product packaging or visit the official LC Lenercom website. Keep your purchase receipt for warranty claims.

