1. Product Overview
The TEHAUX TB388 Mechanical Timer is a 12V AC/DC programmable time control switch designed for automatic control of various electrical devices. It operates on a 24-hour cycle, offering precise timing and featuring a built-in battery for power failure compensation.
Key Features:
- Energy Saving: Automatically controls power supply to reduce consumption.
- Precise Timing: Manages tasks with accuracy.
- Versatile Use: Suitable for home power, advertising light boxes, street lights, and other applications.
- Easy Installation: Simple structure for straightforward setup.
- Durable Material: Constructed from premium PC material for reliability and long-term use.
Component Identification:

Figure 1: Front view of the TEHAUX TB388 Mechanical Timer with key components labeled, including mounting holes, battery cover plate, transparent cover, 24-hour timer paddle, minute hands, current time indicator, manual switch (On/Auto/Off), output indicator, power indicator, and terminal cover plate.
2. Specifications
| Feature | Detail |
|---|---|
| Brand | TEHAUX |
| Model Number | 51KI4W15565193NGQ |
| Color | White |
| Material | Polycarbonate |
| Product Dimensions (D x W x H) | 1.57" x 4.33" x 3.31" (4cm x 11cm x 8.4cm) |
| Item Weight | 0.51 Pounds (8.2 ounces) |
| Number of Settings | 2 (ON/OFF) |
| Minimum Timer Interval | 15 minutes |
| Voltage | 12V AC/DC |
| Current Rating | 15A |
| Power Failure Compensation | Up to 300 hours (via built-in Ni-MH battery) |
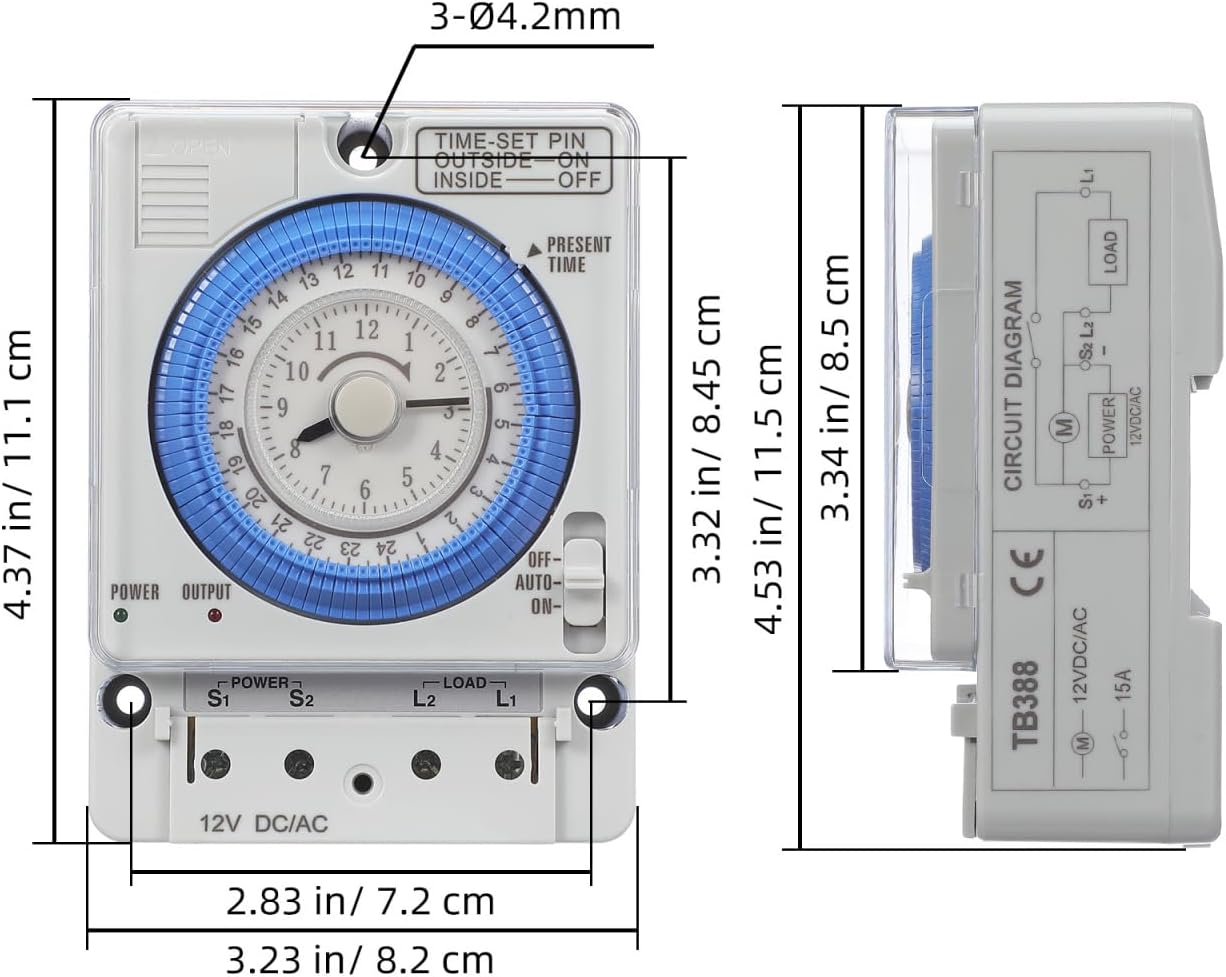
Figure 2: Detailed dimensions of the TEHAUX TB388 Mechanical Timer.
3. Safety Information
- Always disconnect power before installation or maintenance.
- Installation should be performed by a qualified electrician or knowledgeable individual to prevent electrical shock or damage.
- Ensure the timer's voltage and current ratings match your application's requirements. This timer is designed for 12V AC/DC systems.
- Do not expose the timer to water or extreme temperatures.
- Keep out of reach of children.
4. Installation and Wiring
Installation Steps:
- Mounting: Secure the timer to a suitable surface using the mounting holes. Ensure it is in a dry, protected location.
- Wiring: Refer to the wiring diagram below. Connect the 12V AC/DC power supply to the 'POWER' terminals (S1, S2). Connect your load (e.g., lights, pumps, fans) to the 'LOAD' terminals (L1, L2).
- Terminal Cover: After wiring, ensure the terminal cover plate is securely in place to prevent accidental contact.
- Power On: Once all connections are secure, restore power to the circuit.
Wiring Diagram:

Figure 3: Electrical wiring diagram for the TB388 timer. Connect 12V AC/DC power to S1 and S2. Connect the load to L1 and L2. Note that the load is powered by the same 12V AC/DC supply as the timer.
Important Note on Voltage: This timer is designed for 12V AC/DC operation. The load connected to the timer's output terminals (L1, L2) must also operate on 12V AC/DC. It is not designed to control higher voltage loads (e.g., 110V AC) directly from a 12V power source. Attempting to do so may damage the timer or the connected device, and poses a safety risk. If controlling a different voltage load, an appropriate relay or contactor must be used, wired externally to the timer's output.
5. Operation
Setting the Current Time:
- Rotate the central dial clockwise until the 'PRESENT TIME' arrow points to the current hour. The dial is marked for 24 hours.
Programming ON/OFF Times:
- The blue segments around the dial are the timer paddles. Each segment represents 15 minutes.
- To set an 'ON' period, push the corresponding blue paddles outward.
- To set an 'OFF' period, leave the corresponding blue paddles inward.
- The timer will activate the connected load when the paddles are pushed outward and deactivate it when they are inward, according to the current time on the dial.
Manual Override Switch:
The side of the timer features a manual switch with three positions:
- ON: The load will remain continuously ON, overriding the programmed settings.
- AUTO: The timer will operate according to the programmed ON/OFF settings.
- OFF: The load will remain continuously OFF, overriding the programmed settings.
Set the switch to 'AUTO' for normal timed operation.

Figure 4: The timer installed in a home setting, ready for operation.

Figure 5: Example of the timer used in a kitchen environment.

Figure 6: The timer controlling an outdoor light fixture.
6. Maintenance
Cleaning:
Wipe the timer with a dry, soft cloth. Do not use abrasive cleaners or solvents.
Power Failure Compensation Battery:
The TEHAUX TB388 timer includes a built-in Ni-MH battery that provides power failure compensation for up to 300 hours. This battery maintains the timer's settings and clock during power outages. The battery is internal and is not designed for user replacement via an external battery door. If the internal battery requires service or replacement, professional assistance is recommended.

Figure 7: Internal view highlighting the Ni-MH battery for power failure compensation.
7. Troubleshooting
- Timer is not operating or load is not switching:
- Check that the power supply to the timer is active and correctly wired (12V AC/DC).
- Ensure the manual override switch is set to 'AUTO'.
- Verify that the timer paddles are correctly set for the desired ON/OFF periods.
- Confirm that the load is correctly wired to the output terminals and is functional.
- Timer makes a slight noise:
- Mechanical timers may produce a low humming or ticking sound during operation. This is generally normal and does not indicate a malfunction.
- Timer does not control my high-voltage (e.g., 110V AC) device:
- This timer is designed for 12V AC/DC systems only. It cannot directly control higher voltage loads. An external relay or contactor compatible with your load's voltage and current is required for such applications. Consult a qualified electrician for proper wiring.
8. Warranty and Support
For warranty information or technical support, please contact TEHAUX customer service through your retailer or the official TEHAUX website. Please have your model number (51KI4W15565193NGQ) and purchase details available when contacting support.