SeulQirw HGX-LITE Extruder
SeulQirw HGX-LITE Extruder: All-Metal Hardened Steel Reduction Gear for 3D Printers
Instruction Manual
1. Introduction
The SeulQirw HGX-LITE Extruder is a high-performance, all-metal reduction gear extruder designed to enhance the reliability and precision of your 3D printer. Featuring hardened steel gears and a lightweight aluminum construction, it is compatible with a wide range of 3D printers and filament types. This manual provides essential information for the proper installation, operation, and maintenance of your HGX-LITE Extruder.

Figure 1.1: SeulQirw HGX-LITE Extruder, a compact and robust 3D printer component.
2. Product Features
The HGX-LITE Extruder incorporates several design elements for improved 3D printing performance:
- All-Metal Hardened Steel Construction: The extruder features a CNC-machined aluminum alloy shell and integrated quenched nickel-plated gears with HRC 60+ hardness. This construction ensures durability and wear resistance for over 1000 hours of printing.
- Dual-Drive Filament Grip Technology: Ultra-dense teeth (HV3300 hardness) on larger drive wheels minimize filament slippage, providing precise extrusion control, especially for flexible materials like TPU.
- Lightweight and Compact Design: The aluminum profile build reduces carriage weight, contributing to faster printing speeds and enhanced stability. The unit weighs approximately 75.9 grams.
- Long-Lasting POM Drive Gears: One-piece injection-molded POM (Polyoxymethylene) gears offer low friction and resistance to deformation, maintaining consistent extrusion even under high temperatures. These gears have a Mohs hardness of 60°.
- Wide Compatibility: Designed for compatibility with various 3D printers, including Voron 2.4, Ender 3 V2, CR-10, and most Cartesian/Delta 3D printer models.

Figure 2.1: Illustration highlighting the compact size, light weight (76g), and large gear design of the extruder.
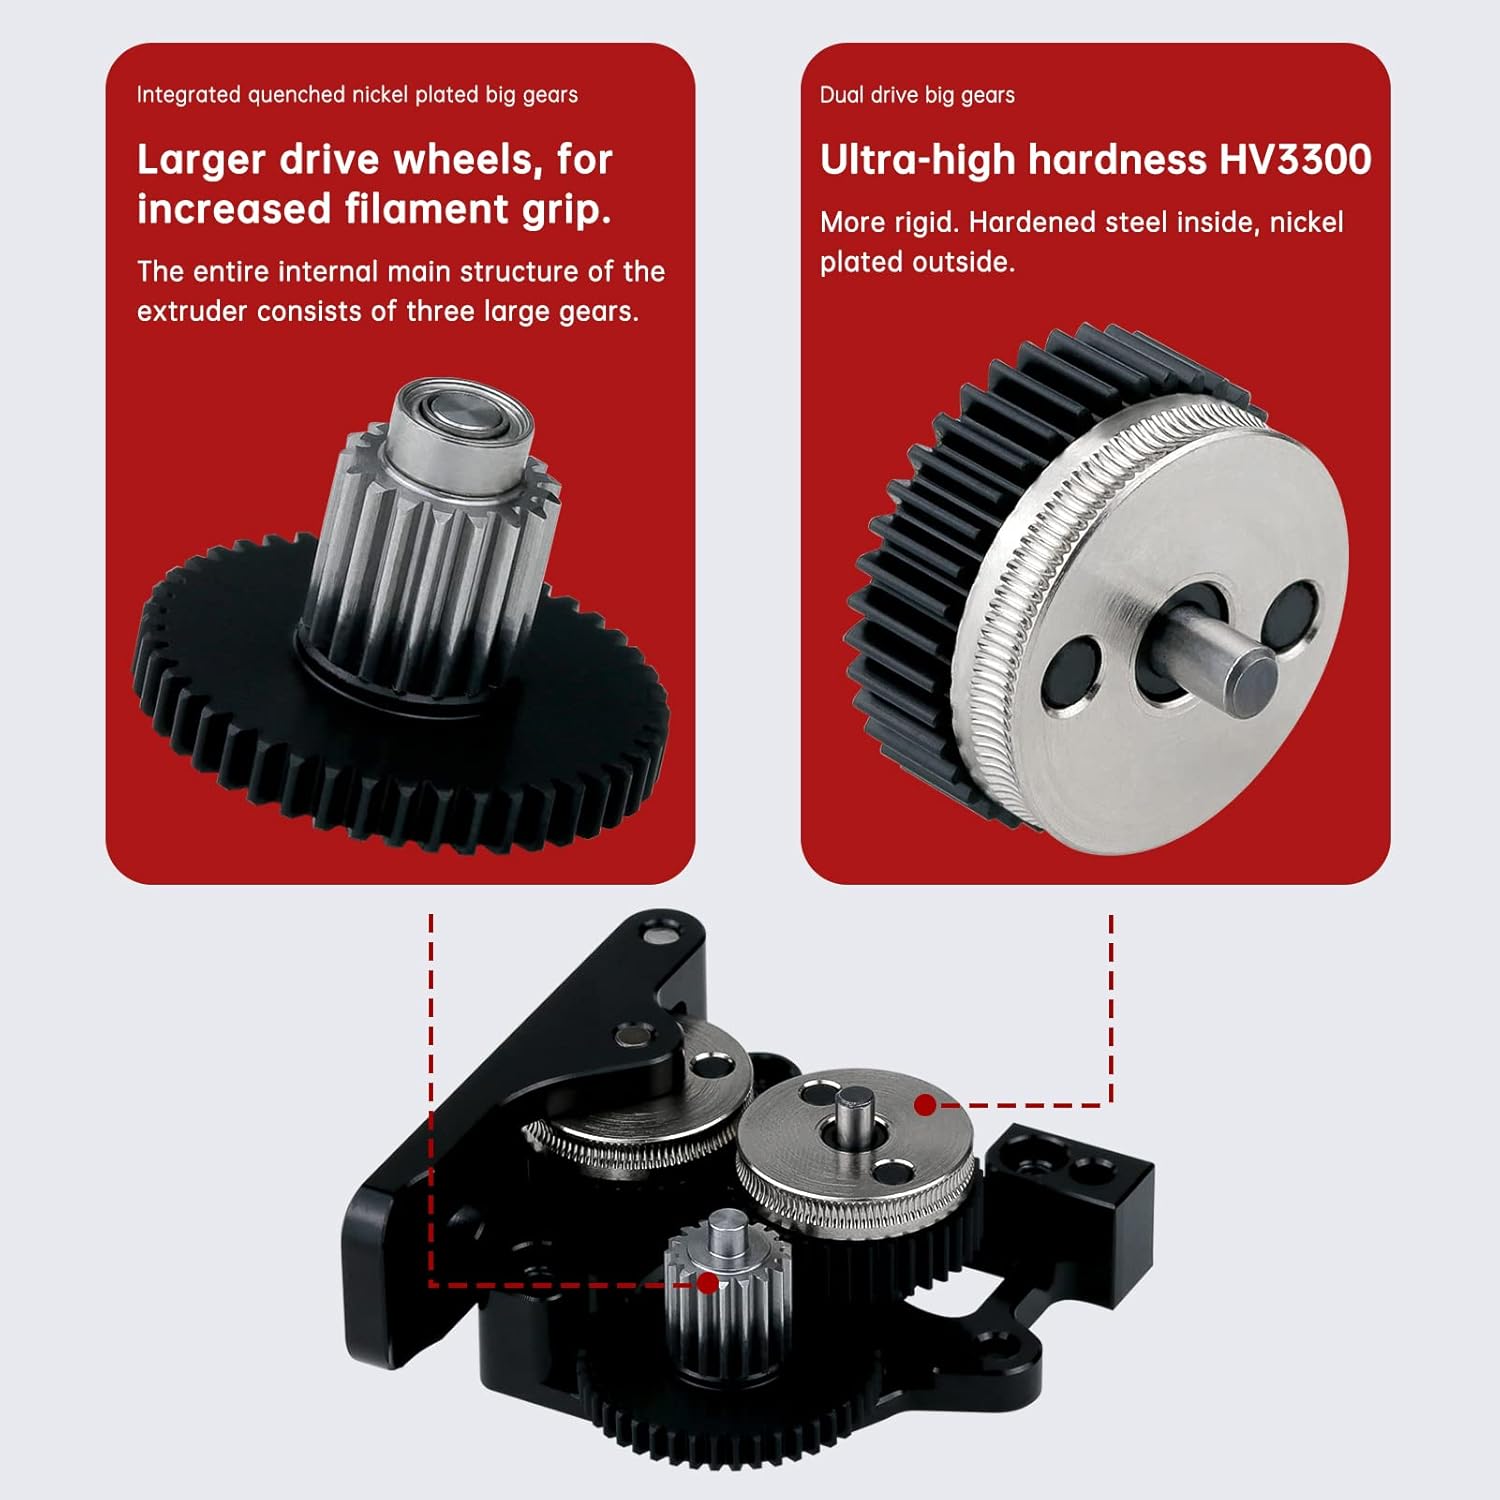
Figure 2.2: Detail of the integrated quenched nickel-plated big gears, emphasizing their ultra-high hardness (HV3300) for increased filament grip.
3. Package Contents
Verify that all components are present in the package before proceeding with installation:
- HGX-LITE Extruder (Aluminum) x 1
- M3 x 12 screws x 2
- Hexagon bar (2.0/2.5 each) x 1 set

Figure 3.1: Contents of the HGX-LITE Extruder package, including the extruder unit, mounting screws, and hex keys.
4. Setup and Installation
Installation of the HGX-LITE Extruder requires careful attention to detail. Ensure your 3D printer is powered off and disconnected from the power source before beginning.
- Preparation: Remove your existing extruder assembly from the 3D printer carriage. Refer to your 3D printer's manual for specific disassembly instructions.
- Mounting the Extruder: Position the HGX-LITE Extruder on your printer's carriage. Use the provided M3 x 12 screws to secure the extruder to the mounting points. Ensure the extruder is firmly attached without overtightening.
- Motor Installation (Motor Not Included): If your setup requires a separate stepper motor, attach it to the HGX-LITE Extruder according to the motor's specifications and the extruder's design.
- Filament Path: Verify that the filament path is clear and unobstructed through the extruder and into the hotend.
- Wiring: Reconnect any necessary wiring for the stepper motor and other components.

Figure 4.1: An exploded diagram illustrating the internal components of the extruder, alongside a reference image demonstrating how to install the extruder onto a 3D printer's print head assembly.
5. Operating Instructions
Once installed, the HGX-LITE Extruder operates similarly to other direct drive or Bowden extruders, depending on your printer's configuration. The key is proper calibration and filament loading.
- Filament Loading: Gently feed the filament into the extruder's input port. The dual-drive gears will grip the filament. Continue feeding until it exits the hotend.
- E-steps Calibration: Due to the reduction gearing, it is crucial to calibrate your printer's E-steps (extruder steps per millimeter) for accurate filament extrusion. This typically involves sending a command to extrude a specific length of filament and measuring the actual extruded length, then adjusting the E-steps value in your printer's firmware or control software.
- Retraction Settings: Adjust retraction distance and speed in your slicer software. The precise grip of the HGX-LITE Extruder may allow for shorter retraction distances compared to other extruders.
- Printing: Begin your print job. Monitor the first layer for proper adhesion and extrusion. Adjust flow rate if necessary.
6. Maintenance
Regular maintenance ensures the longevity and consistent performance of your HGX-LITE Extruder.
- Gear Cleaning: Periodically inspect the drive gears for filament dust or debris accumulation. Use a small brush or compressed air to clean the teeth.
- Lubrication: Apply a small amount of appropriate lubricant (e.g., silicone grease) to the gears if you notice increased noise or friction, especially during rapid retractions.
- Tightness Check: Ensure all screws remain tight. Loose components can affect extrusion consistency.
- Filament Path Inspection: Check the filament path for any wear or obstructions that could impede smooth filament flow.
- Temperature Considerations: While the POM gears are designed for high temperatures, prolonged exposure to chamber temperatures exceeding 70°C may affect their performance. Monitor chamber temperatures if printing in an enclosed environment.
7. Troubleshooting
This section addresses common issues you might encounter with your extruder.
| Problem | Possible Cause | Solution |
|---|---|---|
| Inconsistent Extrusion / Skipping | Incorrect E-steps, clogged nozzle, filament tangle, worn gears, insufficient tension. | Calibrate E-steps. Clean or replace nozzle. Check filament spool. Inspect and clean gears. Adjust tension screw. |
| Filament Grinding | Nozzle clog, excessive tension, heat creep, too many retractions. | Clear nozzle. Reduce tension slightly. Ensure hotend cooling is adequate. Optimize retraction settings. |
| Extruder Motor Clicking | Filament blockage, print speed too high, temperature too low, E-steps too high. | Check for clogs. Reduce print speed. Increase hotend temperature. Recalibrate E-steps. |
| Plastic Gear Failure (in heated chamber) | Excessive chamber temperature causing material degradation. | Avoid operating in chamber temperatures above 70°C for extended periods. Ensure adequate cooling for the extruder motor and gears if operating in high ambient temperatures. |
8. Specifications
| Feature | Detail |
|---|---|
| Model | HGX-LITE Extruder |
| Brand | SeulQirw |
| Material | Aluminum (shell), Hardened Steel (gears), POM (drive gears) |
| Color | Black |
| Product Dimensions | 3.58 x 2.16 x 1.26 inches (9.09 x 5.49 x 3.20 cm) |
| Item Weight | 2.68 ounces (76 grams) |
| Gear Hardness (Nickel-plated) | HRC 60+ / HV3300 |
| POM Gear Hardness | Mohs hardness 60° |
| Compatibility | Voron 2.4, Ender 3 V2, CR-10, most Cartesian/Delta 3D printers |
| Filament Compatibility | PLA, ABS, PETG, TPU, PC, Nylon (excluding carbon fiber) |
Ask a question about this manual
Ask about setup, troubleshooting, compatibility, parts, safety, or missing instructions. Manuals+ will review the question and use this page’s manual context to help answer it.