PLBEREMC debdcf29-9289-4e20-a7ae-7b0e37ec0741
PLBEREMC Universal Remote Control User Manual
Model: debdcf29-9289-4e20-a7ae-7b0e37ec0741
Introduction
This manual provides comprehensive instructions for setting up and operating your PLBEREMC Universal Remote Control. This remote is designed to control a wide range of audio/video devices, including TVs, Blu-ray/DVD players, streaming media players, soundbars, and cable receivers. Please read this manual carefully to ensure proper use and to maximize the functionality of your new remote control.

Image: The PLBEREMC Universal Remote Control.
Product Features
- Universal Compatibility: 100% compatible with all major TV brands (Samsung, LG, Sony, Panasonic, Philips, Sharp, TCL, HAIER, Toshiba, Hitachi, VIZIO Smart TV, and others), Blu-ray/DVD Players, Streaming Media Players, Soundbars, and Cable receivers.
- Full Functionality: Designed to perfectly replace and cover all functions of your original remote control.
- Durable Construction: Made from high-quality ABS material for longevity.
- Ergonomic Design: Lightweight and comfortable to hold, suitable for all users.
- Infrared Technology: Ensures fast matching connection and stable performance.
- Simple Setup: Easy to set up and use directly after battery insertion.

Image: Key features of the PLBEREMC Universal Remote Control.
Package Contents
- 1 x PLBEREMC Universal Remote Control
- 1 x Instruction Manual (included with the remote)
Note: 2 AAA batteries are not included and must be purchased separately.
Setup
Battery Installation
- Locate the battery compartment on the back of the remote control.
- Slide open the battery compartment cover.
- Insert two (2) AAA batteries, ensuring correct polarity (+ and -) as indicated inside the compartment.
- Close the battery compartment cover securely.

Image: Illustration of battery installation for the remote control.
Initial Setup
After inserting the batteries, the remote is ready for programming. The universal remote control is designed to control multiple audio/video devices, and you will need to program it for your specific devices to ensure full functionality.
Programming the Universal Remote Control
There are two primary methods to program your PLBEREMC Universal Remote Control: Direct Code Entry and Auto Code Search. Detailed operation steps are provided in the manual included with the remote.
Method 1: Direct Code Entry
This method involves entering a specific code for your device's brand. Refer to the code list provided in the physical instruction manual that came with your remote.
- Turn on the device you wish to control (e.g., TV, DVD player).
- Press and hold the SETUP button on the remote until the indicator light stays on.
- Press the device button you want to program (e.g., TV, DVD, CBL, AUX). The indicator light will blink once and then remain lit.
- Enter the 4-digit code for your device's brand using the number buttons.
- If the code is valid, the indicator light will turn off. Test the remote by pressing POWER or other function buttons. If the device responds, the programming is successful.
- If the device does not respond, repeat the process with the next code listed for your brand.
Method 2: Auto Code Search
If you cannot find a code for your device or prefer an automatic search, use this method.
- Turn on the device you wish to control.
- Press and hold the SETUP button on the remote until the indicator light stays on.
- Press the device button you want to program (e.g., TV, DVD, CBL, AUX). The indicator light will blink once and then remain lit.
- Point the remote at the device and press the POWER button repeatedly (or CH+ for TVs) until the device turns off. This may take several minutes as the remote cycles through codes.
- Once the device turns off, immediately press the SETUP button to lock in the code. The indicator light will turn off.
- Test the remote's functions. If not all functions work, repeat the auto code search to find a more compatible code.
Operating Instructions
Familiarize yourself with the buttons and their functions for optimal use of your universal remote control.
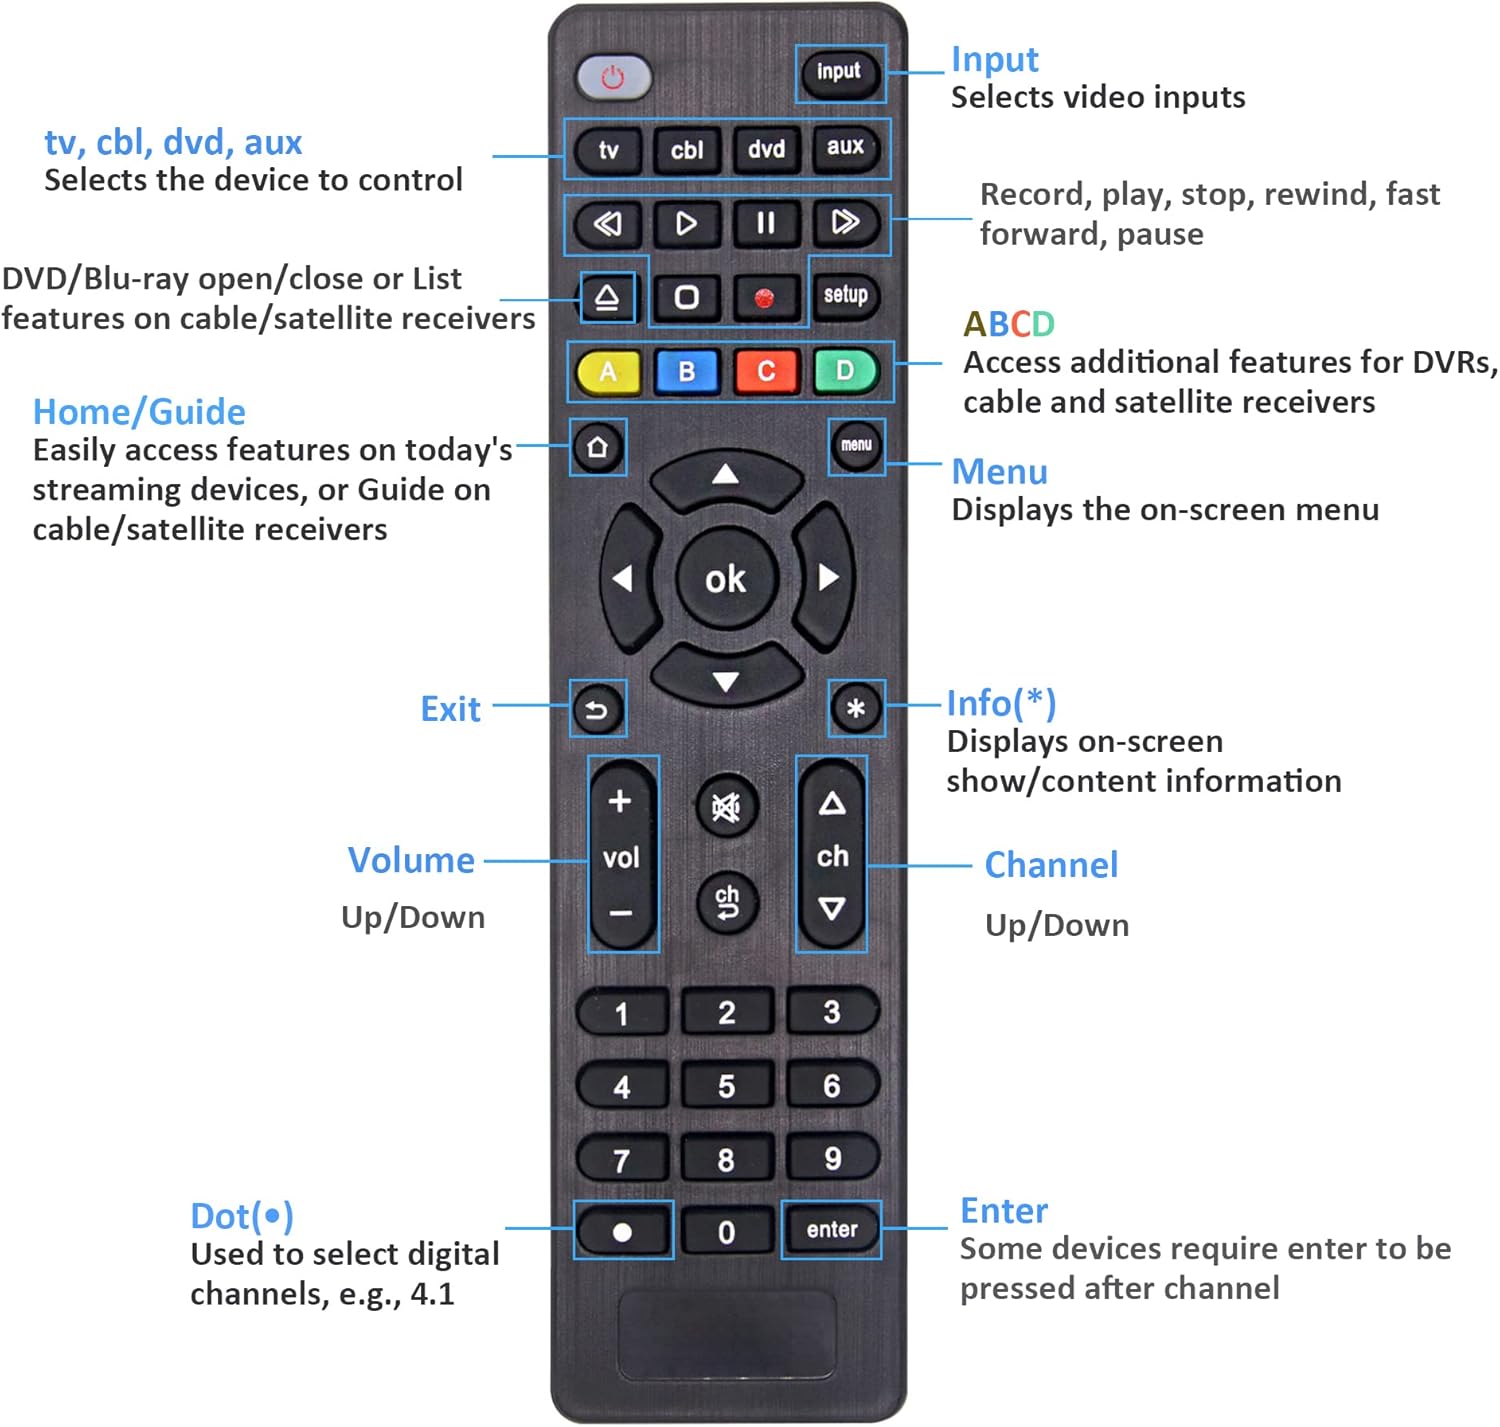
Image: Detailed button layout and function guide for the PLBEREMC Universal Remote Control.
Button Functions
| Button | Function |
|---|---|
| POWER | Turns the selected device on or off. |
| INPUT | Selects video inputs (e.g., HDMI 1, AV). |
| TV, CBL, DVD, AUX | Selects the device to control. Press the corresponding button before operating that device. |
| Playback Controls (Play, Pause, Stop, Rewind, Fast Forward) | Controls media playback for DVD/Blu-ray players and streaming devices. |
| SETUP | Used for programming the remote control. |
| ABCD Buttons (Colored) | Access additional features for DVRs, cable, and satellite receivers. Functions vary by device. |
| HOME/GUIDE | Easily access features on today's streaming devices or Guide on cable/satellite receivers. |
| MENU | Displays the on-screen menu. |
| OK / Navigation Arrows | Navigates through menus and confirms selections. |
| EXIT | Exits current menu or screen. |
| INFO (*) | Displays on-screen show/content information. |
| VOL +/- | Adjusts volume up or down. |
| MUTE | Mutes or unmutes audio. |
| CH +/- | Changes channels up or down. |
| Number Pad (0-9) | Direct entry for channel numbers or other numerical inputs. |
| DOT (•) | Used to select digital channels, e.g., 4.1. |
| ENTER | Confirms selections. Some devices require ENTER to be pressed after channel number entry. |
Troubleshooting
- Remote not working after programming: Ensure batteries are inserted correctly and are not depleted. Try reprogramming using a different code from the list or the auto code search method. Ensure the remote is pointed directly at the device.
- Some buttons not working: This may indicate that the current code is not fully compatible. Try reprogramming with another code for your device.
- Indicator light not turning on: Check battery installation and replace batteries if necessary.
- Device not responding to auto code search: Ensure the device is turned on before starting the search. Try moving closer to the device or ensuring no obstructions.
If you continue to experience issues, please refer to the comprehensive manual included with your remote or contact customer support for further assistance.
Specifications
| Feature | Detail |
|---|---|
| Product Dimensions | 1.18 x 0.39 x 1.57 inches (approx. 3 x 1 x 4 cm) |
| Item Weight | 0.882 ounces (approx. 25 grams) |
| Model Number | debdcf29-9289-4e20-a7ae-7b0e37ec0741 |
| Batteries Required | 2 x AAA batteries (not included) |
| Material | ABS |
| Color | Black |
| Max Supported Devices | 1 (per programmed device type, e.g., 1 TV, 1 DVD) |
| Compatible Devices | TVs, Blu-ray/DVD Players, Streaming Media Players, Soundbars, Cable Receivers, Stereo Systems |

Image: Dimensions of the PLBEREMC Universal Remote Control.
Warranty and Support
The manufacturer, PLBEREMC, is committed to providing a satisfactory solution for any quality problems. If you have any questions or encounter issues with your universal remote control, please feel free to contact the seller or manufacturer for assistance.
For further support, refer to the contact information provided in the physical instruction manual that came with your product.
Related Documents - debdcf29-9289-4e20-a7ae-7b0e37ec0741
 |
Browning Command Ops Elite 20 BTC-4E20 Trail Camera Instruction Manual Comprehensive instruction manual for the Browning Command Ops Elite 20 (Model BTC-4E20) trail camera, covering setup, features, and specifications. |
 |
Beijer Electronics G- and M-series Adapter Firmware Upgrade Guide Detailed instructions for updating the firmware on Beijer Electronics G- and M-series network adapters, including PROFINET and MODBUS TCP/UDP models, using an Ethernet connection. |
 |
Secadora Portátil Newlux SecaDry V150 XXL UV: Manual y Características Información completa sobre la secadora portátil Newlux SecaDry V150 XXL UV, incluyendo características, guía de instalación, manual de usuario, mantenimiento y solución de problemas. |
 |
Quick Start Guide: Beijer Electronics GL-9089 & GN-9289 Modbus TCP/Ethernet IP Network Adapter Configuration This guide provides step-by-step instructions for setting the IP address, Subnet Mask, and Gateway for Beijer Electronics GL-9089 and GN-9289 Modbus TCP/Ethernet IP network adapters using the BOOTP protocol. |
 |
Altus G Series Network Adapters and Field Heads: Product Catalog and Technical Specifications Explore the Altus G Series of industrial automation network adapters and field heads. This document provides detailed specifications, ordering information, features, and configuration guidance for PROFINET, EtherNet/IP, EtherCAT, and MODBUS TCP compatible modules. |
 |
Learning Resources 2021 STEM Educational Product Catalog Explore the 2021 catalog of STEM-certified educational products from Learning Resources, featuring a wide range of toys and learning materials for science, technology, engineering, and math. |
Ask a question about this manual
Ask about setup, troubleshooting, compatibility, parts, safety, or missing instructions. Manuals+ will review the question and use this page’s manual context to help answer it.