
1. Introduction
This manual provides comprehensive instructions for the safe and efficient use of your WAS 978 W130 Work Light. Please read this manual thoroughly before installation and operation, and retain it for future reference. This work light is designed for robust performance in various demanding environments, providing bright and reliable illumination.
2. Safety Information
Always observe the following safety precautions to prevent injury or damage to the product:
- Ensure the power source voltage matches the specifications of the work light. Incorrect voltage can cause damage or fire.
- Disconnect power before performing any installation, maintenance, or cleaning.
- Do not look directly into the light source when it is illuminated, as this may cause eye strain or temporary vision impairment.
- Keep the work light away from flammable materials.
- Ensure all wiring connections are secure and properly insulated to prevent short circuits.
- If the light is damaged, do not attempt to repair it yourself. Contact qualified personnel for service.
- Install the light in a location where it will not obstruct vision or create a hazard.
3. Package Contents
Verify that all items are present in the package:
- WAS 978 W130 Work Light (1 unit)
- Mounting Bracket (1 unit)
- Mounting Hardware (screws, nuts, washers)
4. Product Overview
The WAS 978 W130 Work Light features a durable housing, multiple LED elements for bright illumination, and an adjustable mounting bracket for versatile positioning. The integrated wiring simplifies connection to a power source.
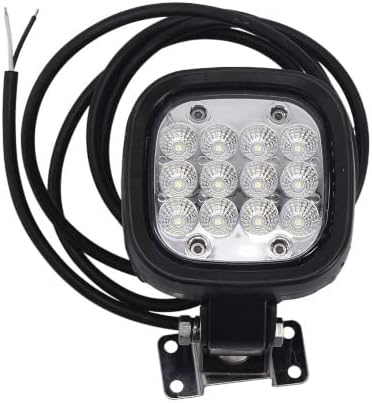
Figure 1: Front view of the WAS 978 W130 Work Light. This image displays the light's primary illumination surface, featuring twelve individual LED bulbs protected by a clear lens. The robust black casing and the adjustable mounting bracket are also visible.
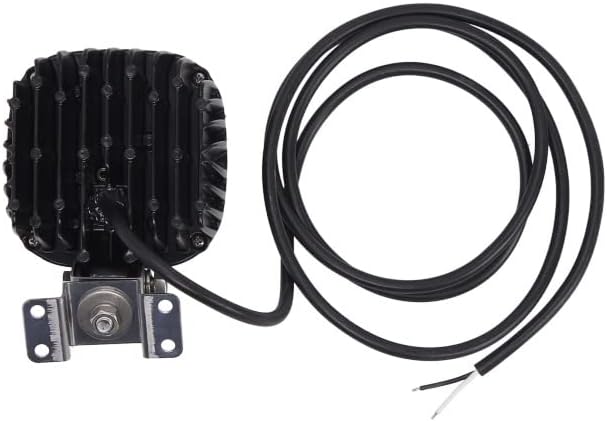
Figure 2: Rear view of the WAS 978 W130 Work Light. This image highlights the heat dissipation fins on the back of the light, crucial for maintaining optimal operating temperature. The attached mounting bracket and the power cable with its exposed positive and negative wires are clearly shown.
5. Setup
5.1 Mounting the Work Light
- Select a Location: Choose a stable and secure surface for mounting that can support the weight of the light and provide the desired illumination angle.
- Attach Bracket: Use the provided mounting hardware to securely fasten the mounting bracket to the chosen surface. Ensure the bracket is firmly attached to prevent vibration or detachment.
- Position Light: Attach the work light to the mounting bracket using the supplied bolt and nut. Adjust the angle of the light to achieve the desired illumination. Tighten the bolt to secure the light in position.
5.2 Wiring Connections
Before making any electrical connections, ensure the power source is turned OFF.
- Identify the positive (+) and negative (-) wires from the work light. Typically, the white wire is positive and the black wire is negative, but always verify with a multimeter if unsure.
- Connect the positive wire of the work light to the positive terminal of your power source (e.g., vehicle battery, power supply).
- Connect the negative wire of the work light to the negative terminal or ground of your power source.
- Ensure all connections are tight and insulated with electrical tape or heat shrink tubing to prevent short circuits and corrosion.
6. Operating Instructions
Once the WAS 978 W130 Work Light is securely mounted and wired:
- Turn on the power supply connected to the work light.
- The work light should illuminate immediately.
- To turn off the light, simply disconnect or switch off the power supply.
7. Maintenance
Regular maintenance ensures optimal performance and longevity of your work light:
- Cleaning: Periodically clean the lens and housing with a soft, damp cloth. Avoid abrasive cleaners or solvents that could damage the finish or lens.
- Inspection: Regularly check the mounting hardware for tightness and the wiring for any signs of wear, fraying, or corrosion. Tighten any loose connections and replace damaged wiring immediately.
- Heat Sink: Ensure the heat sink fins on the back of the light are free from dirt and debris to allow for proper heat dissipation.
8. Troubleshooting
If you encounter issues with your WAS 978 W130 Work Light, refer to the following common problems and solutions:
| Problem | Possible Cause | Solution |
|---|---|---|
| Light does not turn on. | No power supply; incorrect wiring; blown fuse/circuit breaker. | Check power source connection. Verify wiring polarity. Inspect and replace fuse or reset circuit breaker if applicable. |
| Light is dim or flickers. | Low voltage; loose connection; faulty wiring. | Ensure adequate voltage from power source. Check all wiring connections for tightness. Inspect wiring for damage. |
| Excessive heat from light. | Blocked heat sink; operating in high ambient temperature. | Clean heat sink fins. Ensure adequate airflow around the light. |
If the problem persists after attempting these solutions, contact customer support.
9. Specifications
| Feature | Detail |
|---|---|
| Brand | WAS |
| Model | 978 W130 |
| ASIN | B0BDFS9HHQ |
| Date First Available | February 14, 2024 |
| Light Type | LED Work Light |
| Power Source | DC (Voltage details not provided, refer to product packaging) |
| Mounting | Adjustable Bracket |
10. Warranty and Support
Specific warranty information for the WAS 978 W130 Work Light is not provided in the available product data. For details regarding warranty coverage, return policies, or technical support, please refer to the product packaging, the seller's website, or contact the retailer where the product was purchased.
For general inquiries or assistance, please contact WAS customer service through their official channels.


