1. Introduction
This manual provides comprehensive instructions for the installation, operation, and maintenance of your Onisamt Universal Dimmable Ceiling Fan Remote Control Kit. This kit is designed to add remote control functionality to most 3-speed AC ceiling fans, offering convenient control over fan speed and light dimming. Please read this manual thoroughly before installation and use to ensure proper function and safety.

Figure 1: Onisamt Universal Dimmable Ceiling Fan Remote Control Kit components.
2. Important Safety Information
- Always disconnect power to the ceiling fan at the circuit breaker before attempting any installation, maintenance, or troubleshooting.
- Installation should be performed by a qualified electrician or a person with experience in electrical wiring.
- Ensure all wiring connections are secure and comply with local electrical codes.
- Do not use this product with fans that have a DC motor or fans that are not 3-speed AC models.
- The light dimming function is compatible with incandescent lamps and some dimmable CFL/LED lights. Non-dimmable LED/CFL lights may only support ON/OFF functionality and could flicker if dimming is attempted.
- The remote control requires one 3V CR2032 battery (not included).
3. Package Contents
Verify that all items listed below are included in your package:
- Remote Control (1)
- Receiver (1)
- Wall Mount Holder (1)
- User Guide (1)
- Wire Nuts (6)
- Screws (2)

Figure 2: Included components in the product package.
4. Product Specifications
| Feature | Detail |
|---|---|
| Model Number | RC-5T&RC-5R |
| Brand | Onisamt |
| Compatible Devices | 3-Speed AC Ceiling Fan |
| Max Number of Supported Devices | 1 |
| Receiver Rated Power | 240W |
| Light Dimmer Compatibility | Incandescent lamps, some dimmable CFL/LED lights |
| Remote Battery | 1 CR2032 (not included) |
| Item Weight | 7.4 ounces |
| Package Dimensions | 5.87 x 4.96 x 1.73 inches |
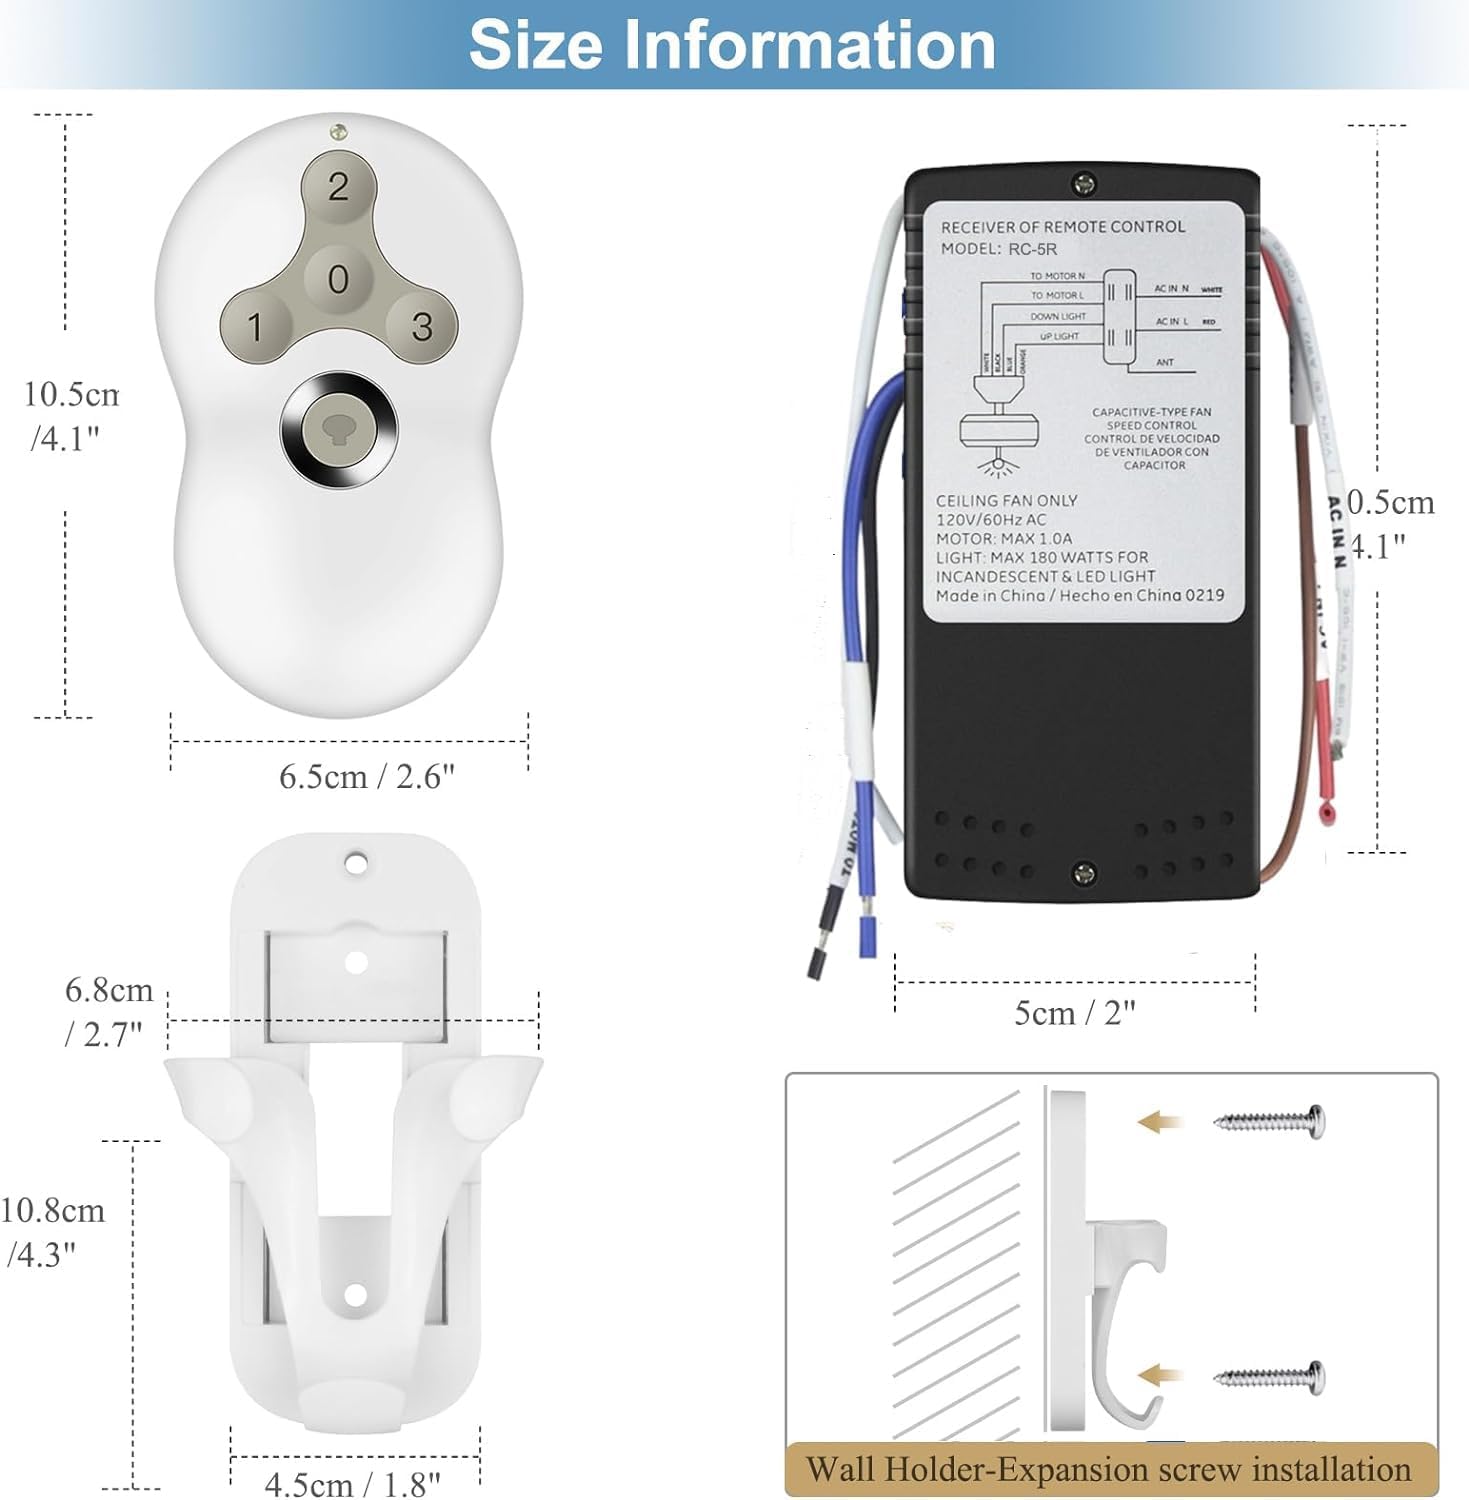
Figure 3: Product dimensions for the remote, receiver, and wall holder.
5. Setup and Installation
Follow these steps carefully to install your remote control kit. Ensure power is disconnected before starting.
5.1 Wiring the Receiver
- Disconnect Power: Turn off the power to your ceiling fan at the circuit breaker. Verify power is off using a voltage tester.
- Access Fan Wiring: Remove the canopy of your ceiling fan to access the existing wiring.
- Disconnect Existing Wiring: Carefully disconnect the existing wiring from the ceiling fan motor and light kit.
- Connect Receiver: Connect the receiver wires to your ceiling fan and household wiring according to the diagram below. The receiver wires are color-coded for ease of installation. Use the provided wire nuts to secure connections.
- Red Wire (Receiver) to AC IN L (Household Live Wire)
- White Wire (Receiver) to AC IN N (Household Neutral Wire)
- Blue Wire (Receiver) to Light Wire (Fan Light)
- Black Wire (Receiver) to Fan Motor Wire
- Brown Wire (Receiver) is the Antenna (ANT). Do not connect.
- Position Receiver: Carefully tuck the receiver into the fan canopy, ensuring it does not interfere with fan operation or wiring.
- Reattach Canopy: Securely reattach the fan canopy.

Figure 4: Wiring diagram and installation steps for the receiver.
5.2 Remote Control Battery Installation
The remote control requires one 3V CR2032 battery (not included). Open the battery compartment on the back of the remote and insert the battery, observing the correct polarity.
5.3 Pairing the Remote Control (Self-Learning Function)
This remote control kit features a self-learning function, eliminating the need for manual code matching.
- After completing the wiring and installing the battery in the remote, restore power to your ceiling fan at the circuit breaker.
- Within 30 seconds of restoring power, press and hold the "LEARN" button on the remote control for approximately 4 seconds. The "LEARN" button is typically located inside the battery compartment or a small pinhole on the remote.
- The fan light should flash or the fan should briefly turn on, indicating successful pairing.

Figure 5: Location of the 'LEARN' button for remote pairing.
6. Operating Instructions
Once installed and paired, use the remote control to operate your ceiling fan and light.
- Fan Speed Control:
- Press "1" for Low speed.
- Press "2" for Medium speed.
- Press "3" for High speed.
- Press "0" to turn the fan OFF.
- Light Control:
- Press the Light Button (often depicted as a light bulb icon) to turn the light ON or OFF.
- To dim the light, press and hold the Light Button. Release when the desired brightness is reached.

Figure 6: Remote control in use, demonstrating fan and light control.
This kit is compatible with ceiling fans that have a reverse switch on the fan body. The remote itself does not have a reverse button; the fan's physical reverse switch must be used.

Figure 7: Ceiling fan with reverse switch functionality.
7. Compatibility
This remote control kit is designed for broad compatibility with various ceiling fan and lighting types:
- Ceiling Fans: Compatible with most 3-speed AC downrod style ceiling fans. This includes many models from brands like Hunter, Hampton Bay, and Harbor Breeze, specifically designed as a replacement for Hunter 99122, 99123, and 99600.
- Lighting:
- Halogen & Incandescent Lamps: Up to 4.2A/500W Max. Fully dimmable.
- Dimmable CFL: Up to 1.5A/150W Max. Dimmable.
- Dimmable LED: Up to 1.5A/150W Max. Dimmable.
- Note: Some LED and CFL lamps are non-dimmable. For these, the remote will only control the ON and OFF function, and attempting to dim may cause flickering.

Figure 8: Compatibility details for fan and light types.
8. Maintenance
- Battery Replacement: Replace the CR2032 battery in the remote control when its range decreases or it stops responding. Ensure correct polarity when inserting the new battery.
- Cleaning: Wipe the remote control and receiver with a soft, dry cloth. Do not use abrasive cleaners or immerse in water.
- Environmental Conditions: Avoid exposing the remote and receiver to extreme temperatures, humidity, or direct sunlight.
9. Troubleshooting
| Problem | Possible Cause | Solution |
|---|---|---|
| Fan/Light does not respond to remote. | No power to receiver, dead remote battery, remote not paired, incorrect wiring. |
|
| Light flickers when dimming. | Non-dimmable LED/CFL bulb being used. |
|
| Fan operates but light does not, or vice versa. | Incorrect wiring, faulty bulb. |
|
| Remote range is poor. | Low remote battery, interference. |
|
10. Warranty and Support
Onisamt products are manufactured with quality and reliability in mind. For specific warranty information or technical support, please refer to the warranty card included with your product or contact Onisamt customer service directly. Contact details can typically be found on the product packaging or the official Onisamt website.
For additional assistance, you may visit the Onisamt Store on Amazon.