1. Introduction
This manual provides essential instructions for the safe and effective operation, maintenance, and troubleshooting of your Shop-Vac 5 Gallon 2.0 Peak HP Wet/Dry Vacuum and its accompanying 2-piece car cleaning kit. Please read this manual thoroughly before using the product and retain it for future reference.
2. Safety Information
Always follow basic safety precautions when using this appliance to reduce the risk of fire, electric shock, or injury.
- Do not leave the vacuum unattended when plugged in. Unplug from outlet when not in use and before servicing.
- Do not use with a damaged cord or plug. If the appliance is not working as it should, has been dropped, damaged, left outdoors, or dropped into water, return it to a service center.
- Do not pull or carry by cord, use cord as a handle, close a door on cord, or pull cord around sharp edges or corners. Do not run appliance over cord. Keep cord away from heated surfaces.
- Do not vacuum flammable or combustible liquids, such as gasoline, or use in areas where they may be present.
- Do not vacuum anything that is burning or smoking, such as cigarettes, matches, or hot ashes.
- Use extra care when cleaning on stairs.
- Do not use without filters in place.
- Unplug before connecting or disconnecting hose.
- Do not allow to be used as a toy. Close attention is necessary when used by or near children.
3. Package Contents
Verify that all items listed below are included in your package. If any parts are missing or damaged, contact Shop-Vac customer support.
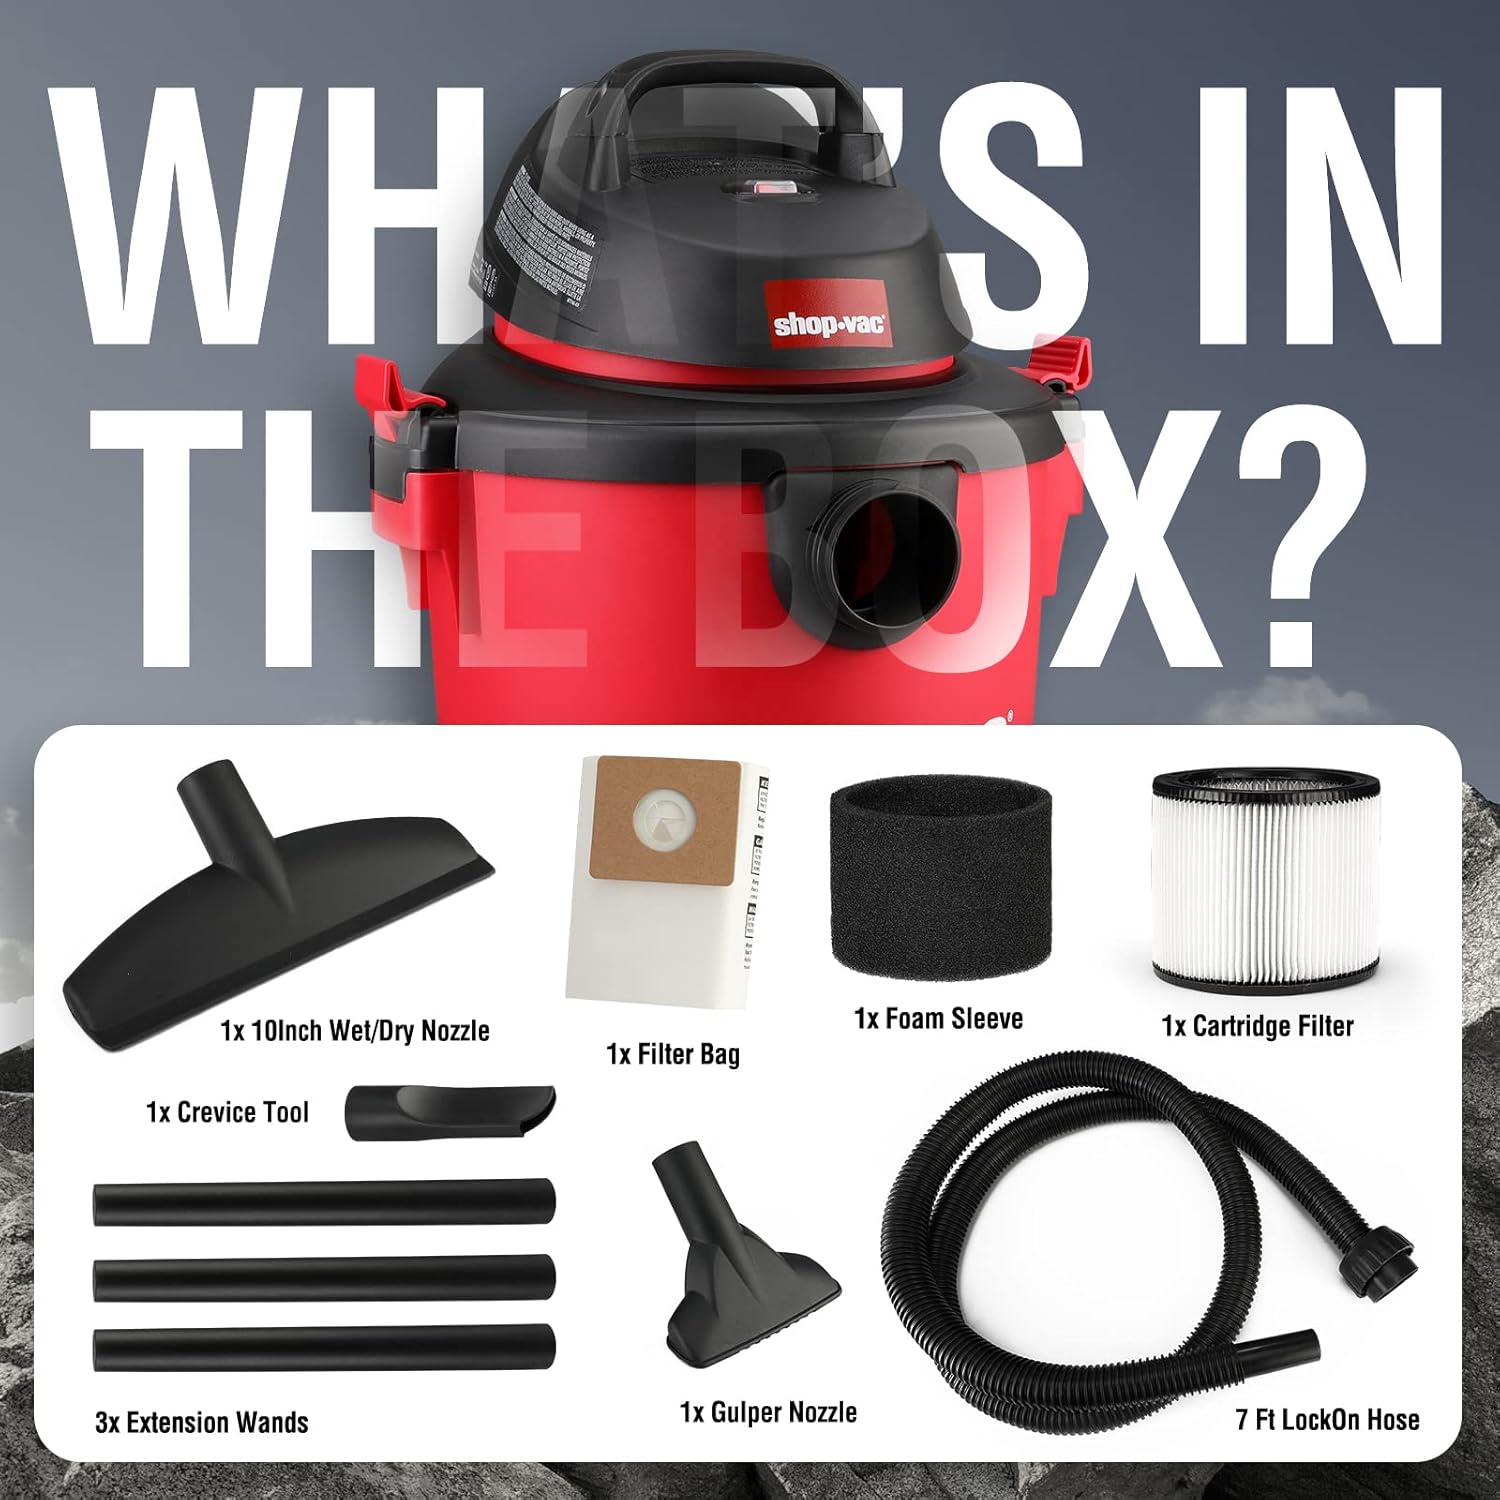
Image: All components included in the Shop-Vac 5 Gallon Wet/Dry Vacuum package.
- Shop-Vac 5 Gallon 2.0 Peak HP Wet/Dry Vacuum Unit
- 7 ft. x 1-1/4 inch Secure Fit Hose
- 3 Extension Wands
- 10 inch Wet/Dry Nozzle
- Gulper Nozzle
- Crevice Tool
- Standard Cartridge Filter
- Filter Bag
- Foam Sleeve
- 1-piece Flexible Crevice Tool (Car Cleaning Kit)
- 1-piece Soft Bristle Brush (Car Cleaning Kit)

Image: The Shop-Vac 5 Gallon Wet/Dry Vacuum and its complete set of accessories.
4. Product Components
Familiarize yourself with the main parts of your Shop-Vac wet/dry vacuum.

Image: Labeled diagram of the Shop-Vac 5 Gallon Wet/Dry Vacuum, highlighting key components.
- Carry Handle: For easy transport of the vacuum.
- ON/OFF Switch: Controls power to the motor.
- 2 HP Motor: Provides suction and blowing power.
- Latches: Secure the power head to the collection tank.
- Blower Port: Outlet for using the vacuum as a blower.
- Vacuum Port: Inlet for attaching the hose for vacuuming.
- Caster: Wheels for mobility.
- Collection Tank: Holds collected wet or dry debris.
5. Setup
5.1 Assembly
- Attach Casters: Invert the collection tank and insert the casters into the designated slots on the bottom of the tank until they click into place.
- Secure Power Head: Place the power head onto the collection tank, aligning the latches. Close the latches securely to fasten the power head.
- Attach Hose: Insert the large end of the 7 ft. Secure Fit Hose into the vacuum port on the front of the power head. Twist to lock it in place.
5.2 Filter Installation for Dry Vacuuming
For dry vacuuming, the Standard Cartridge Filter and a Filter Bag are required.
- Remove the power head from the collection tank.
- Slide the Filter Bag onto the inlet deflector inside the tank, ensuring the cardboard collar covers the opening.
- Place the Cartridge Filter over the filter cage, securing it with the filter retainer.
- Replace the power head and secure the latches.
5.3 Filter Installation for Wet Vacuuming
For wet vacuuming, the Foam Sleeve is required. Remove all other filters.
- Remove the power head from the collection tank.
- Remove the Cartridge Filter and Filter Bag if installed.
- Slide the Foam Sleeve over the filter cage until it completely covers the cage.
- Replace the power head and secure the latches.
6. Operating Instructions
6.1 General Operation
- Ensure the correct filter is installed for your task (dry or wet).
- Plug the power cord into a suitable electrical outlet.
- Flip the ON/OFF switch to the 'ON' position to start the vacuum.
- Flip the ON/OFF switch to the 'OFF' position to turn off the vacuum.
6.2 Dry Vacuuming
Use the 10 inch Wet/Dry Nozzle, Gulper Nozzle, or Crevice Tool with the extension wands for various dry cleaning tasks. Ensure the Cartridge Filter and Filter Bag are installed.
6.3 Wet Vacuuming
Use the 10 inch Wet/Dry Nozzle for picking up liquids. Ensure only the Foam Sleeve is installed. The vacuum will automatically shut off when the tank is full. Turn off the vacuum, unplug it, and empty the tank before continuing.
6.4 Blower Function
To use the blower function, detach the hose from the vacuum port and insert it into the blower port located on the back of the power head. This is useful for clearing debris from driveways or workshops.
6.5 Using the Car Cleaning Kit
The 2-piece car cleaning kit includes a flexible crevice tool and a soft bristle brush, both designed to fit the 1-1/4 inch hose end for detailed interior cleaning.
- Flexible Crevice Tool: Ideal for reaching tight spaces such as between seat cushions, under seats, and console gaps. Its bendable design allows for maneuverability in confined areas.
- Soft Bristle Brush: Use this brush for gently agitating and lifting dirt from upholstery, floor mats, and carpets without causing damage.

Image: The flexible crevice tool demonstrating its ability to bend and access difficult areas.

Image: Detailed views of the soft bristle brush and the flexible crevice tool from the car cleaning kit.
7. Maintenance
Regular maintenance ensures optimal performance and extends the life of your vacuum.
7.1 Emptying the Collection Tank
After wet or dry vacuuming, unlatch and remove the power head. Carefully pour out liquids or dispose of dry debris from the tank. Clean the inside of the tank with a damp cloth if necessary.
7.2 Filter Cleaning and Replacement
- Cartridge Filter: For dry use, tap the filter gently to dislodge dust. For heavy dirt, rinse under running water and allow to air dry completely before reinstallation. Replace when damaged or suction decreases significantly.
- Foam Sleeve: For wet use, rinse the foam sleeve with water and allow it to air dry completely before storing or reusing.
- Filter Bag: Dispose of the filter bag when full. Do not attempt to reuse or clean.
7.3 Hose and Accessory Cleaning
Periodically check the hose and accessories for blockages. Clear any obstructions. Wipe down accessories with a damp cloth as needed.
8. Troubleshooting
Refer to this section for common issues and their solutions.
| Problem | Possible Cause | Solution |
|---|---|---|
| Vacuum does not turn on. | No power to outlet; Power cord not plugged in; ON/OFF switch in 'OFF' position. | Check power outlet; Plug in power cord securely; Flip switch to 'ON'. |
| Loss of suction. | Clogged hose or accessory; Full collection tank; Dirty or improperly installed filter. | Clear blockages; Empty tank; Clean or replace filter, ensure proper installation. |
| Water shut-off during wet vacuuming. | Collection tank is full. | Turn off vacuum, unplug, and empty the collection tank. |
| Dust escapes from vacuum. | Filter not installed correctly; Filter damaged; Filter bag full or damaged. | Check filter installation; Replace damaged filter; Replace filter bag. |
9. Specifications
Technical details for the Shop-Vac 5 Gallon 2.0 Peak HP Wet/Dry Vacuum.

Image: Front and back views of the Shop-Vac 5 Gallon Wet/Dry Vacuum with key dimensions.

Image: Visual representation of the Shop-Vac 5 Gallon Wet/Dry Vacuum's core specifications.
| Feature | Specification |
|---|---|
| Brand | Shop-Vac |
| Model | 5 Gallon 2.0 Peak HP Wet/Dry Vacuum |
| Capacity | 5 Gallons |
| Motor Horsepower | 2.0 Peak HP |
| Hose Length | 2.1 Meters (7 feet) |
| Hose Diameter | 1-1/4 inches |
| Filter Type | Cartridge, Foam Sleeve, Filter Bag |
| Special Feature | Wet/Dry/Blower Functionality |
| Number of Wheels | 4 (Casters) |
| Indoor/Outdoor Usage | Outdoor |
| Color | Red |
| ASIN | B0BDF4PC5W |
10. Warranty and Support
For warranty information, product registration, or technical support, please refer to the documentation included with your purchase or visit the official Shop-Vac website. Keep your purchase receipt as proof of purchase for any warranty claims.


