1. Introduction
This manual provides essential information for the safe and efficient use of your TESSAN Ultra Thin Flat Extension Cord. This device is designed to expand your power options with multiple AC outlets and USB charging ports, featuring a space-saving flat plug design and integrated surge protection.
2. Safety Information
Please read and understand all safety instructions before using this product. Failure to follow these instructions may result in electric shock, fire, or serious injury.
- Do not exceed the rated power of 1250W.
- This product is intended for indoor use only. Do not expose to moisture or wet conditions.
- Do not disassemble or modify the device.
- Keep out of reach of children.
- Ensure the plug is fully inserted into the wall outlet.
- Do not use with appliances that require more power than the rated capacity.
- If the product appears damaged, discontinue use immediately and contact customer support.
3. Product Features
- 6-in-1 Power Solution: Converts one wall socket into 3 AC outlets, 2 USB-A ports, and 1 USB-C port.
- Ultra-Thin Flat Plug: Features a 0.31-inch flat head design that fits easily in tight spaces behind furniture.
- 45-Degree Right Angle Plug: Allows for an extra space for other plugs in a wall outlet without blocking.
- USB Charging Ports: Dual USB-A ports (2.4A each) and one USB-C port (3A) for optimal charging speed for various devices.
- Surge Protection: Equipped with overload, short-circuit, and over-current protection to safeguard your electronics.
- Widely Spaced Outlets: Designed with ample space between AC outlets to accommodate bulky adapters.
- 5-Foot Extension Cord: Provides extended reach for convenient placement.
- Rubber Feet: Four rubber feet on the base prevent slipping and sliding on surfaces.
4. Setup Instructions
- Unpack the TESSAN Ultra Thin Flat Extension Cord from its packaging.
- Locate a standard 3-prong wall outlet.
- Plug the flat plug of the extension cord firmly into the wall outlet. The 45-degree angle design allows it to sit flush against the wall, ideal for behind furniture.
- Place the power strip on a stable surface or use the integrated mounting holes on the back for wall mounting if desired.

Image: The 45-degree right angle flat plug minimizes space usage when plugged into a wall outlet, allowing furniture to sit closer to the wall.

Image: Visual comparison demonstrating the minimal protrusion of the TESSAN flat plug (0.31 inches) compared to a standard plug (2.04 inches), ideal for tight spaces.
5. Operating Instructions
Once the power strip is plugged into a wall outlet, it is ready for use.
- AC Outlets: Plug your electronic devices (e.g., laptops, lamps, small appliances) into the 3 AC outlets. Ensure the total power consumption does not exceed 1250W.
- USB-A Ports: Connect your USB-A compatible devices (e.g., smartphones, tablets, earphones) to the two USB-A ports for charging. Each port provides up to 2.4A.
- USB-C Port: Connect your USB-C compatible devices to the dedicated USB-C port for charging. This port provides up to 3A.
- The power strip can charge up to 6 devices simultaneously.

Image: The 6-in-1 power strip in use, demonstrating its ability to charge a laptop, smartphone, and tablet simultaneously via its AC outlets and USB ports.
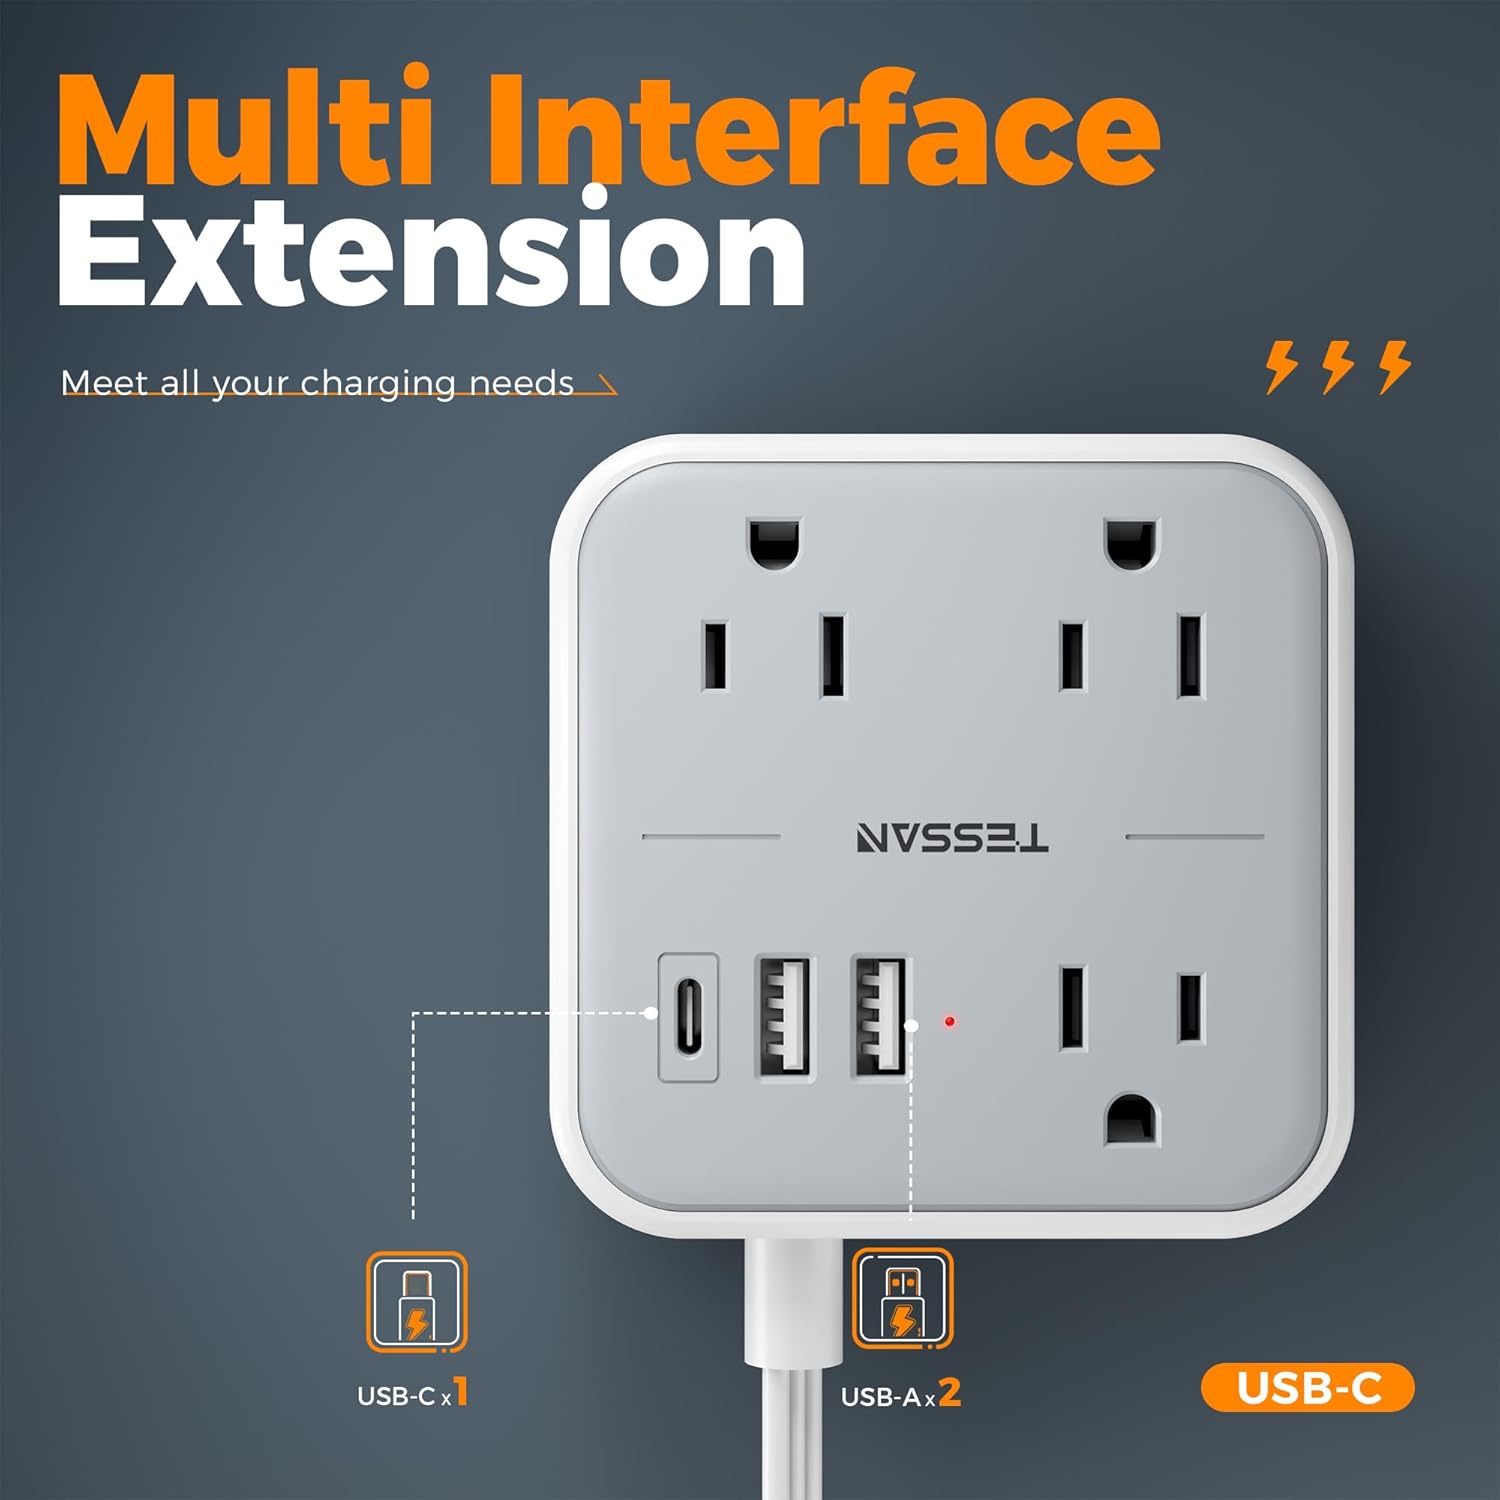
Image: Detailed view of the power strip's multi-interface extension, highlighting the 3 AC outlets, 2 USB-A ports, and 1 USB-C port for diverse charging needs.
Video: An official TESSAN video demonstrating the Ultra Thin Flat Extension Cord with USB Ports, showcasing its features and compact design.
6. Maintenance
- To clean the power strip, unplug it from the wall outlet and wipe it with a dry, soft cloth.
- Do not use liquid cleaners or abrasive materials.
- Regularly check the cord and plug for any signs of damage.
7. Troubleshooting
| Problem | Possible Cause | Solution |
|---|---|---|
| No power to devices | Power strip not plugged in; Wall outlet not working; Overload protection tripped. | Ensure the power strip is securely plugged in. Test the wall outlet with another device. Reduce the number of connected devices or their total wattage. |
| Slow USB charging | Device requires higher current; Multiple devices charging simultaneously. | Check your device's charging requirements. Try charging fewer devices at once or use a dedicated high-speed charger if available. |
| Power strip feels warm | Normal operation under load; Overload. | A slight warmth is normal. If it feels excessively hot, unplug immediately and reduce the load. |
8. Specifications
| Feature | Detail |
|---|---|
| Model Number | TS-103 |
| Rated Power | 1250W Max |
| Voltage | 125V |
| Maximum Current | 10 Amps |
| Total Power Outlets | 3 AC Outlets |
| USB-A Output | 5V/2.4A Max Per Port (2 ports) |
| USB-C Output | 5V/3A Max Per Port (1 port) |
| Total USB Ports | 3 |
| Cord Length | 5 Feet |
| Plug Type | Type B - 3 pin (North American & Japanese) |
| Material | Polycarbonate |
| Item Weight | 0.28 Kilograms |
| Item Dimensions (L x W) | 3.45"L x 1.9"W |

Image: Visual representation of the multiple safety protections integrated into the TESSAN power strip, including over-current, overvoltage, overload, and short-circuit protection.
9. Warranty and Support
This TESSAN product comes with an 18-month warranty from the date of purchase. For any questions, technical support, or warranty claims, please contact TESSAN customer service.
Manufacturer: Zhuhai Tessan Power Technology Co., Ltd.
For further assistance, please refer to the official TESSAN website or contact their support channels.