1. Important Safety Instructions
Please read all instructions carefully before using your KUMIO Ice Maker. Retain this manual for future reference.
- Ensure the appliance is placed on a stable, level surface away from direct sunlight and heat sources.
- Do not immerse the power cord, plug, or any part of the appliance in water or other liquids.
- Unplug the ice maker from the power outlet when not in use, before cleaning, or during maintenance.
- Keep children away from the appliance during operation.
- Do not operate the appliance with a damaged cord or plug, or if it malfunctions or is damaged in any way.
- Use only potable water in the water reservoir.
- Important Note: Before first use, leave the machine upright for 24 hours to allow the refrigerant to settle.
2. Product Overview and Components
The KUMIO Countertop Ice Maker is designed for convenient and efficient ice production. Familiarize yourself with its main components:

Figure 2.1: Front view of the KUMIO Countertop Ice Maker with an ice scoop and bullet ice cubes.

Figure 2.2: The ice maker's internal mechanism, highlighting its capacity to produce 26.5 lbs of ice per day, 9 pieces in 9 minutes, and featuring a 1.5L water tank.

Figure 2.3: Illustration of the two selectable bullet ice sizes: Small (S) for beverages like juice and milk, and Large (L) suitable for whiskey or seafood preservation.
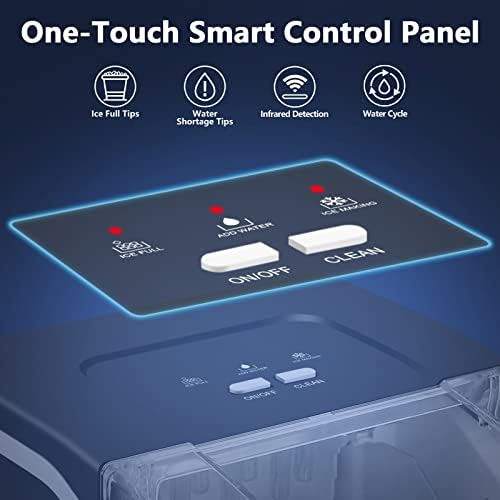
Figure 2.4: The intuitive one-touch smart control panel, featuring indicator lights for 'Ice Full' and 'Add Water', along with 'ON/OFF' and 'CLEAN' buttons.
3. Setup
- Unpack the Ice Maker: Carefully remove all packaging materials. Inspect the appliance for any damage.
- Placement: Place the ice maker on a flat, stable, and level surface. Ensure there is adequate ventilation around the unit (at least 6 inches of space on all sides) to allow for proper heat dissipation. Avoid placing it near heat sources or in direct sunlight.
- Initial Cleaning: Before first use, clean the interior of the ice maker. Refer to the 'Maintenance and Cleaning' section for detailed instructions.
- Allow to Settle: After transportation, allow the ice maker to stand upright for at least 24 hours before plugging it in. This allows the compressor fluids to settle, ensuring optimal performance and longevity.
- Connect Power: Plug the power cord into a grounded electrical outlet.
4. Operating Instructions
Operating your KUMIO Ice Maker is straightforward:
- Add Water: Open the lid and fill the water reservoir with potable water up to the MAX fill line. The internal water tank holds 1.5 liters of water.
- Power On: Press the ON/OFF button on the control panel to turn on the ice maker.
- Select Ice Size: Press the SELECT button to choose between two sizes of bullet ice: Small (S) or Large (L).
- Small Ice Bullets: Ideal for juice, milk, and other beverages. Recommended when room temperature is below 59°F (15°C).
- Large Ice Bullets: More suitable for whiskey, cocktails, or for quick cooling purposes like seafood preservation. Recommended when room temperature is above 86°F (30°C).
- Ice Production: The ice maker will begin producing ice. It takes approximately nine minutes to produce the first batch of nine bullet-shaped ice cubes. The machine can produce up to 26.5 pounds of ice in 24 hours.
- Indicator Lights:
- The ADD WATER indicator light will illuminate when the water reservoir is low, prompting you to refill.
- The ICE FULL indicator light will illuminate when the ice basket is full. An internal sensor automatically detects this and stops production to prevent overflow.
- Collecting Ice: When the ice basket is full, carefully remove it to collect the ice. The transparent lid allows you to monitor the ice capacity without opening the unit. Unused ice bullets will melt back into the water reservoir and be recycled for the next batch.
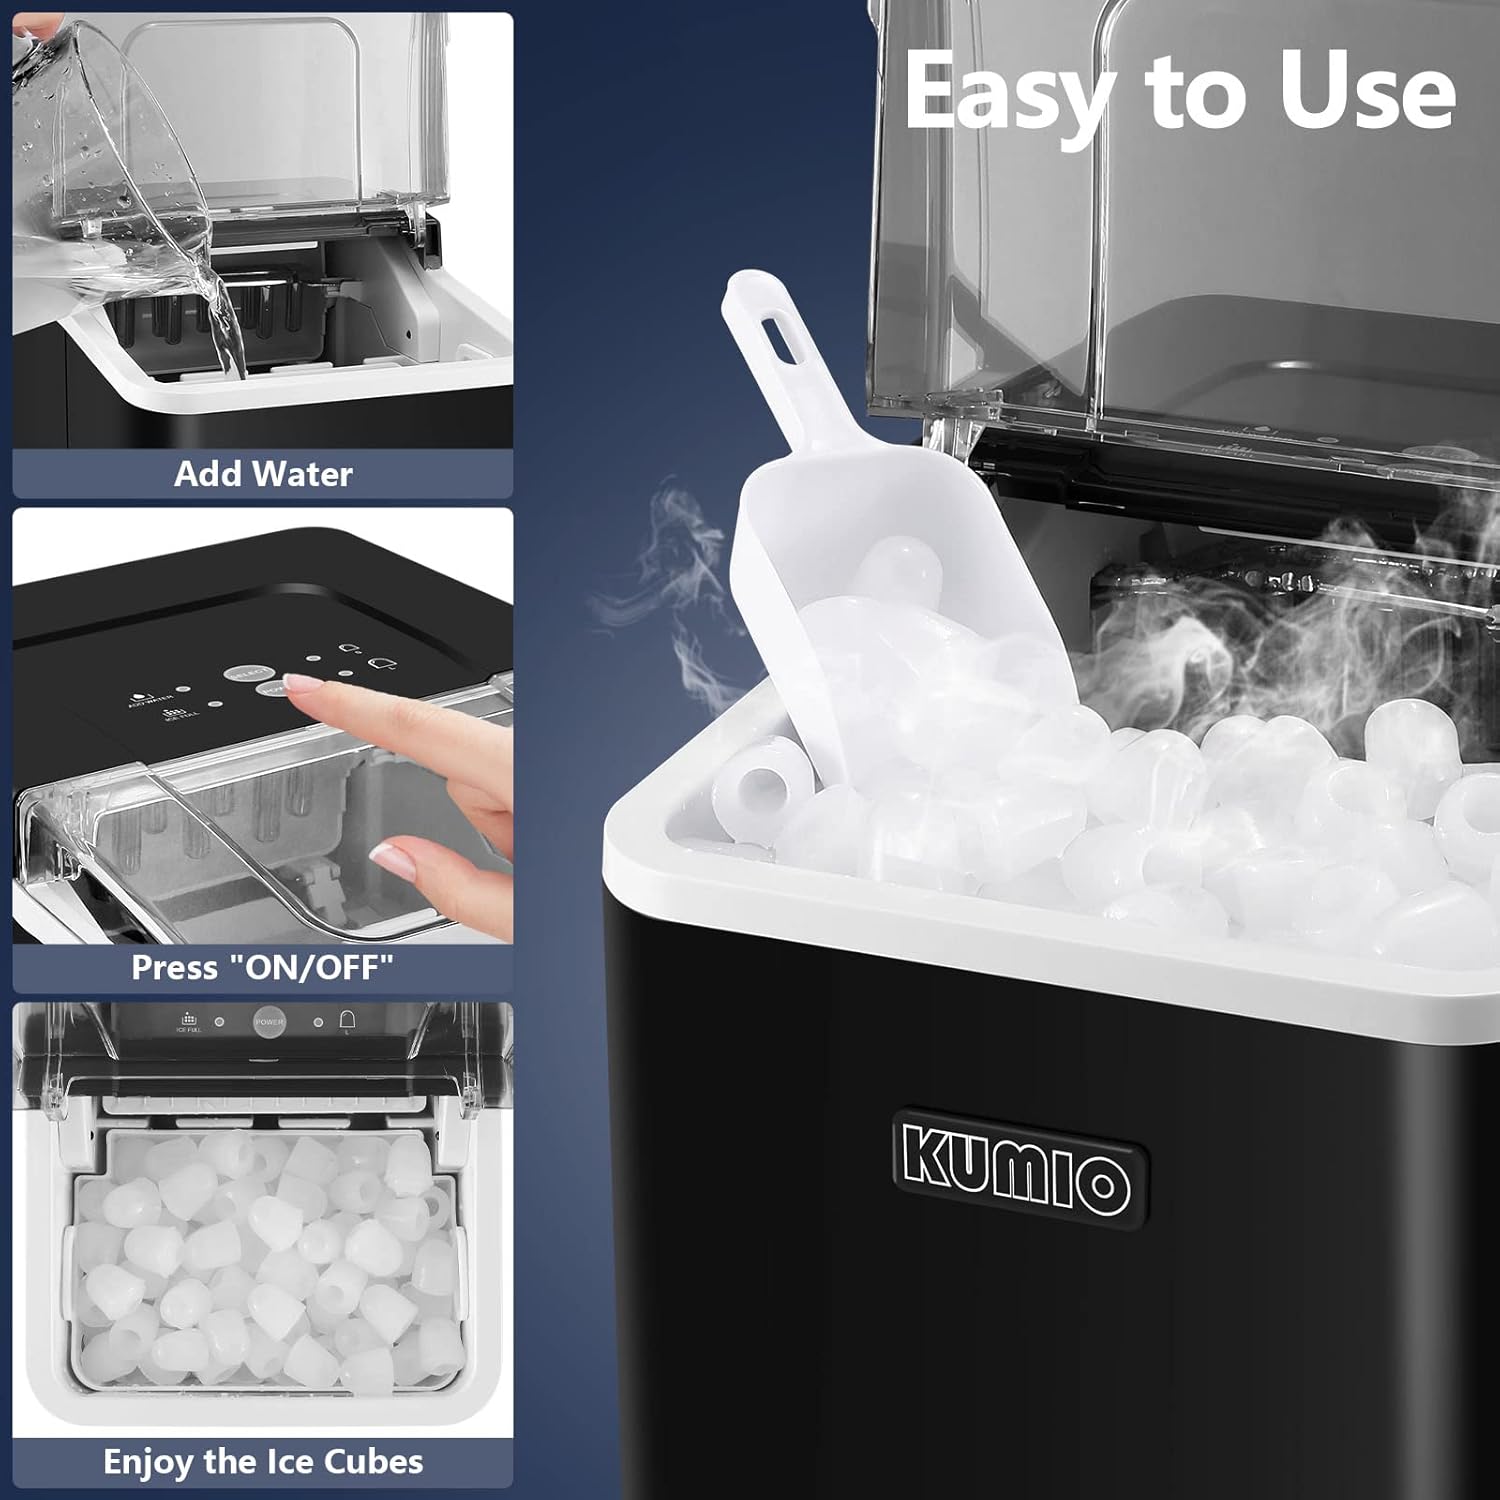
Figure 4.1: Simple steps for operation: Adding water, pressing the ON/OFF button, and collecting the ice cubes.
5. Maintenance and Cleaning
Regular cleaning ensures optimal performance and extends the lifespan of your ice maker.
- Self-Cleaning Function:
- Ensure there is water in the tank.
- Press and hold the CLEAN button for 3 seconds to activate the automatic five-cycle cleaning function.
- The cleaning cycle will run automatically.
- Draining Water: After the self-cleaning cycle or when you need to drain dirty water, locate the small rubber plug at the bottom of the machine. Open the plug to drain the water completely. Close the plug securely afterward.
- Water Filtration System: The water tank inlet is equipped with a filter to remove impurities and improve the taste of the ice. Periodically check and clean this filter as needed.
- External Cleaning: Wipe the exterior of the ice maker with a soft, damp cloth. Do not use abrasive cleaners or solvents.
- Storage: If storing the ice maker for an extended period, ensure it is thoroughly cleaned and dried. Drain all water and leave the lid slightly ajar to prevent mold or mildew growth.
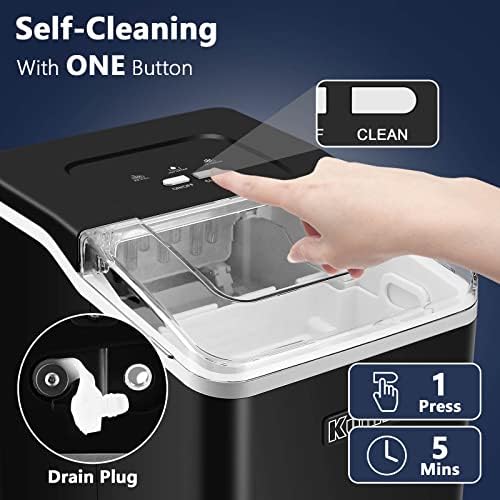
Figure 5.1: Activating the self-cleaning function by pressing the CLEAN button and locating the drain plug for water removal.
6. Troubleshooting
If you encounter issues with your KUMIO Ice Maker, refer to the following common problems and solutions:
| Problem | Possible Cause | Solution |
|---|---|---|
| Ice maker not turning on. | No power; power cord not plugged in; circuit breaker tripped. | Ensure the power cord is securely plugged into a working outlet. Check your home's circuit breaker. |
| "ADD WATER" light is on, but water is in the tank. | Water level sensor is obstructed or malfunctioning; water not reaching sensor. | Ensure water level is above the minimum line. Clean the water level sensor if visible. Unplug and replug the unit. |
| "ICE FULL" light is on, but ice basket is not full. | Ice detection sensor is obstructed or malfunctioning. | Clear any ice blocking the sensor. Clean the sensor if visible. Unplug and replug the unit. |
| No ice production or very little ice. | Insufficient water; ambient temperature too high; ventilation blocked; compressor issue. | Add water. Ensure proper ventilation around the unit. Operate in a cooler environment. If problem persists, contact support. |
| Ice melts quickly in the basket. | The ice maker's storage bin is not refrigerated. | This is normal. The ice maker is designed to produce ice on demand. For long-term storage, transfer ice to a freezer. |
| Machine is noisy. | Normal operation sounds (compressor, water pump); unit not level. | Some noise is normal. Ensure the unit is on a level surface. If noise is excessive or unusual, contact support. |
7. Specifications
Key technical specifications for the KUMIO Countertop Ice Maker, Model ICM-1234:
| Feature | Specification |
|---|---|
| Brand | KUMIO |
| Model Name | ICM-1234 |
| Product Dimensions (L x W x H) | 32D x 22.8W x 29.7H Centimetres (8.98 x 12.6 x 11.69 inches) |
| Net Weight | 7.7 kg (16.98 lbs) |
| Daily Ice Production Capacity | Up to 26.5 lbs (12.02 kg) per 24 hours |
| Ice Production Cycle | 9 bullet ice cubes in 9 minutes |
| Water Tank Capacity | 1.5 Liters |
| Ice Basket Capacity | Up to 1.5 lbs |
| Wattage | 120 watts |
| Voltage | 110 Volts |
| Refrigerant | R600a |
| Material | Acrylonitrile Butadiene Styrene (ABS) |

Figure 7.1: Compact design of the ice maker with its precise dimensions for easy placement on countertops.
8. Warranty and Support
KUMIO is committed to providing high-quality products and customer satisfaction.
- Technical Support: We offer lifetime technical support for your KUMIO ice maker. If you have any questions or require assistance, please do not hesitate to contact our after-sales staff. They are available to provide professional technical support.
- Warranty Claims: For any warranty-related inquiries or claims, please contact KUMIO customer service directly. Ensure you have your purchase details and model number (ICM-1234) ready for faster service.