Introduction
This manual provides detailed instructions for the safe and effective use of the hetaida HTD8208-001 Infrared Ear Thermometer. This device is designed for intermittent measurement and monitoring of human body temperature by consumers in a home environment and as a screening tool in primary care settings. It is suitable for use on adults, children, and infants.
The hetaida HTD8208-001 utilizes advanced sensor technology to ensure accurate and reliable temperature readings. Ear temperature is less affected by external environmental factors and provides a measurement closer to the body's core temperature compared to surface temperature readings.

Image: The hetaida HTD8208-001 Infrared Ear Thermometer, shown with a mother and baby, highlighting its use for all ages.
Safety Information
- Consult your physician if you have concerns about your temperature reading. Self-diagnosis based on temperature readings alone is not recommended.
- Do not use the thermometer if the ear canal is inflamed or infected.
- Keep the device out of reach of children.
- Do not expose the thermometer to extreme temperatures, direct sunlight, or high humidity.
- Do not drop or subject the thermometer to strong impact.
- Clean the probe after each use to ensure hygiene and accuracy.
- This device is intended for household use. It is not a substitute for professional medical advice.
Product Overview
The hetaida HTD8208-001 Infrared Ear Thermometer features a clear LCD display and intuitive controls.
Components:
- Measurement Probe
- Scan Button
- LCD Display
- Power/Memory Button
- Battery Compartment
LCD Display Indicators:

Image: A detailed view of the thermometer's LCD display, showing indicators for measurement, ear temperature, smile (normal) and cry (high temperature) indicators, digital readout, unit (°C/°F), memory indicator, memory number, and battery indicator.
- Measure Indicator: Shows when a measurement is in progress.
- Ear Temperature Indicator: Confirms ear measurement mode.
- Smile Indicator: Appears for normal temperature readings.
- Cry Indicator: Appears for high temperature readings (fever alarm).
- Digital Readout: Displays the temperature value.
- Unit Indicator: Shows °C (Celsius) or °F (Fahrenheit).
- Memory Indicator: Indicates memory recall mode.
- Memory Number: Shows the current memory slot.
- Battery Indicator: Displays battery level.
Setup
1. Battery Installation
The thermometer requires 2 AAA batteries (included). To install or replace batteries:
- Open the battery compartment cover located at the bottom of the device.
- Insert two AAA batteries, ensuring correct polarity (+ and -).
- Close the battery compartment cover securely.
A low battery indicator will appear on the display when batteries need replacement.

Image: The hetaida HTD8208-001 Infrared Ear Thermometer, illustrating its compact design and the location of the battery compartment.
Operating Instructions
1. Power On/Off
Press the Power/Memory button to turn on the thermometer. The device will perform a self-test and display the last measurement. It will automatically shut off after 35 seconds of inactivity to conserve battery life.
2. Taking an Ear Temperature Measurement
For accurate readings, ensure the ear canal is clear of obstructions and the probe is properly positioned.
- Turn on the thermometer.
- Gently insert the probe into the ear canal.
- For children under 1 year: Gently pull the ear slightly back.
- For children 1 year and older, and adults: Gently pull the ear slightly up.
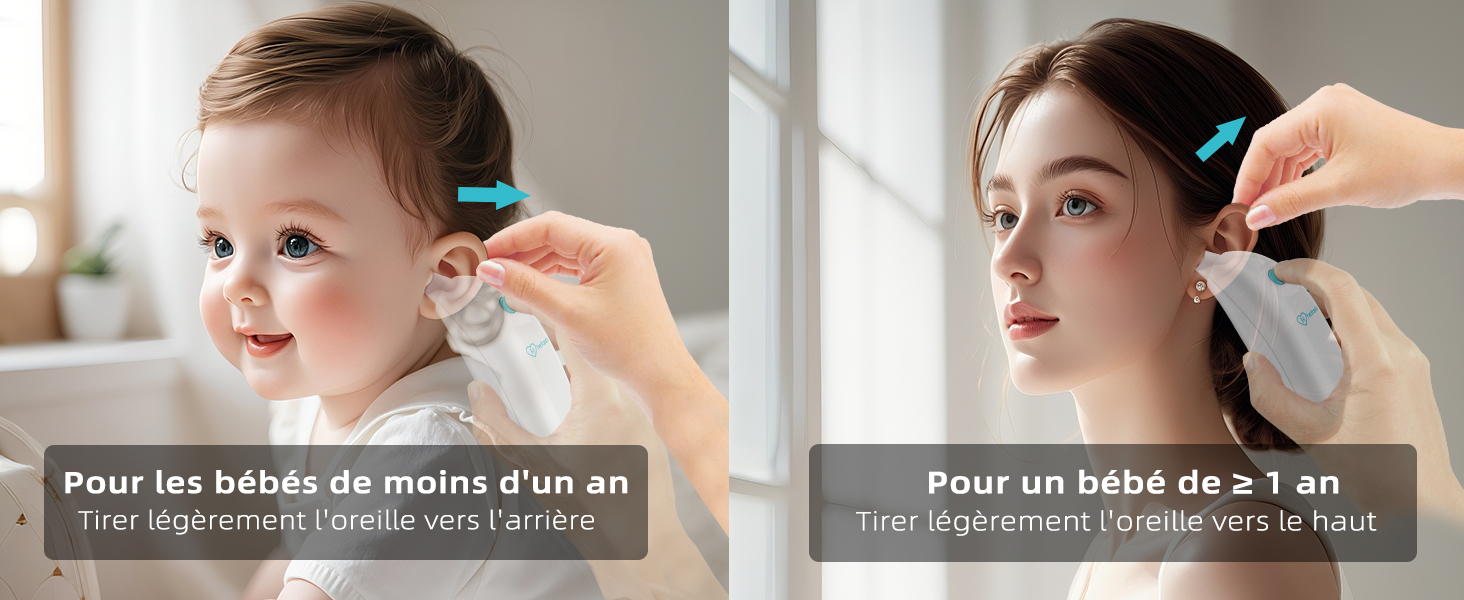
Image: Illustration demonstrating the correct method for pulling the ear during temperature measurement: slightly back for babies under one year, and slightly up for children aged one year and older, and adults.
- Press the "SCAN" button. You will hear a beep, indicating the start of measurement.
- Hold the thermometer steady. After 2-3 seconds, a second beep will sound, indicating the measurement is complete.
- Remove the thermometer and read the temperature on the LCD display.

Image: Step-by-step visual guide on taking an ear temperature: inserting the probe, hearing the first beep to start, and the second beep after 2-3 seconds to indicate completion.
3. Celsius/Fahrenheit Switching
To switch between Celsius (°C) and Fahrenheit (°F):
- Ensure the thermometer is off.
- Press and hold the "SCAN" button for approximately 5 seconds until the unit changes on the display.
- Release the button. The new unit will be saved.

Image: Visual representation of switching between Celsius (°C) and Fahrenheit (°F) temperature units on the thermometer display.
4. Fever Alarm and Backlit Display
The thermometer features a backlit LCD display that changes color based on the temperature reading, providing a quick visual indication of fever:
- Green Backlight: Normal temperature.
- Yellow Backlight: Low fever.
- Red Backlight: High fever, accompanied by an audible alarm (beeps).

Image: The thermometer's display indicating temperature ranges for normal (green), low fever (yellow), and high fever (red), with corresponding Celsius and Fahrenheit values.
5. Memory Function
The thermometer can store up to 10 sets of temperature readings. To recall past measurements:
- With the thermometer on, press the Power/Memory button repeatedly to cycle through the stored readings.
- Each press will display a previous measurement, indicated by the memory number.
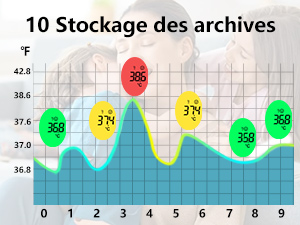
Image: A visual representation of the thermometer's memory function, displaying a graph of 10 past temperature readings with their corresponding fever indications.
Maintenance
1. Cleaning the Thermometer
To ensure hygiene and accurate readings, clean the thermometer after each use:
- Wipe the probe gently with an alcohol swab or a cotton swab moistened with alcohol.
- Do not immerse the thermometer in water or any other liquid.
- Do not use abrasive cleaning agents or thinners.
- Allow the probe to dry completely before storing or next use.
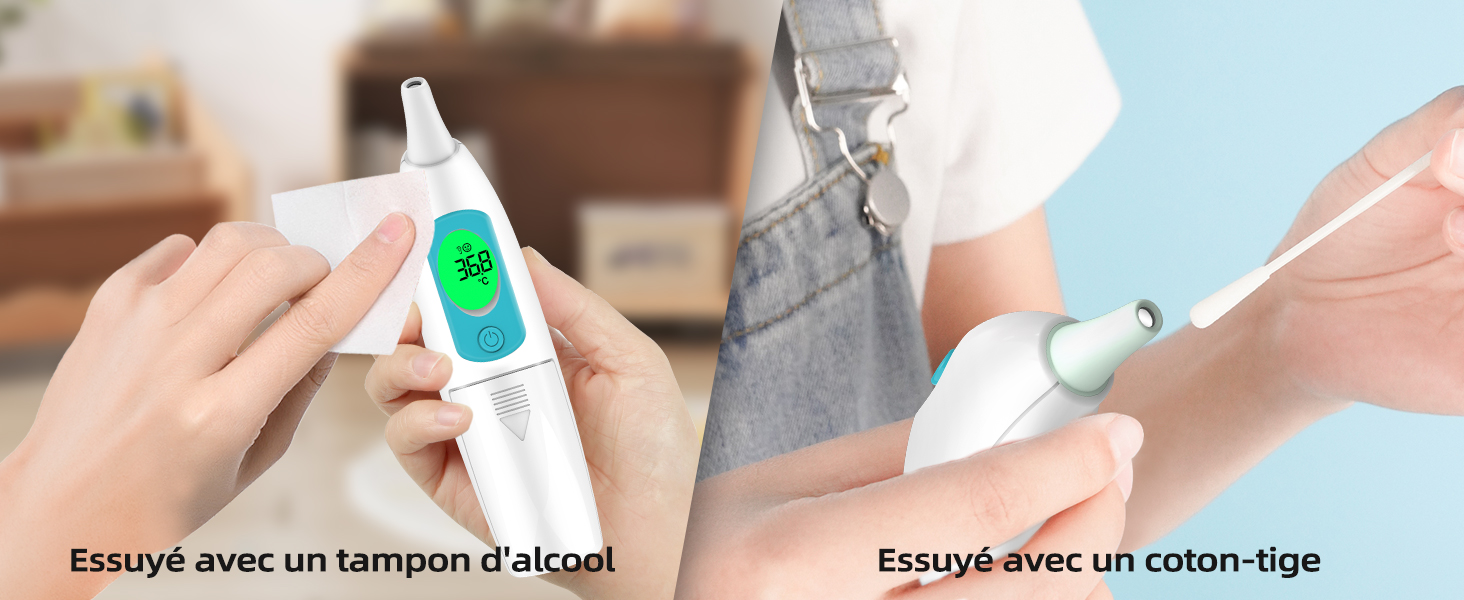
Image: Instructions for cleaning the thermometer: using an alcohol swab for the main body and a cotton swab for the probe tip.
2. Storage
- Store the thermometer in a cool, dry place, away from direct sunlight and extreme temperatures.
- Remove batteries if the device will not be used for an extended period.
Troubleshooting
| Problem | Possible Cause | Solution |
|---|---|---|
| Inaccurate readings | Improper probe placement; dirty probe; earwax obstruction; recent activity (eating, bathing). | Ensure correct probe placement; clean the probe; clear ear canal; wait 30 minutes after activity before measuring. |
| Display shows "Lo" or "Hi" | Temperature is outside the measurable range. | Ensure the ambient temperature is within the operating range (10°C-40°C / 50°F-104°F). If measuring body temperature, ensure proper technique. |
| No display or device won't turn on | Dead batteries; incorrect battery installation. | Replace batteries with new AAA batteries; check battery polarity. |
| Fever alarm (red backlight and beeps) for normal temperature | Possible incorrect reading or device malfunction. | Retake measurement carefully. If issue persists, consult a healthcare professional and contact customer support. |
Specifications
| Feature | Detail |
|---|---|
| Model Number | HTD8208-001 |
| Measurement Range | 34.0°C - 42.9°C (93.2°F - 109.2°F) |
| Accuracy | ±0.2°C (35.0°C - 42.0°C) / ±0.4°F (95.0°F - 107.6°F) |
| Display | LCD with Backlight (Green, Yellow, Red) |
| Memory Storage | 10 readings |
| Automatic Shut-off | Approx. 35 seconds |
| Power Source | 2 x AAA batteries (included) |
| Dimensions | 15.8 x 9.7 x 4.9 cm |
| Weight | 60 grams (without batteries) |
| Material | Plastic |
| Compliance | CE |
Warranty and Support
hetaida offers a 12-month replacement or refund policy for this product. For any inquiries, technical assistance, or warranty claims, please contact hetaida customer service. Our friendly customer support team is available 24/7 to assist you.
For further assistance, please visit the official hetaida store on Amazon: hetaida Store