STARNY STARNY 999
STARNY Double Liquid Type High-Pressure Grouting Machine
Instruction Manual
1. Product Overview
The STARNY Double Liquid Type High-Pressure Grouting Machine is a professional tool designed for high-pressure chemical grouting. It is specifically engineered for concrete crack repair, leakage stoppage, and reinforcement applications using double-liquid type PU foam waterproofing plugging agents, insulation materials, and quick-setting PU/EPOXY reinforcing agents. Its optimized structure, closed design, and portability make it suitable for various construction and repair tasks.

Figure 1: Front view of the STARNY Double Liquid Type High-Pressure Grouting Machine, showing the two liquid containers and pressure gauge.

Figure 2: Side view of the grouting machine, illustrating the connected high-pressure hose and injection gun.
2. Safety Information
Always prioritize safety when operating the machine. Failure to follow these precautions may result in injury or damage to the equipment.
General Safety Precautions:
- Read the entire instruction manual before operating the machine.
- Wear appropriate personal protective equipment (PPE), including safety glasses, gloves, and protective clothing, to prevent contact with grouting materials.
- Ensure the work area is well-ventilated to avoid inhalation of fumes from grouting agents.
- Keep children and unauthorized personnel away from the operating machine.
- Do not operate the machine if any parts are damaged or missing.
- Always disconnect power before performing any maintenance or cleaning.
Specific Warnings:
- DO NOT use water to test the machine. Using water will cause no pressure and can damage the machine. The pressure must be tested with lubricating oil (e.g., engine oil) before first use.
- This grouting machine is designed for polyurethane grouting material. It can inject polyurethane oily and water-based grouting liquid.
- Do not pour corrosive solid materials such as acrylates or water curing agents into the machine. Thinner epoxy resin can be used, but ensure it is finished before reaction to avoid clogging.
- Ensure all screws are tightened before using the device, as shaking may occur during transportation.
3. Product Components & Specifications
Included Components:
The package typically includes the Double Liquid Type High-Pressure Grouting Machine unit, high-pressure hose, injection gun, and various accessories for operation and maintenance.

Figure 3: Common accessories and components included with the grouting machine.
Technical Specifications:
| Parameter | Value |
|---|---|
| Model Number | STARNY 999 |
| Power | 1300 W |
| Power Source | AC, Electric-powered |
| Maximum Output Pressure | 18000 PSI |
| Restart Pressure | 7500 PSI |
| Safe Range of High-Pressure Hose | 10000 PSI |
| Switch Valve Safety Range | 18000 PSI |
| Weight | 13 kg / 29 lb |
| Item Package Quantity | 1 |
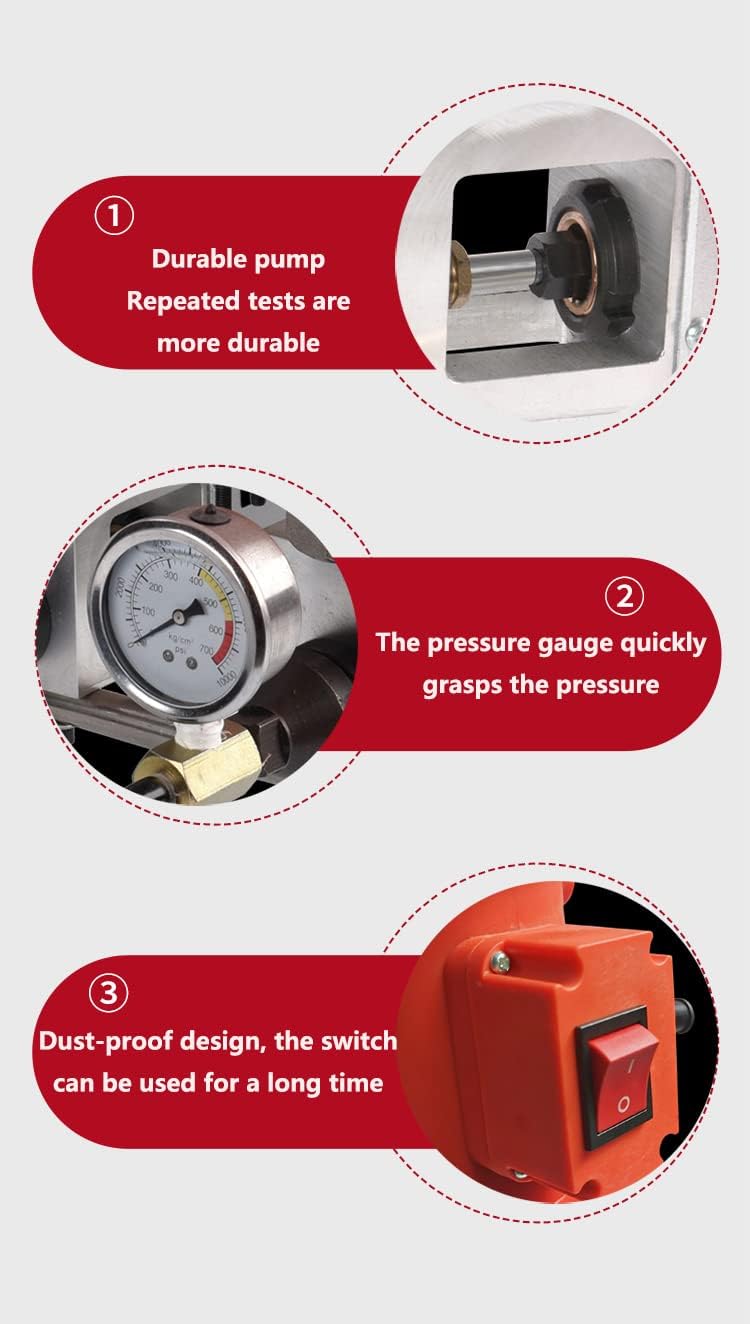
Figure 4: Key features of the machine, including the durable pump, pressure gauge for quick pressure monitoring, and dust-proof switch for extended lifespan.
4. Setup and Initial Preparation
Before First Use:
- Lubrication: The new injection pump must be lubricated before use. Mop the body and accessories with a lubricant-saturated cloth.
- Tighten Screws: Due to potential shaking during transportation, ensure all screws on the device are tightened securely before operation.
- Pressure Test (Crucial):
- Pour lubricating oil (e.g., engine oil) into the material barrel.
- Close the valve and point the gun outwards.
- Turn on the electric drill (power switch).
- When the pressure gauge shows a pressure of 300-400kg, turn off the electric drill.
- Open the valve and spray the lubricating oil back into the oil barrel.
- This confirms the pressure test is successful. Remember, the pressure gauge will not show pressure if tested with liquid without viscosity (e.g., water).
5. Operating Instructions
This machine is designed for double-liquid grouting. The A and B agents are poured separately into their respective feed cups.
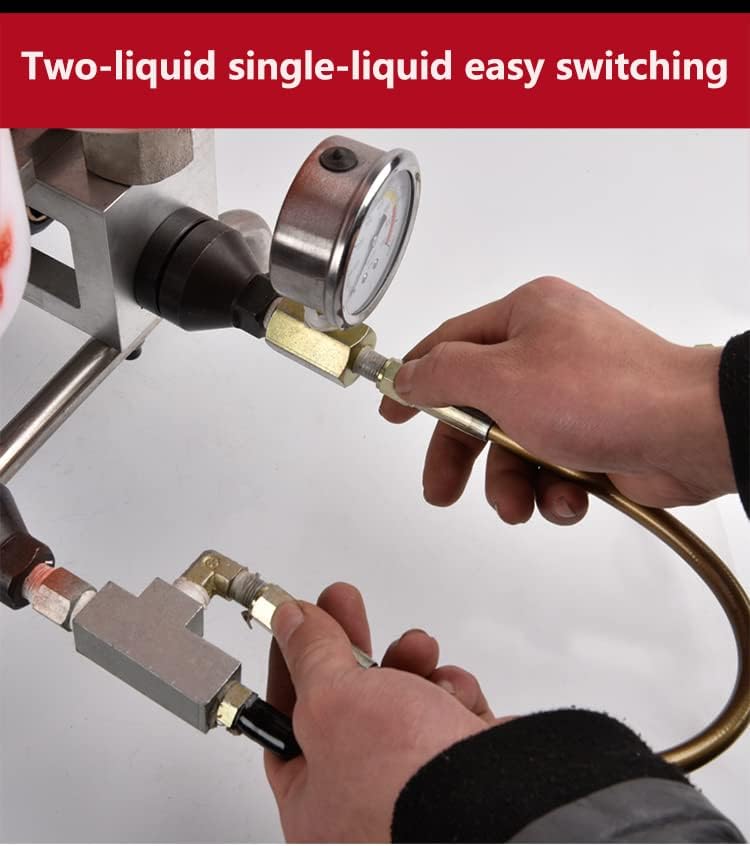
Figure 5: Illustration of the connection point for easy switching between two-liquid and single-liquid operation.
- Material Loading: Pour the A and B agents separately into their designated feed cups. Ensure the lids are securely covered.
- Initial Purge: Turn the switch to 'open' and direct the injector towards a dust bin. Turn on the power switch and expel any remaining lubricant from the hose until the grouting medicament begins to come out. Then, turn off the power and close the switch valve.
- Grouting Process:
- Turn off the switch of the straw and ensure the double-liquid needle is locked.
- Start the power switch.
- Inject the water-sealing agent into the body for leakage stoppage and reinforcement.
- When spraying the double-liquid foam agent, the air compressor must be kept open continually to prevent hardening and jamming of the spraying nozzle.
- The cleanliness of the spraying surface depends on the thickness of the coating.
- Spray the material directly onto the construction surface for 2-3 passes. The second pass should be applied after the completion of the hardening of the first spraying.
- Proportional Adjustment: Two-component grouting can be proportionally adjusted through the controller, allowing for precise application based on material requirements.
6. Maintenance and Cleaning
Proper cleaning and maintenance are essential for the longevity and optimal performance of your grouting machine.
- Immediate Cleaning: After each construction job, you must immediately use a cleaning agent to clean the machine.
- Cleaning Procedure:
- Pour a unique cleanser (such as acetone or xylene) into the material cup.
- Expel the cleanser from the hose into a dustbin.
- Place the injector into the material cup.
- Turn the switch valve on and off several times to create pressure in the hose. This helps in thorough cleaning.
- After 3 to 5 minutes, expel the cleanser from the pump to the dustbin.
- Storage: Store the machine in a clean, dry place, away from direct sunlight and extreme temperatures.
7. Troubleshooting
Common Issues and Solutions:
- No Pressure / Pressure Gauge Not Showing:
- Cause: Machine tested with water or liquid without viscosity.
- Solution: Always test the machine's pressure with lubricating oil (e.g., engine oil) as described in the 'Setup and Initial Preparation' section. The machine is not designed for water testing.
- Spraying Nozzle Hardening/Jamming:
- Cause: Air compressor not continuously open when spraying foam agent.
- Solution: Ensure the air compressor remains open throughout the spraying of double-liquid foam agents to prevent material hardening in the nozzle.
- Machine Clogging:
- Cause: Use of unsuitable materials (e.g., corrosive solids, fast-curing epoxy not purged quickly).
- Solution: Only use recommended materials (polyurethane oily and water-based grouting liquid). If using thinner epoxy resin, ensure it is purged from the machine before it reacts and hardens. Perform thorough cleaning immediately after use.
- Loose Components After Transport:
- Cause: Vibrations during shipping.
- Solution: Always tighten all screws on the device before initial use.
8. Applicable Materials and Applications
Suitable Materials:
- Water-soluble polyurethane plugging agent
- Oil-soluble polyurethane plugging agent
- Epoxy resin (low viscosity liquid materials)
- Acrylic resin (low viscosity liquid materials)
Typical Applications:
- Leakage plugging and sealing of cracks, expansion joints, construction joints, and structural joints in various buildings and underground concrete projects.
- Leakage stoppage and reinforcement of drilling wall protection in geological drilling engineering.
- Grouting of reservoir dam bodies in water conservancy and hydropower projects.
- Leakage stoppage and seepage prevention of cracks in water conveyance tunnels.
- Seepage prevention and reinforcement of concrete cracks in dam bodies.
- Leakage repair in subways, tunnels, culverts, sewage treatment ponds, and concrete cracks with water.
- Water leakage and stoppage in basements, underground garages, underground passages, and concrete cracks.
- Roof concrete slab cracks, wall pipes, corners, water leakage, and leakage stoppage with water.
- High-pressure injection of epoxy resin for cracks in concrete structures, beams, columns, and plates.
9. Warranty and Support
For specific warranty terms, conditions, and technical support, please refer to the documentation provided at the time of purchase or contact the manufacturer, STARNY, directly. Information regarding extended protection plans may also be available from your retailer.
Related Documents - STARNY 999
 |
Integrator's Complete Guide to the Vaddio OneLINK Bridge AV Interface A comprehensive guide for integrators on installing, configuring, and managing the Vaddio OneLINK Bridge AV Interface, detailing its features, connectivity options for HDBaseT and HDMI cameras with various codecs, web interface administration, Telnet API, specifications, and troubleshooting. |
 |
Vaddio IntelliSHOT Auto-Tracking Camera Installation Guide Comprehensive installation guide for the Vaddio IntelliSHOT Auto-Tracking Camera, covering setup, connections, features, and troubleshooting. |
 |
Laser Tools Engine Timing Tool Kit for Volvo Diesel & Petrol - Instructions Comprehensive instructions for using the Laser Tools Engine Timing Tool Kit (Part No. 8194) for Volvo 1.5L and 2.0L petrol engines, and 2.0L diesel engines. Includes component identification, application lists, and detailed steps for engine timing. |
 |
CMT INDUSTRIO 999.500.01 Routing Table: Assembly, Installation, and Maintenance Manual Detailed guide for assembling, installing, and maintaining the CMT INDUSTRIO 999.500.01 Routing Table. Includes parts list, safety warnings, and operational instructions. |
 |
Vaddio DocCAM 4K HDBT Ceiling-Mounted Document Camera Installation Guide This installation guide provides comprehensive instructions for setting up the Vaddio DocCAM 4K HDBT ceiling-mounted document camera. It covers unpacking, features, installation procedures for both suspended tile and hard ceilings, power options, basic connection diagrams, laser safety, status light indicators, and warranty information. |
 |
Instructions de fonctionnement du programmateur SEAeasy (SEP) Manuel d'utilisation détaillé pour le programmateur SEAeasy (SEP) de SEA Systèmes de fermetures, couvrant la configuration, les fonctions, les menus, les paramètres et les accessoires. |