JDLLONG J38-14101-02
JDLLONG J38-14101-02 Carburetor Instruction Manual
For Yamaha Golf Cart Models G2, G5, G8, G9, G11 (1985-1995)
1. Introduction
This manual provides essential information for the installation, operation, and maintenance of your JDLLONG J38-14101-02 Carburetor. This carburetor is designed as a replacement part for specific Yamaha Golf Cart models.
1.1 Compatibility
This carburetor is compatible with the following Yamaha Golf Cart 4-Cycle models:
- Yamaha Golf Cart G2 (1985-1995)
- Yamaha Golf Cart G5 (1985-1995)
- Yamaha Golf Cart G8 (1985-1995)
- Yamaha Golf Cart G9 (1985-1995)
- Yamaha Golf Cart G11 (1985-1995)
Interchangeable Part Numbers: J38-14101-02, J38-14101-01, J38-14101-00.
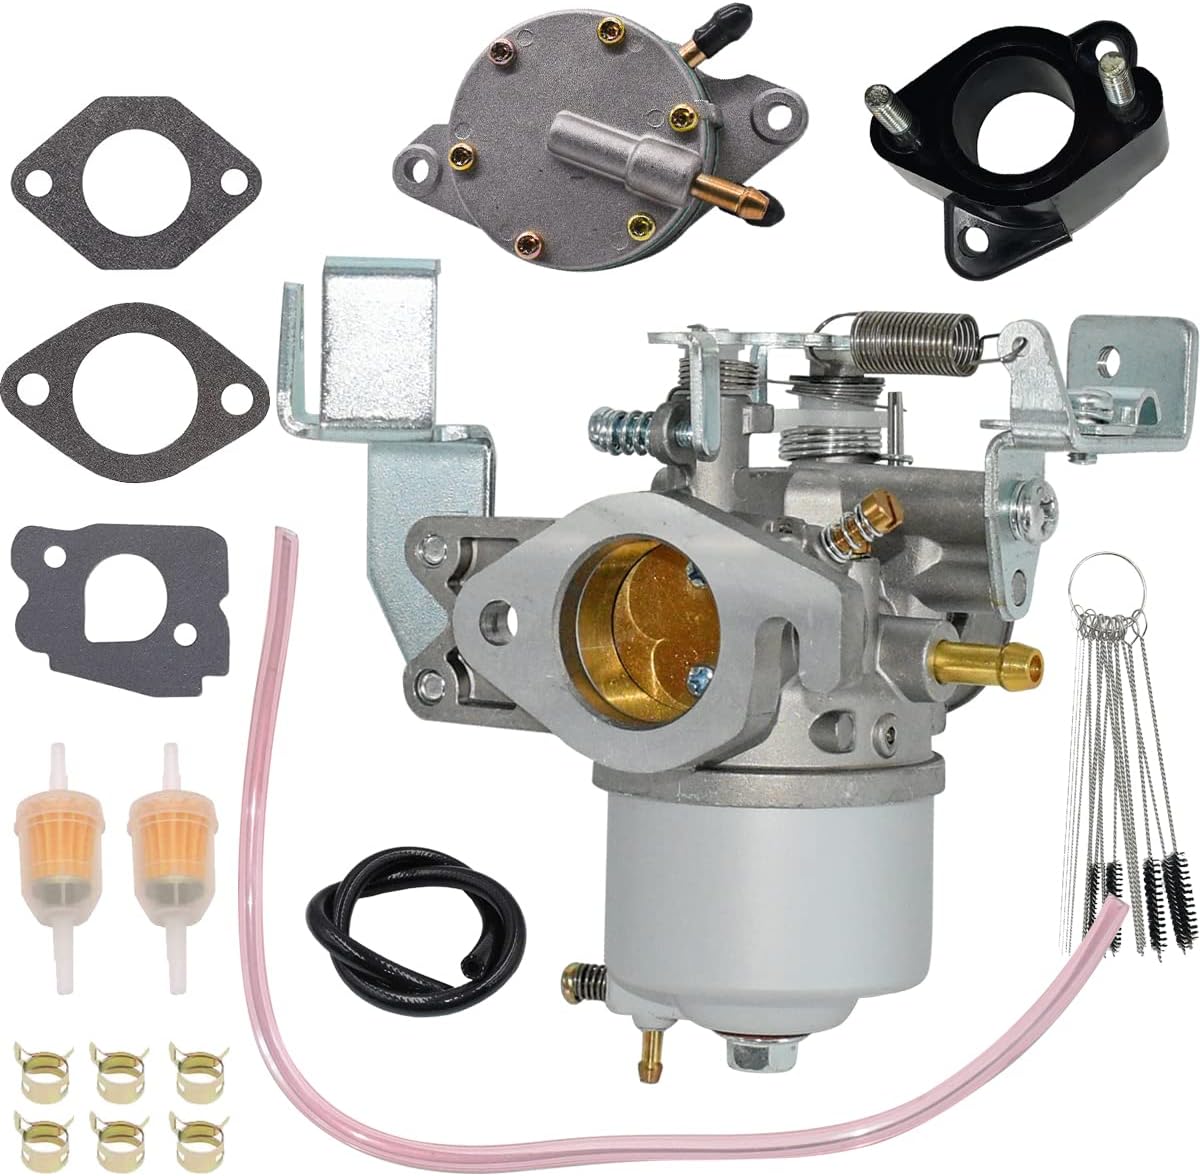
Figure 1: Complete JDLLONG J38-14101-02 Carburetor Kit. This image displays all components included in the package, such as the carburetor, fuel pump, gaskets, fuel filters, fuel lines, clamps, and cleaning tools.
2. Package Contents
Please verify that all items listed below are present in your package:
- 1 x Carburetor
- 1 x Air Filter
- 1 x Gas Fuel Tank Petcock
- 4 x Clamps
- 2 x Fuel Line
- 1 x Spark Plug
- 1 x Shut-off Valve
- 1 x Fuel Filter
- 1 x Carbon Dirt Jet Cleaner Tool Kit
Figure 2: All components included in the JDLLONG J38-14101-02 Carburetor kit. This visual representation helps confirm the presence of all parts.
3. Setup and Installation
Installation of a carburetor requires mechanical knowledge and proper tools. If you are unsure about any step, it is recommended to seek assistance from a qualified technician.
3.1 Pre-Installation Checks
- Ensure the engine is cool and the golf cart is turned off with the parking brake engaged.
- Disconnect the battery to prevent accidental starting.
- Gather all necessary tools, including wrenches, screwdrivers, and a clean rag.
- Inspect all new components for any visible damage before installation.
3.2 Removal of Old Carburetor
- Locate the existing carburetor on your Yamaha Golf Cart engine.
- Carefully disconnect the fuel lines, throttle cable, and choke cable from the old carburetor. Be prepared for minor fuel spills.
- Remove the mounting bolts that secure the carburetor to the intake manifold and air filter housing.
- Remove the old carburetor and any old gaskets.
3.3 New Carburetor Installation
- Clean the mounting surfaces on the intake manifold and air filter housing to ensure a proper seal.
- Install new gaskets (provided in the kit) between the carburetor and the intake manifold, and between the carburetor and the air filter housing.
- Position the new carburetor and secure it with the mounting bolts. Caution: When installing the carburetor intake spacer joint, ensure not to overtighten the bolts, as some components may be susceptible to cracking if excessive force is applied.
- Reconnect the throttle cable, choke cable, and fuel lines. Ensure all connections are secure and free of leaks.
- Install the new air filter, fuel filter, spark plug, and fuel pump as needed.

Figure 3: Side view of the carburetor with key dimensions. This image provides a visual reference for the physical size and connections of the carburetor.

Figure 4: Front view of the carburetor with key dimensions. This image helps in understanding the carburetor's intake and outlet measurements.

Figure 5: Top view of the carburetor with key dimensions. This image illustrates the overall width and height of the carburetor assembly.

Figure 6: Detailed view of the carburetor intake spacer joint and gaskets with measurements. This image highlights the critical components for sealing the carburetor to the engine.
4. Operating Instructions
After successful installation, follow these steps to start and operate your golf cart:
- Reconnect the battery.
- Ensure the fuel tank has sufficient fuel.
- Turn the fuel shut-off valve to the "ON" position.
- Engage the choke if the engine is cold, then disengage once the engine warms up.
- Start the golf cart as per the manufacturer's instructions.
- Allow the engine to run for a few minutes to stabilize.
- Check for any fuel leaks or unusual noises.
The carburetor is typically pre-adjusted for optimal performance. Minor adjustments may be required based on environmental conditions or specific engine requirements. Consult a service manual for detailed adjustment procedures if necessary.

Figure 7: An example of a carburetor installed in a golf cart engine bay. This image provides context for the installed component.
5. Maintenance
Regular maintenance ensures the longevity and optimal performance of your carburetor and golf cart.
- Fuel Filter Replacement: Replace the fuel filter periodically (e.g., annually or every 100 hours of operation) to prevent contaminants from reaching the carburetor.
- Air Filter Cleaning/Replacement: Regularly inspect and clean or replace the air filter to ensure proper air intake and prevent dirt from entering the engine.
- Spark Plug Inspection: Check the spark plug condition and replace it if fouled or worn.
- Fuel System Inspection: Periodically inspect fuel lines and connections for cracks, leaks, or deterioration.
- Carburetor Cleaning: If performance issues arise, the carburetor may require cleaning. Use the provided carbon dirt jet cleaner tool kit for this purpose. Disassembly and reassembly should be done carefully.
6. Troubleshooting
This section addresses common issues you might encounter.
| Problem | Possible Cause | Solution |
|---|---|---|
| Engine not starting or rough idle |
|
|
| Loss of power or poor acceleration |
|
|
| Fuel leaks |
|
|
| Plastic intake spacer breaks during installation |
|
|
7. Specifications
| Feature | Detail |
|---|---|
| Brand | JDLLONG |
| Model Number | J38-14101-02 |
| OEM Part Numbers | J38-14101-00, J38-14101-01, J38-14101-02 |
| Compatible Vehicle Service Type | Yamaha Golf Cart (G2, G5, G8, G9, G11 4-Cycle) |
| Compatible Years | 1985-1995 |
| Fuel Type | Gasoline |
| Item Weight | 1.59 pounds (approx.) |
| UPC | 768432633844 |
8. Warranty and Support
For any questions regarding product quality or performance, please contact JDLLONG customer support. Refer to your purchase documentation for specific warranty terms and contact information.
You can typically find support contact details on the seller's page or within your order history.
Related Documents - J38-14101-02
 |
VEVOR Car Refrigerator User Manual J38 J53 - Operation and Installation Guide Comprehensive user manual for VEVOR Car Refrigerator models J38 and J53. Learn about operation, installation, battery protection, troubleshooting, and specifications for your portable cooling solution. |
 |
VEVOR J38 J53 Car Refrigerator User Manual - Operation, Features, and Troubleshooting Comprehensive user manual for VEVOR J38 and J53 car refrigerators. Learn about operation, temperature settings, battery protection, fault analysis, and safety precautions for your portable dual-zone cooler. |
 |
GTW Light Kit Installation Instructions for Yamaha Drive Golf Cart Step-by-step installation guide for the GTW 02-080 Light Kit on Yamaha Drive golf carts, including included parts and detailed instructions for headlights, taillights, and wiring. |
 |
GTW LED Light Kit Installation Guide for Yamaha Drive G29 Golf Carts This document provides detailed installation instructions for the GTW LED Light Kit, compatible with Yamaha Drive G29 golf carts (model years 2007-2016). Learn about kit contents, required tools, and follow step-by-step guidance for a successful installation. |
 |
Instructions de fonctionnement du programmateur SEAeasy (SEP) Manuel d'utilisation détaillé pour le programmateur SEAeasy (SEP) de SEA Systèmes de fermetures, couvrant la configuration, les fonctions, les menus, les paramètres et les accessoires. |
 |
VeEX RTU-4100 OTDR Module Software Release Notes and Updates Comprehensive release notes detailing firmware and software updates for the VeEX RTU-4100 OTDR Module, including version history, new features, and system requirements from 2019 to 2023. |
Ask a question about this manual
Ask about setup, troubleshooting, compatibility, parts, safety, or missing instructions. Manuals+ will review the question and use this page’s manual context to help answer it.