1. Safety Information
Please read all instructions carefully before assembly and installation. Failure to follow these instructions may result in injury or damage to the product or property.
- Ensure all components are present and undamaged before beginning installation.
- Do not exceed the maximum weight capacity of 40 pounds per shelf.
- Install shelves into wall studs or use appropriate anchors for drywall to ensure secure mounting.
- Keep small parts away from children to prevent choking hazards.
- Wear appropriate safety gear, such as eye protection, during installation.
- Do not hang or climb on the installed shelves.
2. Package Contents
Verify that all items listed below are included in your package. If any parts are missing or damaged, please contact customer support.
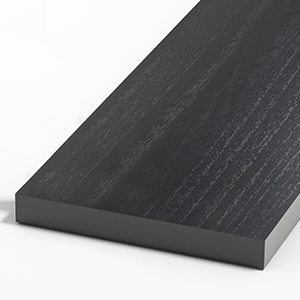
Image: Package contents showing shelves, brackets, and mounting hardware.
- Corner Shelf Boards: 4 pieces (Black, Paulownia Wood)
- Metal Brackets: 8 pieces (Black, L-Shape)
- Wall Anchors: 20 pieces
- Long Screws: 20 pieces (for wall mounting)
- Short Screws: 20 pieces (for attaching brackets to shelves)
3. Installation Instructions
Follow these steps for proper installation of your EACHPAI Floating Corner Wall Shelves.
3.1 Tools Required (Not Included)
- Pencil
- Measuring Tape
- Level
- Drill
- Screwdriver (Phillips head recommended)
- Stud Finder (recommended for secure installation)
3.2 Assembly Steps
- Determine Placement: Choose the desired location for your shelves in a corner. Consider the height and spacing between multiple shelves.
- Attach Brackets to Shelves:
- For each shelf, align two metal brackets with the pre-drilled holes on the underside of the shelf board. The longer arm of the L-shaped bracket should be against the wall once mounted.
- Secure the brackets to the shelf using the provided short screws. Ensure they are tightened firmly but do not overtighten to avoid damaging the wood.

Image: Brackets attached to the underside of a shelf.
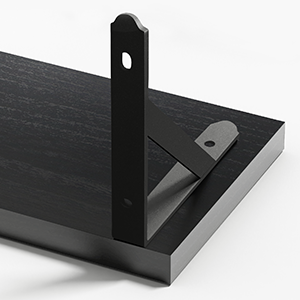
Image: Close-up of bracket attachment.
- Mark Wall Positions:
- Hold the assembled shelf against the wall in the desired corner. Use a level to ensure it is perfectly horizontal.
- Mark the positions of the screw holes on the wall through the bracket holes using a pencil.
- Drill Pilot Holes:
- If installing into drywall without studs, drill pilot holes at the marked locations using a drill bit appropriate for the wall anchors. Insert the wall anchors until flush with the wall surface.
- If installing into wood studs, drill smaller pilot holes suitable for the long screws directly into the studs.
- Mount Shelves to Wall:
- Align the bracket holes with the drilled holes/anchors on the wall.
- Insert the long screws through the brackets and into the wall anchors or studs.
- Tighten all screws securely until the shelf is firmly mounted to the wall. Do not overtighten.
- Repeat for Additional Shelves: Install remaining shelves following the same procedure, ensuring consistent spacing and alignment.

Image: Example of installed shelves in a living room.

Image: Example of installed shelves in a kitchen.

Image: Example of installed shelves in a bedroom.

Image: Example of installed shelves in a bathroom.
4. Maintenance
Proper care will ensure the longevity and appearance of your shelves.
- Cleaning: Wipe the shelves with a dry, soft cloth to remove dust and debris. Avoid abrasive cleaners or harsh chemicals that may damage the finish.
- Inspection: Periodically check all mounting screws to ensure they remain tight and secure. Retighten if necessary.
- Avoid Moisture: While suitable for bathrooms, avoid prolonged exposure to excessive moisture. Wipe up any spills immediately.
5. Troubleshooting
If you encounter any issues with your shelves, refer to the following common solutions:
| Problem | Possible Cause | Solution |
|---|---|---|
| Shelf is wobbly or loose. | Screws are not fully tightened or improper wall anchors were used. | Ensure all screws are securely tightened. If using drywall anchors, verify they are correctly installed and suitable for the wall type. Consider relocating to a wall stud if possible. |
| Shelf appears uneven. | Not leveled during installation. | Remove the shelf, re-mark the screw holes using a level, and reinstall. |
| Shelf damaged during installation. | Overtightening screws or improper handling. | Handle components carefully. Avoid overtightening screws. If damage is significant, contact customer support for replacement options. |
6. Specifications
| Feature | Detail |
|---|---|
| Model Number | M-829 |
| Brand | EACHPAI |
| Material | Paulownia Wood, Metal (Brackets) |
| Color | Black |
| Product Dimensions (each shelf) | 16 x 11.4 x 0.6 inches (Length x Width x Thickness) |
| Item Weight (total package) | 5.06 pounds |
| Weight Limit (per shelf) | 40 Pounds |
| Installation Type | Wall-mounted |
| Care Instructions | Wipe with Dry Cloth |

Image: Shelf dimensions and weight capacity.
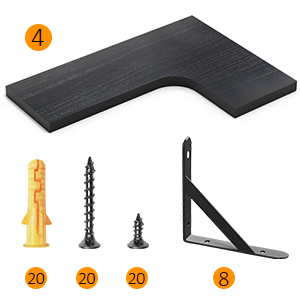
Image: Shelf material texture.
7. Warranty and Support
For warranty information or customer support, please refer to the seller's policy on the purchase platform or contact EACHPAI directly through their official channels. Keep your purchase receipt for any warranty claims.