
Goodsby Goodsby Wheel For Shark - Left Wheel
Goodsby Replacement Left Wheel & Motor Assembly User Manual
For Shark IQ Robot UR1005AE, UR1105ARUS, UR1100SRUS, UR1000SR, QR1000S Vacuum Cleaners
Product Overview
This manual provides instructions for the installation and maintenance of the Goodsby Replacement Left Wheel & Motor Assembly, designed specifically for compatible Shark IQ Robot Vacuum Cleaner models.

Image: The Goodsby Left Wheel & Motor Assembly, showing the wheel, motor, and spring mechanism.

Image: A different angle of the Goodsby Left Wheel & Motor Assembly, highlighting its structural components.
Compatibility Information
It is crucial to verify your Shark IQ Robot Vacuum Cleaner model number before ordering and installing this replacement part. This assembly is specifically designed for the following models:
- Shark IQ Robot UR1005AE
- Shark IQ Robot UR1105ARUS
- Shark IQ Robot UR1100SRUS
- Shark IQ Robot UR1000SR
- Shark IQ Robot QR1000S
Important: This part is NOT compatible with Shark IQ Robot models from the 7xx, 8xx, 20xx, 21xx, 23xx, 24xx, 25xx, 26xx, and 28xx series.
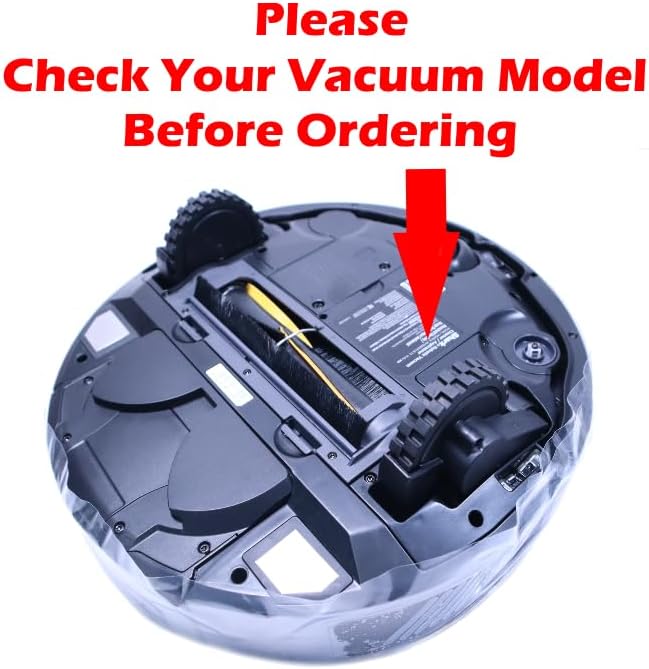
Image: Underside of a Shark IQ Robot Vacuum, indicating where to locate the model number for verification.

Image: Top view of a Shark IQ Robot Vacuum, showing the general layout and indicating the left (L) and right (R) sides for orientation.
Installation Instructions (Setup)
The following steps outline the general procedure for replacing the left wheel and motor assembly. Always refer to your specific Shark IQ Robot's user manual for detailed disassembly and reassembly instructions, as procedures may vary slightly by model.
- Preparation: Ensure the robot vacuum is powered off and disconnected from its charging base. Place the robot upside down on a clean, soft surface to prevent scratches.
- Locate the Left Wheel Assembly: Identify the left wheel assembly on the underside of the robot.
- Remove Retaining Screws: Carefully remove any screws securing the existing left wheel and motor assembly. These are typically small Phillips head screws. Keep track of all screws, as they will be needed for reassembly.
- Disconnect Wiring: Gently disconnect the electrical connector(s) attached to the motor assembly. Take care not to pull on the wires themselves.
- Remove Old Assembly: Once all screws and connectors are detached, carefully remove the old left wheel and motor assembly from the robot chassis.
- Install New Assembly: Position the new Goodsby Left Wheel & Motor Assembly into the vacant slot. Ensure it aligns correctly with the mounting points.
- Connect Wiring: Reconnect the electrical connector(s) to the new motor assembly. Ensure a secure connection.
- Secure with Screws: Reinsert and tighten the retaining screws to secure the new assembly in place. Do not overtighten.
- Final Check: Gently test the movement of the new wheel to ensure it rotates freely and is properly seated.

Image: A detailed view of the Goodsby Left Wheel & Motor Assembly, useful for identifying connection points during installation.
Operating Considerations
Once the new left wheel and motor assembly is installed, the robot vacuum should resume normal operation. If the robot exhibits unusual behavior, refer to the Troubleshooting section.
- Ensure the robot's battery is fully charged after installation.
- Perform a test run in an open area to confirm proper navigation and wheel function.
- Listen for any unusual noises from the wheel assembly during operation.
Maintenance
Regular maintenance of your robot vacuum, including the wheel assemblies, can extend its lifespan and ensure optimal performance.
- Wheel Cleaning: Periodically inspect the wheels for hair, string, or debris accumulation. Use a small brush or a pair of scissors to carefully remove any tangled material.
- Axle Check: Ensure the wheel axles are free of obstructions and allow for smooth rotation.
- General Robot Cleaning: Follow your Shark IQ Robot's manufacturer guidelines for routine cleaning of brushes, filters, and dustbin.
Troubleshooting
If your Shark IQ Robot exhibits issues after replacing the left wheel assembly, consider the following:
| Problem | Possible Cause | Solution |
|---|---|---|
| Robot moves in circles or one wheel is not moving. | Incorrect installation, debris in wheel, faulty connection. | Re-check installation steps, ensure all screws are tight and connections are secure. Clean any debris from the wheel and axle. |
| Robot displays an error related to wheel. | Sensor obstruction, wheel jam, or electronic issue. | Clear any visible obstructions. Power cycle the robot. If the issue persists, consult the original Shark IQ Robot manual or contact Goodsby support. |
| New wheel makes unusual noise. | Debris, improper seating, or manufacturing defect. | Inspect for debris. Ensure the wheel is fully seated and screws are tightened correctly. If noise persists, contact Goodsby for assistance. |
Specifications
| Attribute | Detail |
|---|---|
| Brand | Goodsby |
| Model Name | Left Wheel |
| Item Model Number | Goodsby Wheel For Shark - Left Wheel |
| Compatibility | Shark IQ Robot UR1005AE, UR1105ARUS, UR1100SRUS, UR1000SR, QR1000S |
| Color | Black |
| Package Dimensions | 6 x 4 x 4 inches |
| Item Weight | 8 ounces |
| UPC | 685674544328 |
| Date First Available | August 30, 2022 |
Warranty and Support
Goodsby is committed to providing quality products and services. If you encounter any issues with your Goodsby Replacement Left Wheel & Motor Assembly or have questions regarding its installation or performance, please contact Goodsby customer support.
For specific warranty details, please refer to the product packaging or contact Goodsby directly. Your satisfaction is our priority.
Ask a question about this manual
Ask about setup, troubleshooting, compatibility, parts, safety, or missing instructions. Manuals+ will review the question and use this page’s manual context to help answer it.