1. Introduction
This manual provides detailed instructions for the MAIWO M.2 NVMe SSD 4-Bay Docking Station and Cloner Duplicator. This device is designed for high-speed data transfer and efficient offline cloning of M.2 NVMe Solid State Drives. It supports simultaneous read/write operations for up to four SSDs and offers a convenient one-key offline cloning function for two groups of 1:1 duplication.

Image 1.1: MAIWO M.2 NVMe SSD 4-Bay Docking Station in operation.
2. Package Contents
Please verify that all items listed below are included in your package:
- 1x MAIWO 4-Bay NVMe M.2 Docking Station with Offline Clone Function
- 1x USB-C to USB-A Data Cable (80cm)
- 1x 12V 3A Power Adapter
- 1x User Manual (This document)
3. Product Overview
Familiarize yourself with the components and indicators of your MAIWO docking station.

Image 3.1: Labeled diagram of the MAIWO M.2 NVMe SSD 4-Bay Docking Station.
- Power Indicator: Illuminates red when power is connected.
- Mode Switch for Group A (PM A): Selects operation mode for Group A.
- Mode Switch for Group B (PM B): Selects operation mode for Group B.
- Clone Button A: Initiates cloning for Group A.
- Clone Button B: Initiates cloning for Group B.
- Source SSD A Slot: Slot for the source SSD in Group A.
- Target SSD A Slot: Slot for the target SSD in Group A.
- Source SSD B Slot: Slot for the source SSD in Group B.
- Target SSD B Slot: Slot for the target SSD in Group B.
- Progress Indicators (25%, 50%, 75%, 100%): Indicate cloning progress.
- OK/Error Indicators: Green for successful operation, red for error.
- USB-C Port: For connecting to a computer.
- DC IN Port: For power adapter connection.
4. Compatibility
This device is designed to work with specific types of M.2 SSDs and operating systems.
- Supported SSD Type: M.2 PCIe NVMe SSDs with an M Key interface.
- Supported SSD Sizes: 2230, 2242, 2260, 2280, 22110mm.
- Unsupported SSD Types: B Key or B+M Key SATA SSDs are NOT supported.
- Operating System Support: Compatible with Windows, macOS, and Linux operating systems.

Image 4.1: M.2 NVMe SSD compatibility details.
5. Setup
Follow these steps for initial setup of your docking station.
- Connect Power: Connect the provided 12V 3A power adapter to the DC IN port on the docking station and then to a power outlet. The Power Indicator will illuminate red.
- Insert SSDs: Carefully insert your M.2 NVMe SSDs into the desired Source and/or Target slots. Ensure they are fully seated.
- For Read & Write Mode: Connect the USB-C to USB-A data cable between the docking station's USB-C port and an available USB port on your computer.
- New Drive Preparation: If you are using a new SSD, it must be initialized, partitioned, and formatted through your operating system's Disk Management utility before it can be used. Refer to your operating system's documentation for specific steps.

Image 5.1: Connecting the docking station to a computer for Read & Write mode.
6. Operating Modes
6.1. Read & Write Mode (Connected to PC)
In this mode, the docking station functions as an external 4-bay SSD enclosure, allowing you to access and manage your M.2 NVMe SSDs via your computer.
- Ensure the docking station is powered on and connected to your computer using the USB-C to USB-A data cable.
- Insert up to four M.2 NVMe SSDs into the available slots.
- Your computer's operating system should automatically detect the drives. You can then perform read and write operations at speeds up to 10Gbps.
- The device supports connecting to various devices including laptops, desktops, and smartphones (with compatible USB-C ports).

Image 6.1: Connecting to various devices for Read & Write functionality.
6.2. Offline Clone Mode (Standalone Duplication)
This mode allows you to duplicate SSDs without connecting to a computer. The device supports two independent 1:1 cloning groups (Source A to Target A, and Source B to Target B).
Important Considerations for Cloning:- The Target SSD(s) must have a capacity equal to or greater than the Source SSD(s).
- All data on the Target SSD(s) will be permanently erased during the cloning process. Back up any important data from the Target SSD(s) before proceeding.
- The device does NOT support 1-to-3 cloning. Each group performs a 1:1 clone.
- Disconnect from PC: Ensure the docking station is disconnected from any computer.
- Connect Power: Connect the 12V 3A power adapter to the docking station and a power outlet.
- Insert SSDs: Insert the Source M.2 NVMe SSD(s) into the 'Source' slot(s) and the Target M.2 NVMe SSD(s) into the 'Target' slot(s) for the desired group (A or B).
- Select Group (if applicable): If cloning only one group, ensure the PM switch for the other group is in the 'PM' position. For the group you intend to clone, ensure the PM switch is in the 'Clone' position.
- Initiate Clone: Press and hold the corresponding Clone button (Clone A or Clone B) for approximately 3-5 seconds until the progress indicators (25%, 50%, 75%, 100%) begin to flash.
- Monitor Progress: The progress indicators will illuminate sequentially as the cloning process advances.
- Completion: Once all progress indicators are solid, the cloning process is complete. You can then safely remove the SSDs.

Image 6.2: MAIWO M.2 NVMe SSD 4-Bay Docking Station in Offline Clone Mode.
7. Maintenance
Proper care and maintenance will ensure the longevity and optimal performance of your device.
- Cleaning: Keep the device clean and free from dust. Use a soft, dry cloth for cleaning. Avoid liquid cleaners.
- Environment: Avoid exposing the device to extreme temperatures, direct sunlight, or high humidity.
- Handling SSDs: Handle M.2 NVMe SSDs carefully by their edges to prevent damage to the connectors or components.
- Ventilation: The vertical insert design and aluminum alloy base plate are designed for good heat dissipation. Ensure adequate airflow around the device, especially during prolonged operations like cloning, to prevent overheating.
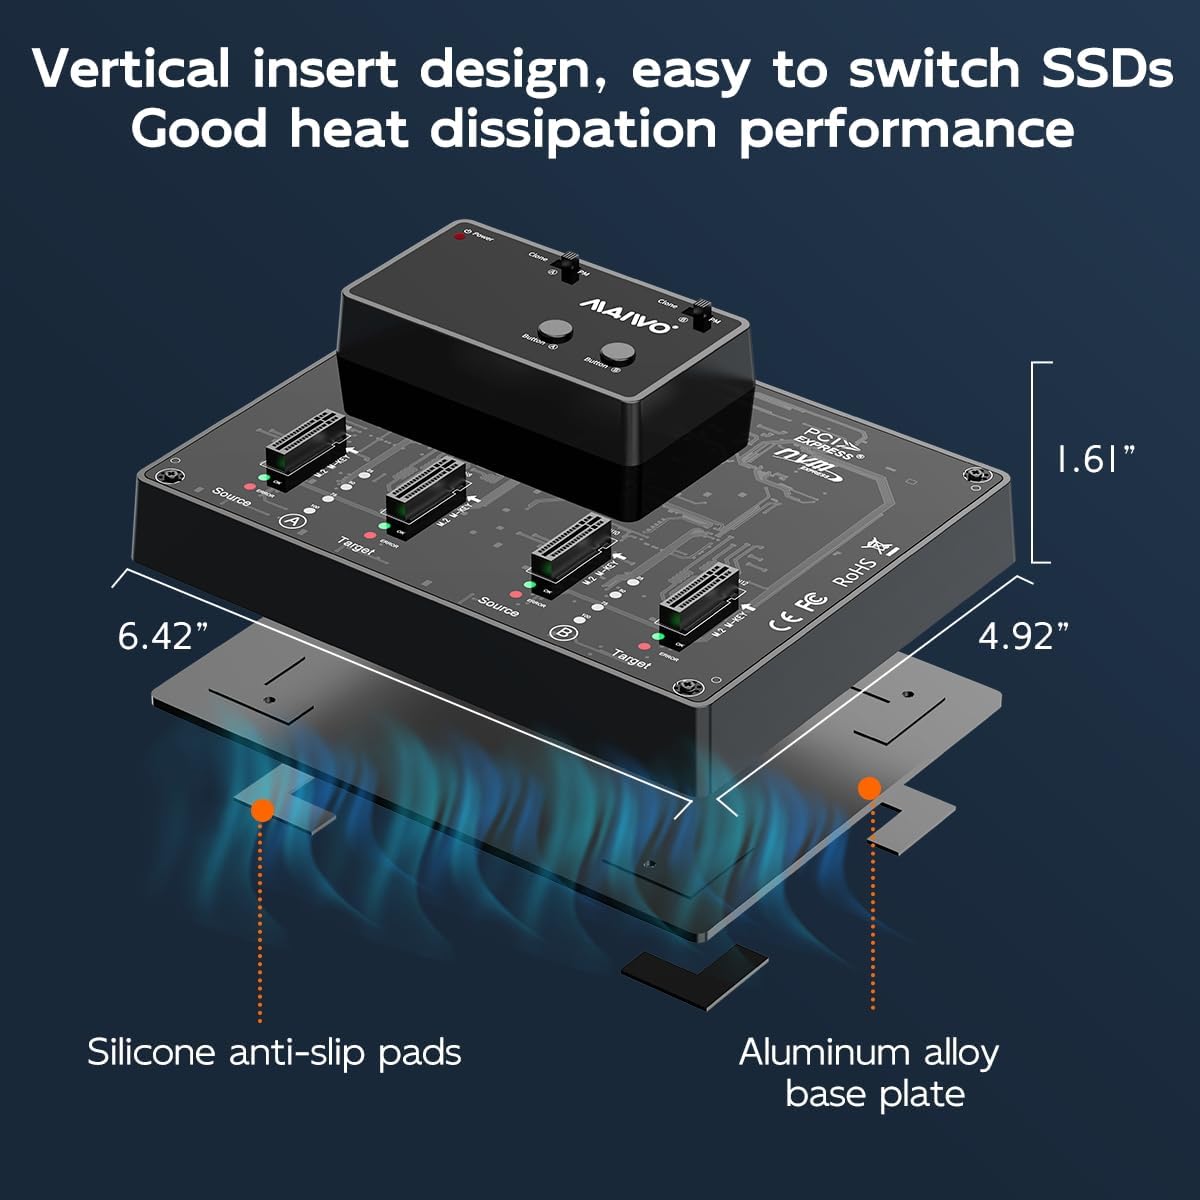
Image 7.1: Heat dissipation features and dimensions of the docking station.
8. Troubleshooting
If you encounter issues, refer to the following common problems and solutions.
- New SSD not recognized by computer:
If a newly inserted SSD is not appearing in your operating system, it likely needs to be initialized, partitioned, and formatted. Access your computer's Disk Management (Windows) or Disk Utility (macOS) to perform these steps.
- Offline cloning fails or does not start:
- Ensure the Target SSD's capacity is equal to or greater than the Source SSD's capacity.
- Verify that both Source and Target SSDs are properly seated in their respective slots.
- Confirm the device is disconnected from any computer during offline cloning.
- Check that the power adapter is securely connected and providing power.
- Ensure the correct Clone button (A or B) is pressed and held for 3-5 seconds.
- Slow data transfer speed:
Ensure your computer's USB port supports USB 3.1 Gen 2 (10Gbps) and that you are using the provided USB-C to USB-A data cable. Older USB ports (e.g., USB 2.0, USB 3.0/3.1 Gen 1) will result in lower transfer speeds.
- SSDs feel hot during operation:
It is normal for NVMe SSDs to generate heat during intensive operations. The device's design includes features for heat dissipation. Ensure the device is placed in a well-ventilated area and not covered, allowing for proper airflow.
9. Specifications
| Model | M.2 NVMe 4 Bay (Clone) |
| Interface | USB 3.1 Gen 2 Type-C (up to 10Gbps) |
| Chipset | ASM2362+ASM2806A |
| SSD Compatibility | M.2 PCIe NVMe SSDs (M Key) |
| Supported SSD Sizes | 2230, 2242, 2260, 2280, 22110mm |
| Max Capacity | Up to 8TB per bay (32TB total) |
| Cloning Function | Two groups of 1:1 offline cloning |
| Power Input | 12V 3A DC |
| Material | Metal aluminum alloy |
| Product Dimensions | 6.42 x 4.92 x 1.61 inches (16.3 x 12.5 x 4.1 cm) |
| Item Weight | 1.72 pounds (0.78 kg) |
10. Warranty and Support
MAIWO products are designed for reliability and performance. For warranty information, please refer to the warranty card included with your product or visit the official MAIWO website. For technical support or inquiries, please contact MAIWO customer service through their official channels.