EAST OAK PES23001
EAST OAK 30" Electric Smoker Instruction Manual
Model: PES23001
Introduction
Thank you for choosing the EAST OAK 30" Electric Smoker. This manual provides essential information for the safe operation, maintenance, and troubleshooting of your new electric smoker. Designed for outdoor use, this smoker features a built-in meat probe, a side chip loader for continuous smoking, and a spacious 725 sq. inch cooking area, allowing for larger batches and consistent results.
Important Safety Information
Please read all safety warnings and instructions carefully before operating the smoker. Failure to follow these instructions may result in fire, electric shock, or serious injury.
- For outdoor use only. Do not operate indoors.
- Always connect to a properly grounded outlet.
- Do not immerse the control panel or electrical components in water.
- Keep children and pets away from the smoker during operation.
- Use heat-resistant gloves when handling hot surfaces or components.
- Ensure the smoker is placed on a stable, non-combustible surface.
- Never leave the smoker unattended during operation.
- Do not use gasoline, alcohol, or other highly volatile fuels to light or relight the smoker.
Setup and Initial Preparation
Before using your EAST OAK Electric Smoker for the first time, it is crucial to perform an initial cleaning and seasoning process to remove manufacturing residues and prepare the unit for optimal performance.
Unpacking and Assembly
Carefully remove all components from the packaging. Refer to the diagram below for component identification and assembly. The smoker comes largely pre-assembled, requiring minimal setup.
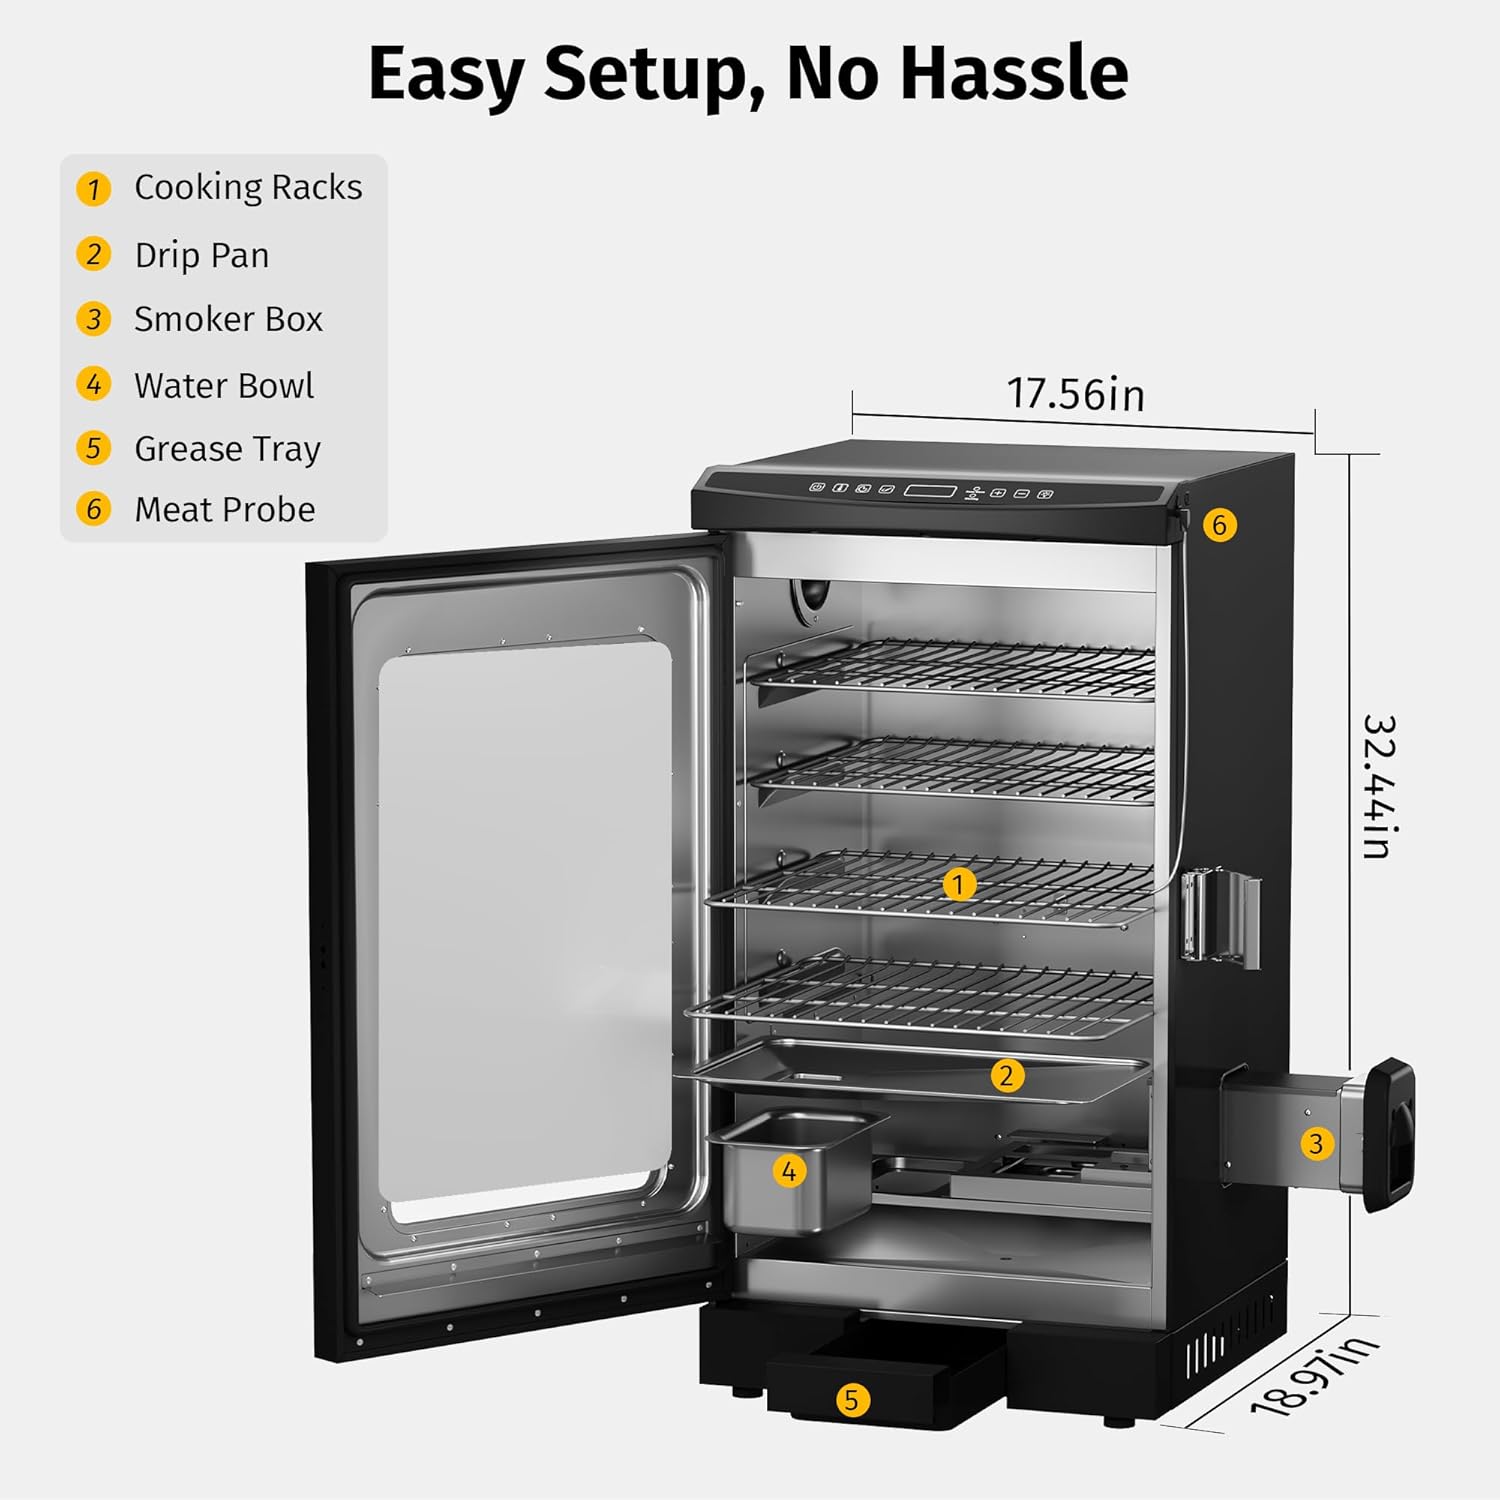
Figure 1: Smoker Components and Dimensions. This diagram illustrates the key parts of the smoker, including the cooking racks, drip pan, smoker box, water bowl, grease tray, and the location of the meat probe, along with overall dimensions.
Initial Cleaning and Seasoning (Before First Use)
This process helps remove any manufacturing oils or dust and prepares the interior surfaces.
- Clean the interior of the smoker with a wet sponge and a mild detergent. Ensure all surfaces are wiped thoroughly.
- Allow the interior to air-dry completely.
- Wipe the interior walls with a cloth lightly coated with cooking oil. Do not oil the smoke box, heating elements, grease tray, or water tray.
- Ensure the water box and smoke box are empty, and the top vent is open.
- Power on the smoker, set the temperature to 275°F (135°C), and allow it to run for 2 hours.
- After 2 hours, turn off the smoker and let it cool down completely.
- During this initial heating, some oil smoke and odors may be present. This is normal and will dissipate.
Your smoker is now ready for use.
Operating Instructions
Loading Wood Chips
The side chip loader allows for easy addition of wood chips without opening the main door, maintaining consistent temperature and smoke.
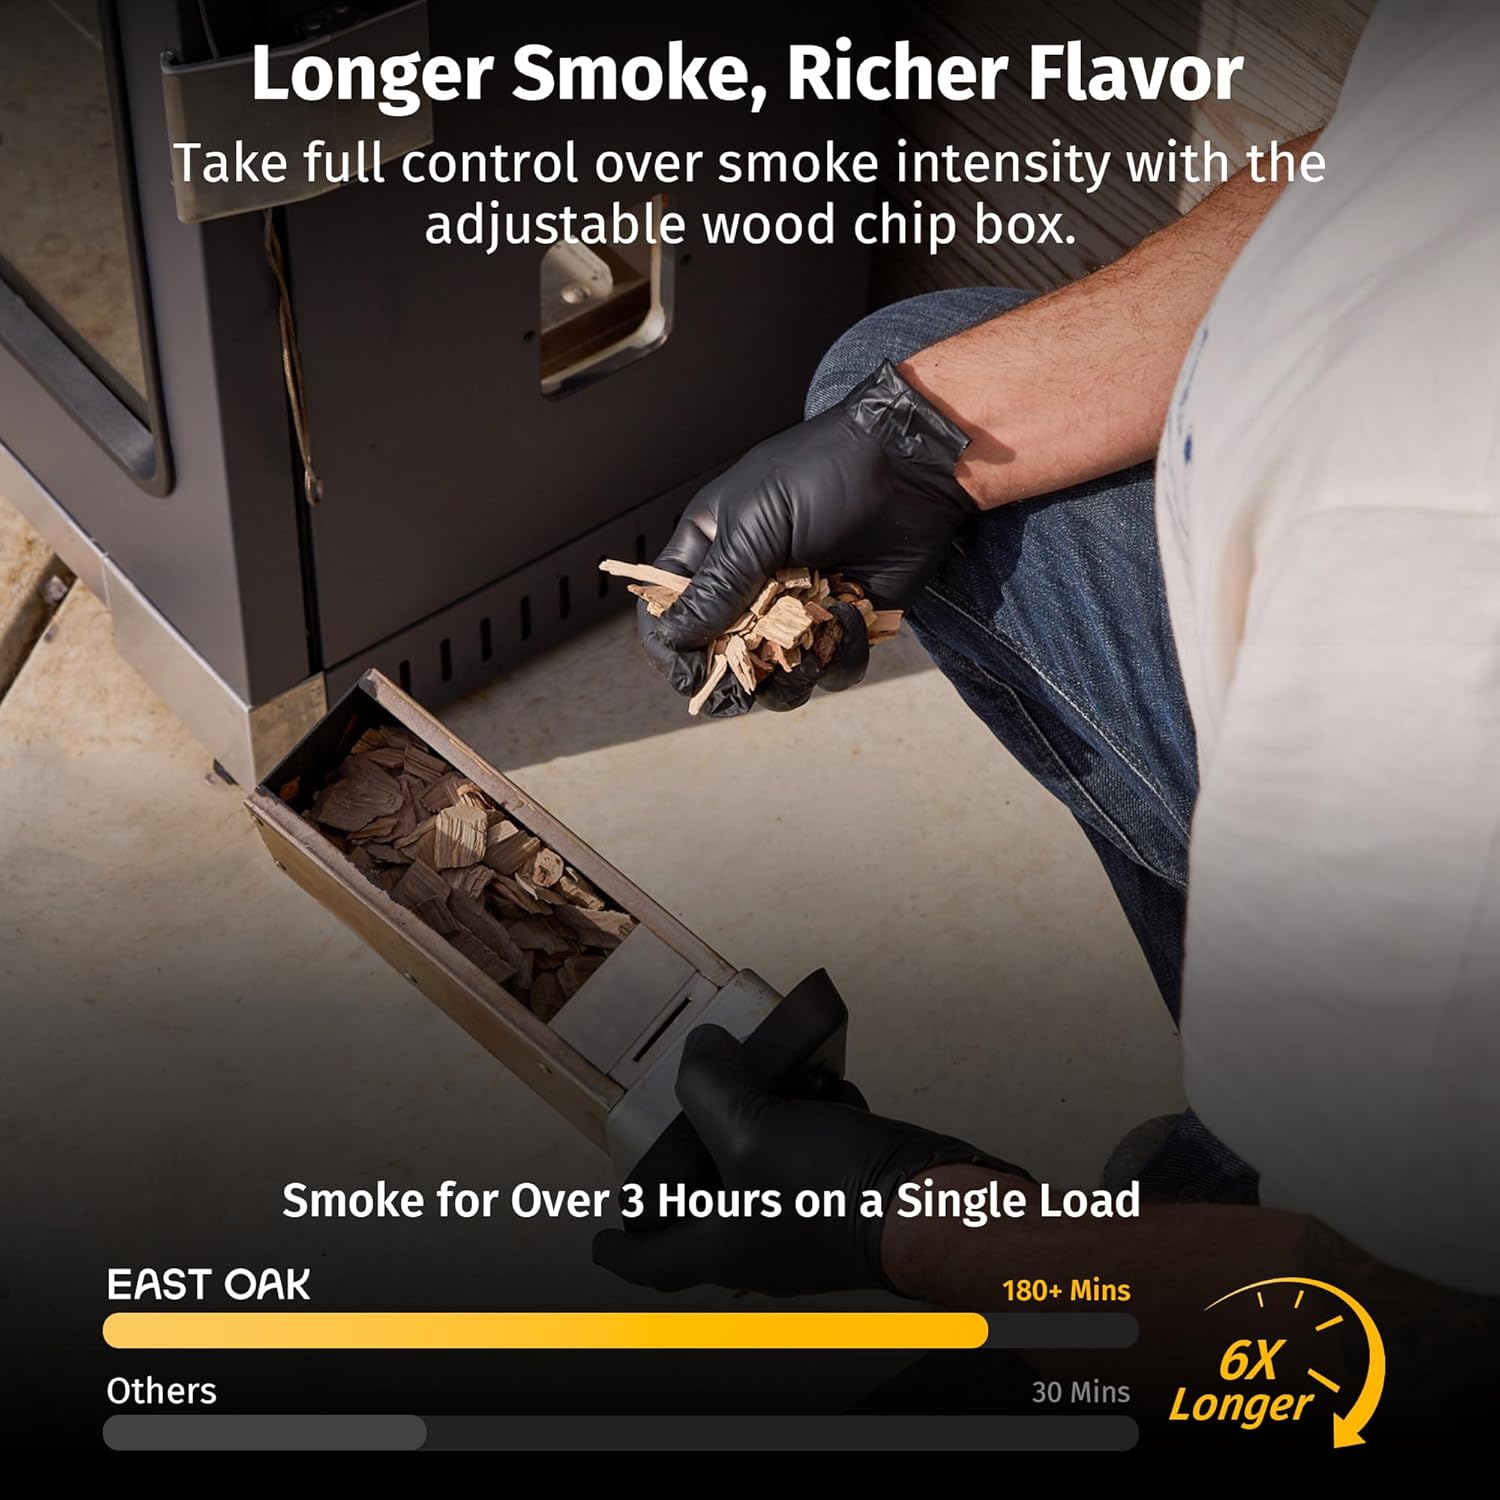
Figure 2: Loading Wood Chips. This image shows the process of adding wood chips to the smoker's side loader, designed for convenience and heat retention.
- Use dry wood chips for best smoke production.
- Fill the wood chip box located in the side loader.
- Slide the loader back into the smoker.
- The smoker is designed to provide up to 6 times longer smoke per load compared to some other models, reducing the need for frequent refills.
Temperature and Time Control
The digital control panel provides precise temperature and time settings.

Figure 3: Digital Control Panel. This image highlights the user-friendly digital interface for setting temperature and time, ensuring precise cooking control.
- Press the power button to turn on the smoker.
- Use the temperature controls to set your desired cooking temperature (up to 275°F / 135°C).
- Set the timer for your desired cooking duration (up to 12 hours).
- For optimal smoke production at low temperatures, it is recommended to initially set the smoker to 250-275°F (121-135°C) to generate ample smoke, then place food inside and adjust the temperature as needed.
Using the Built-in Meat Probe
The integrated meat probe ensures your food is cooked to perfection by monitoring internal temperature in real-time.
- Insert the meat probe into the thickest part of the meat, avoiding bone.
- The smoker will display the internal temperature on the digital panel.
- Once the target internal temperature is reached, the smoker will automatically switch to a "keep warm" mode.
Maximizing Cooking Area
With 725 square inches of cooking space and multiple racks, you can smoke a variety of foods simultaneously.

Figure 4: Spacious Interior. This image illustrates the generous cooking capacity of the smoker, capable of accommodating large items like a whole turkey and multiple racks of food.
It is recommended to place meat on the lower racks and vegetables on the upper racks for optimal cooking and flavor distribution.
Maintenance and Cleaning
Regular cleaning and maintenance will extend the life of your smoker and ensure consistent performance.
- Always allow the smoker to cool completely before cleaning.
- Remove cooking racks, water bowl, and grease tray. Wash them with warm, soapy water.
- The grease tray collects drippings; empty it after each use to prevent buildup.
- Wipe down the interior and exterior surfaces with a damp cloth. For stubborn grease, use a mild degreaser.
- Do not use abrasive cleaners or scouring pads on any part of the smoker.
- Ensure all parts are dry before reassembling or storing the smoker.


Figure 5: Key Removable Components for Cleaning. Images show the grease tray, water bowl, and drip pan, which are designed for easy removal and cleaning.
Troubleshooting
| Problem | Possible Cause | Solution |
|---|---|---|
| Smoker not heating up. | Not plugged in, power switch off, circuit breaker tripped. | Check power connection, ensure switch is on, reset circuit breaker if necessary. |
| Insufficient smoke production. | Insufficient wood chips, temperature too low, wet wood chips. | Add more dry wood chips, ensure temperature is set to at least 250°F (121°C) for initial smoke generation. |
| Temperature not reaching desired level. | Door not sealed, extreme ambient temperature, heating element issue. | Check door seal, avoid opening door frequently, operate in suitable outdoor conditions. Contact support if issue persists. |
| Excessive oil smoke/odor during initial use. | Manufacturing residues burning off. | This is normal during the initial seasoning process. It should dissipate after a few hours of high-temperature operation. |
Specifications
- Model Name: PES23001
- Power Source: Electric
- Color: Night Blue
- Outer Material: Powder Coated Steel
- Inner Material: Aluminized Steel
- Item Weight: 62 Pounds (approx. 28.1 kg)
- Product Dimensions (D x W x H): 17.56" x 18.97" x 32.44" (approx. 44.6 cm x 48.2 cm x 82.4 cm)
- Cooking Area: 725 sq. inches
- Fuel Type: Wood Chips
- UPC: 850045162399
- Form Factor: Tall rectangular smoker with glass door, side wood chip loader, and four removable racks
Warranty and Customer Support
EAST OAK products are designed for quality and durability. This product comes with a 2-year warranty from the date of purchase, covering defects in materials and workmanship.
For warranty claims, technical assistance, or any questions regarding your EAST OAK Electric Smoker, please contact our customer support team:
- USA Customer Support: 1-833-EAST-OAK (1-833-327-8625)
- Operating Hours: Monday - Friday, 9:00 am - 5:00 pm PST/PDT
- You can also visit the official EAST OAK Store on Amazon for more information and accessories.
Please have your model number (PES23001) and proof of purchase ready when contacting support.
Ask a question about this manual
Ask about setup, troubleshooting, compatibility, parts, safety, or missing instructions. Manuals+ will review the question and use this page’s manual context to help answer it.