1. Introduction
This manual provides detailed instructions for the installation, operation, and maintenance of the TycoonWon GP77886 Mixer Cap and GP500520 Pressure Balancing Unit Assembly. This kit is designed as a replacement solution for Kohler K-15701-K and K-15700-K mixing valves.
The assembly features a square brass stem engineered for a proper fit and smooth handle rotation. It is crucial to verify that the shape of your existing valve stem matches the design of this assembly before proceeding with installation.

Image: Exploded view of the GP77886 Mixer Cap and GP500520 Pressure Balancing Unit Assembly, showing its components and how they fit into a mixing valve.
2. Package Contents
The complete kit includes the following components:
- GP77886 Mixer Cap
- GP500520 Pressure Balancing Unit
- Various O-rings for installation
- Mounting Screws

Image: All components included in the package: the GP77886 Mixer Cap, GP500520 Pressure Balancing Unit, various O-rings, and mounting screws.
Video: Package Overview
Video: This video provides a visual overview of the GP77886 Mixer Cap and GP500520 Pressure Balancing Unit, demonstrating the individual components included in the package.
3. Compatibility Check
Before proceeding with installation, it is essential to confirm that the shape of your existing valve stem is compatible with the square brass stem of this replacement assembly. This ensures a proper fit and correct function with your faucet handle.

Image: Illustration of the square shape of the valve stem and a comparison with an existing faucet handle to confirm compatibility before installation.
4. Installation Instructions
Important Safety Note: Before beginning any plumbing work, always turn off the main water supply to prevent leaks or damage. It is recommended to consult a qualified plumber if you are unsure about any steps.
4.1. Preparation
- Turn off the water supply to the faucet at the main shut-off valve.
- Carefully remove the existing mixer cap and pressure balancing unit from the valve body.
- Clean any debris or accumulated scale from inside the pipe and the valve body using sandpaper or a suitable cleaning tool. This step is critical for preventing future leaks and ensuring proper sealing.
- Ensure all O-rings are in place and lubricate them with plumbing grease before installation. This facilitates a proper seal and prevents damage during assembly.
4.2. Installing the Pressure Balancing Unit
- Place the lubricated O-rings into their designated grooves on the GP500520 Pressure Balancing Unit.
- Carefully insert the GP500520 Pressure Balancing Unit into the valve body. Ensure it is firmly placed and do not rotate it in the pipeline during installation to avoid dislodging O-rings.

Image: Diagram illustrating the steps for installing the Pressure Balancing Unit, including cleaning the valve, placing O-rings, and proper insertion into the valve body.
4.3. Installing the Mixer Cap
- Slide the O-ring and upper limit stop onto the valve stem of the GP77886 Mixer Cap.
- Align the mixer cap with the valve body and secure it with the provided cap screws.
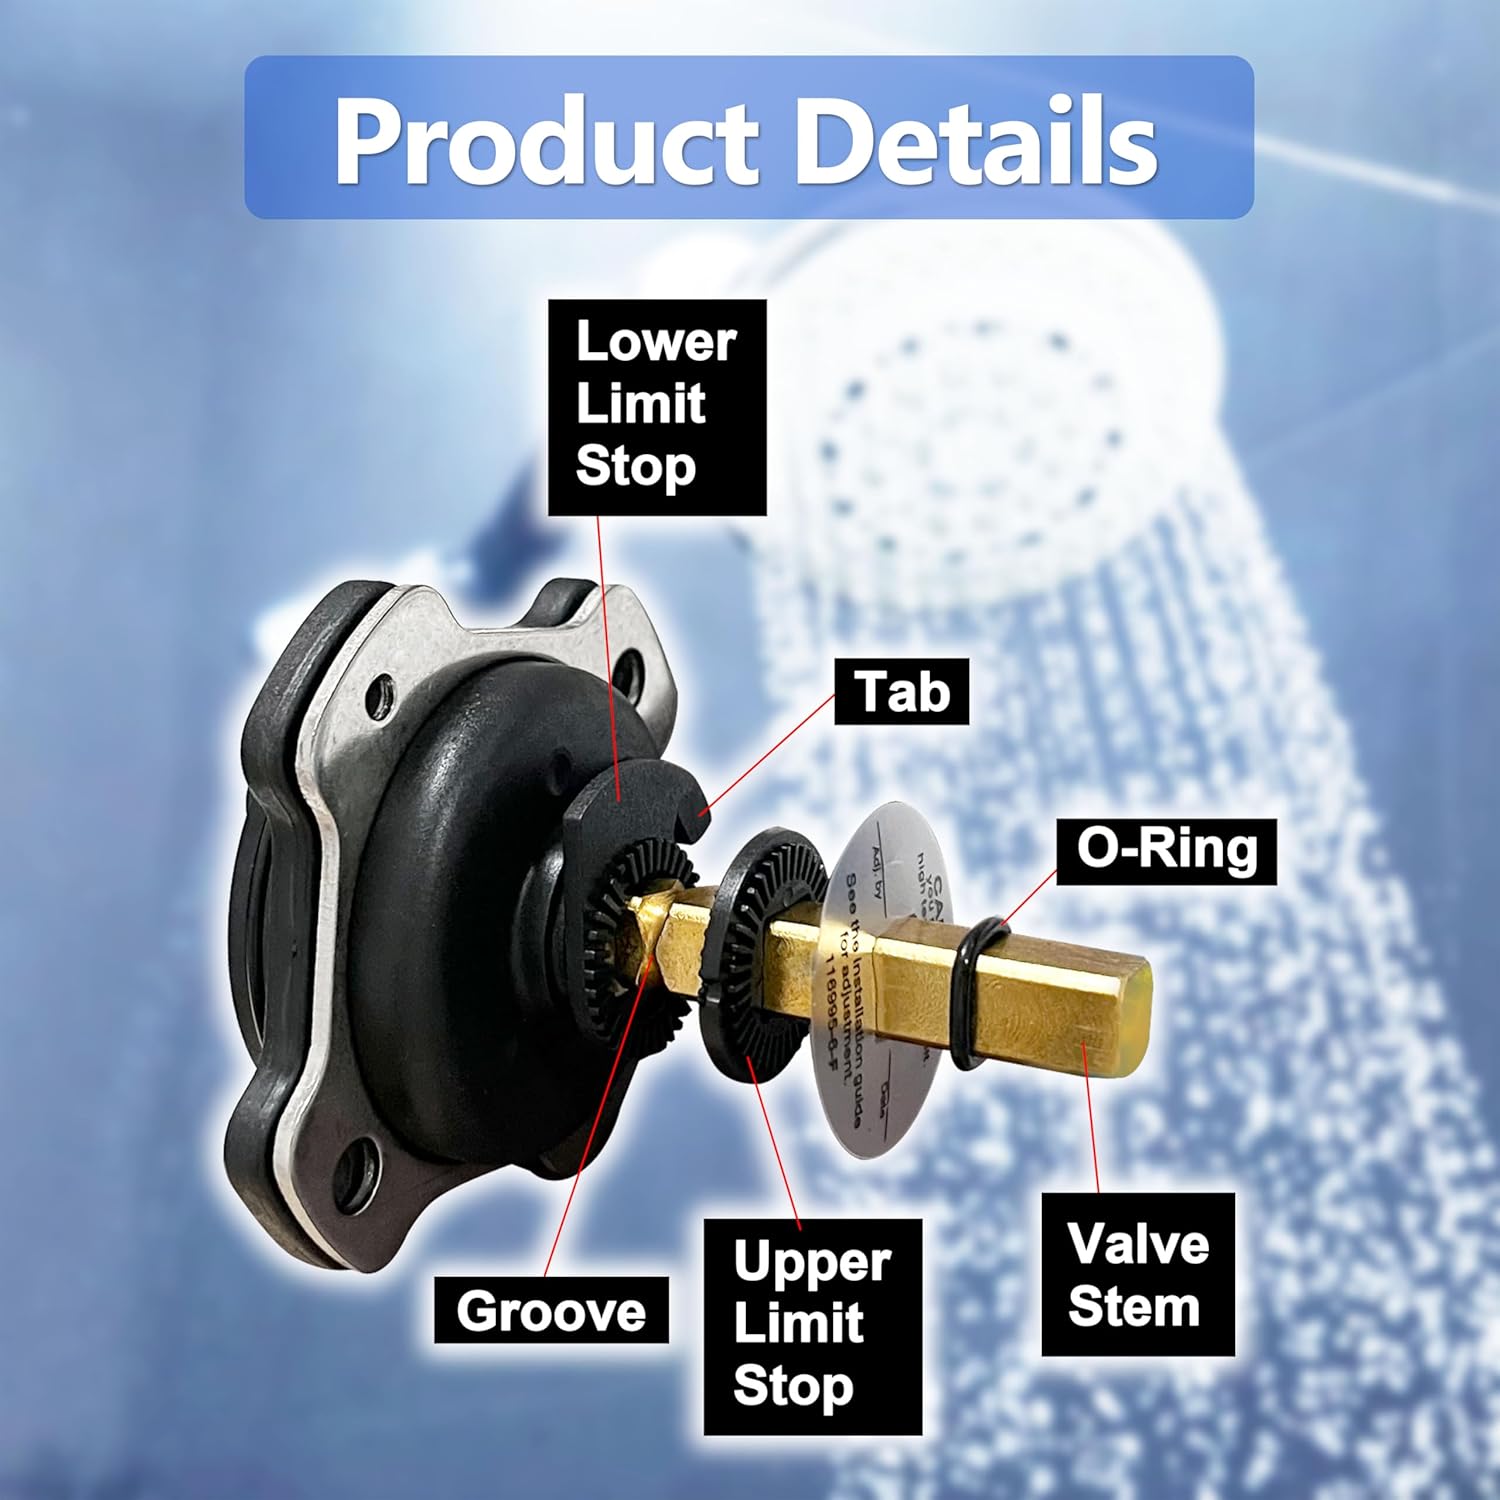
Image: Diagram illustrating the steps for installing the Mixer Cap, showing the body, O-rings, regulator, stainless steel flat collar, and cap screws in their correct positions.
4.4. Important Installation Notes
- O-rings must be installed correctly on both the mixer cap and pressure balancing unit. Apply lubricant if necessary.
- Do not rotate the pressure balancing unit within the pipeline during installation to prevent O-rings from falling off.
- If the mixer cap needs replacement, it is recommended to replace the pressure balancing unit simultaneously, as a faulty pressure balancing unit can also cause leakage.
- Always clean any debris in the pipe before installation, as this can lead to leaks.

Image: Important notes and warnings to consider before and during installation, emphasizing O-ring placement, avoiding rotation, and cleaning debris from the pipes.
5. Operation
5.1. Temperature Limiting Adjustment
The valve stem allows for adjustment of water temperature by changing the position of an internal barrier plate, which mixes hot and cold water in different proportions.
- Slide the O-ring and upper limit stop into the valve stem.
- Place the handle onto the stem and turn it clockwise to the desired temperature.
- Use a thermometer to measure the water temperature from the stream. Adjust the handle until the desired temperature is reached.
- Rotate the lower limit stop until it contacts the tab. Slide the upper limit stop down to engage the lower limit stop. Slide the O-ring into its groove.
- Rotate the handle counter-clockwise to the OFF position.
- Remove the handle and install the trim.

Image: Diagram illustrating how to adjust the valve stem to control water temperature by manipulating the internal barrier plate, showing the mixing mechanism.

Image: A six-step visual guide for adjusting the temperature limiting stop on the mixer cap, including instructions for using a thermometer to verify water temperature.
6. Maintenance
Regular maintenance helps ensure the longevity and proper function of your mixer cap and pressure balancing unit.
- Cleaning: Periodically clean the internal components of the valve to prevent scale and debris accumulation. Buildup can lead to leaks or issues with temperature control.
- O-Ring Lubrication: If disassembling the unit for any reason, always lubricate O-rings with plumbing grease before reassembly to maintain a watertight seal and prevent premature wear.
7. Troubleshooting
7.1. Common Issues and Solutions
- Leaking Faucet:
- Cause: Continuous accumulation of scale in the pipe, damage to gaskets, or debris within the valve.
- Solution: Disassemble the unit, thoroughly clean the pipes and valve body. Replace any damaged O-rings or gaskets. Ensure all O-rings are properly lubricated and seated during reinstallation.
- Water Temperature Not Adjusting:
- Cause: Internal debris, worn components, or incorrect temperature limit stop setting.
- Solution: Clean the valve components. If the issue persists, check the temperature limiting adjustment as described in the "Operation" section. If components are significantly worn, consider replacing the mixer cap and pressure balancing unit.
Image: Explanation of how the kit addresses leaking and temperature adjustment issues, emphasizing the importance of cleaning and correct gasket installation for optimal performance.
8. Specifications
| Feature | Detail |
|---|---|
| Model Number | GP77886-GP500520 |
| Brand | TycoonWon |
| Material | Brass |
| Exterior Finish | Brass |
| Valve Type | Pressure Balancing Valve |
| Inlet Connection Type | Threaded |
| Outlet Connection Type | Threaded |
| Number of Ports | 1 |
| UPC | 761587332075 |
9. Warranty and Support
For warranty information or technical support regarding your TycoonWon GP77886 Mixer Cap and GP500520 Pressure Balancing Unit Assembly, please contact TycoonWon customer service through their official channels. It is recommended to retain your purchase receipt for any warranty claims or inquiries.