1. Introduction
Thank you for choosing the INNOCN 29-inch Ultrawide Monitor, Model WF29-PRO. This monitor is designed to enhance your productivity and entertainment experience with its expansive 21:9 aspect ratio, 2560x1080 resolution, and versatile features. This manual provides essential information for proper setup, operation, maintenance, and troubleshooting to ensure optimal performance and longevity of your device.

Image 1.1: Front view of the INNOCN 29-inch Ultrawide Monitor (WF29-PRO) displaying key features.
2. Safety Information
Please read all instructions carefully before using the monitor. Keep this manual for future reference.
- Do not expose the monitor to rain or moisture to prevent fire or shock hazards.
- Do not open the monitor casing. There are no user-serviceable parts inside. Refer all servicing to qualified personnel.
- Place the monitor on a stable, flat surface to prevent it from falling.
- Ensure proper ventilation around the monitor. Do not block ventilation openings.
- Use only the power adapter and cables provided or recommended by the manufacturer.
- Avoid placing heavy objects on the power cord.
- Unplug the monitor from the power outlet during lightning storms or when unused for long periods.
- When installing, avoid hitting or strongly pressing hard objects against the LCD panel.
3. Package Contents
Verify that all items are present in your package:
- INNOCN 29-inch Ultrawide Monitor
- Monitor Stand (Base and Arm)
- Power Adapter and Cable
- HDMI Cable
- USB Type-C Cable
- User Manual (this document)
- Screws for stand assembly
4. Setup
4.1 Stand Assembly
Follow these steps to correctly assemble the monitor stand:
- Open the packaging box and carefully remove the styrofoam inserts. Place the bottom styrofoam on a flat, stable surface.
- Remove the top styrofoam. Take the monitor body out of its protective bag and place it face down on the bottom styrofoam.
- Remove the stand arm and base from the packaging. As shown in the diagram, attach the stand arm to the base using the provided M6 * L8 screws.
- Firmly push the assembled stand diagonally into the VESA mounting hole on the back of the monitor until you hear a 'click' sound, indicating it is securely locked.

Image 4.1: Stand assembly instructions.
4.2 Connecting the Monitor
The monitor supports multiple input options:
- HDMI: Connect an HDMI cable from your computer or other device to the HDMI port on the monitor.
- DisplayPort (DP): Connect a DisplayPort cable from your computer to the DP port on the monitor.
- USB Type-C: Connect a USB Type-C cable from your compatible laptop or smartphone to the Type-C port on the monitor. This connection supports video, audio, and 65W power delivery to the connected device. Note: 75Hz refresh rate is not supported via Type-C connection.

Image 4.2: Type-C single cable connection for data, video, and power.
4.3 Physical Adjustments
The monitor stand offers ergonomic adjustments for optimal viewing comfort:
- Height Adjustment: Adjust the monitor height by up to 120mm.
- Tilt: Tilt the screen from -5° to +20° to find your preferred viewing angle.
- Swivel: Swivel the monitor left or right by up to 45° in each direction.
- Pivot (Vertical Rotation): Rotate the monitor 90° for vertical orientation, ideal for reading long documents or coding.

Image 4.3: Ergonomic adjustments including pivot, tilt, and height.
4.4 Wall Mounting
The monitor supports VESA 100x100mm wall mounts. Ensure you use a compatible VESA mount and follow the mount manufacturer's instructions for safe installation.

Image 4.4: Monitor mounted on a wall.
5. Operating Instructions
5.1 Power On/Off
Press the power button located on the monitor to turn it on or off. The power indicator light will show the monitor's status.
5.2 On-Screen Display (OSD) Menu
The OSD menu allows you to adjust various monitor settings. Use the control buttons (usually located on the back or bottom right of the monitor) to navigate the menu. Common settings include:
- Brightness/Contrast: Adjust image luminance. The monitor features 350cd/m² high brightness and 1000:1 contrast ratio.
- Color Settings: Select color modes like sRGB or DCI-P3 (93% DCI-P3 coverage for rich, accurate colors).
- Input Source: Manually select between HDMI, DisplayPort, or Type-C inputs.
- Picture-in-Picture (PIP) / Picture-by-Picture (PBP): Display content from two different sources simultaneously.
- Audio: Adjust volume for the built-in speakers or connected headphones.
- Blue Light Filter: Reduce blue light emission to minimize eye strain.
- HDR: Enable or disable HDR functionality for enhanced dynamic range.
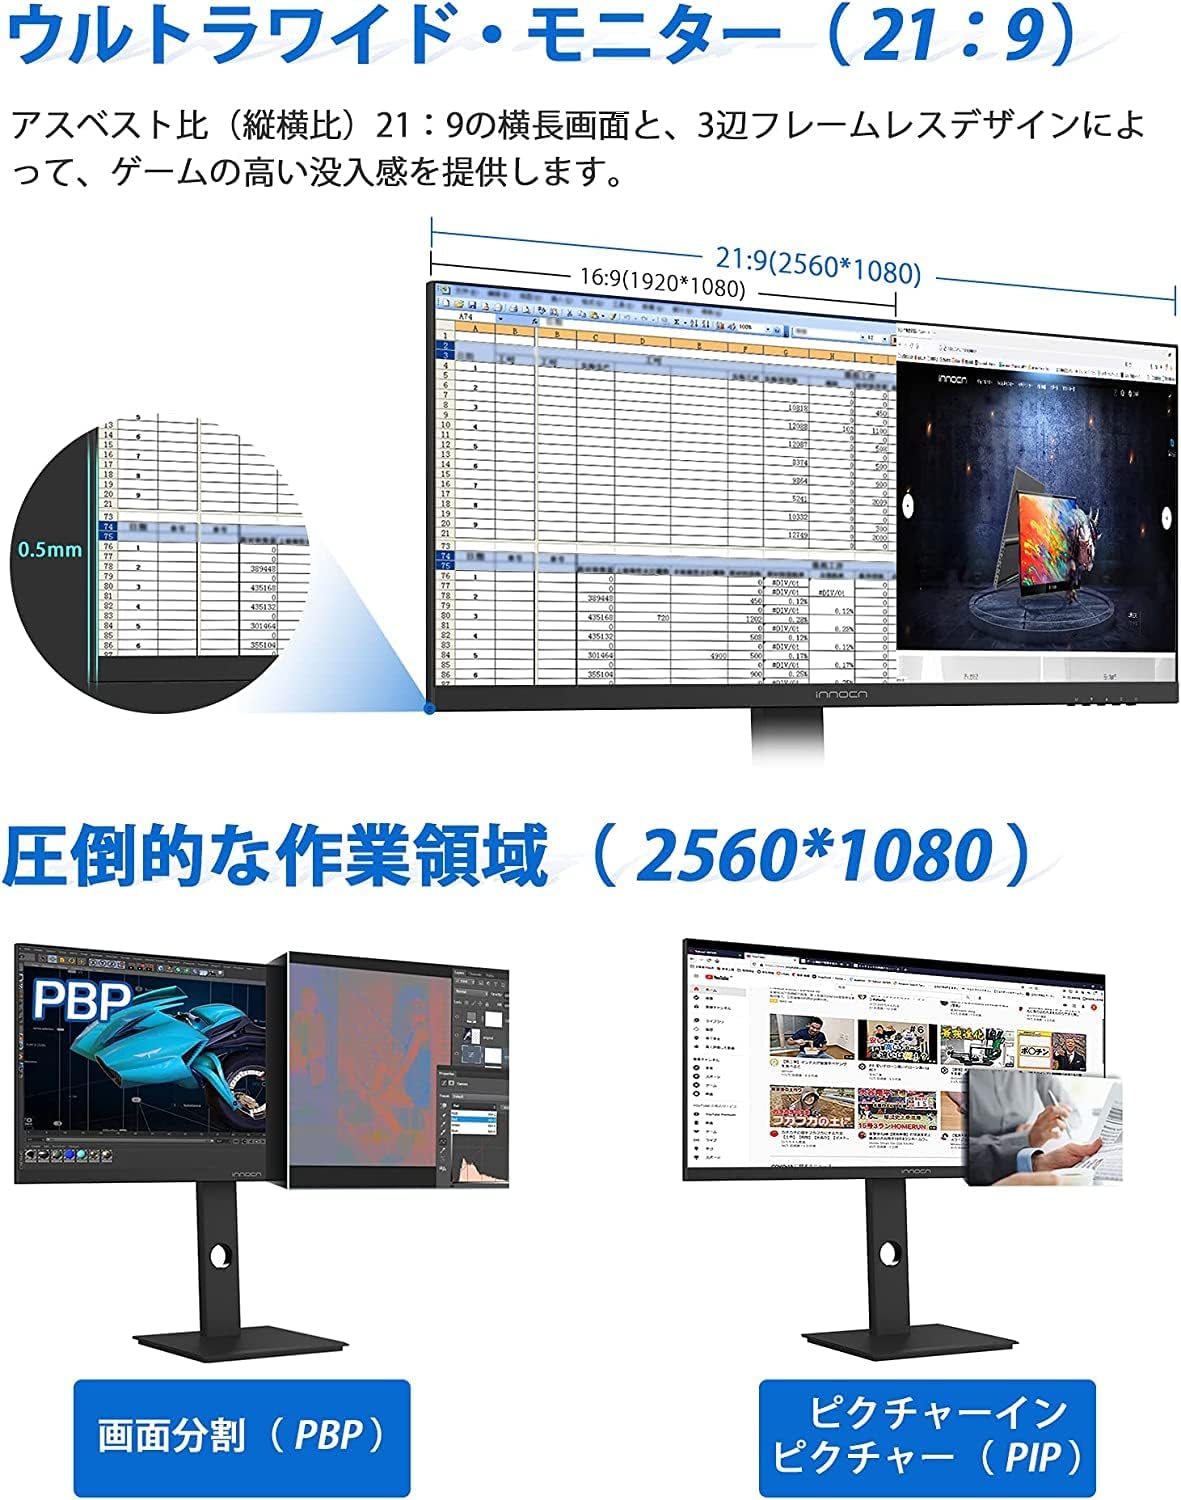
Image 5.1: Ultrawide display with PIP and PBP modes.
5.3 Refresh Rate and Response Time
The monitor supports a 75Hz refresh rate and 5ms (OD) response time, providing smoother visuals, especially for fast-paced content like games.

Image 5.2: High brightness, contrast, and 75Hz refresh rate benefits.
5.4 Built-in Speakers
The monitor includes built-in speakers for audio output. You can adjust the volume through the OSD menu or your connected device.

Image 5.3: Built-in speakers.
6. Maintenance
Proper maintenance ensures the longevity and performance of your monitor.
- Cleaning the Screen: Gently wipe the screen with a soft, lint-free cloth. For stubborn marks, dampen the cloth slightly with water or a screen-cleaning solution. Never spray liquid directly onto the screen.
- Cleaning the Casing: Use a soft, dry cloth to wipe the monitor casing. Avoid using abrasive cleaners or solvents.
- Ventilation: Ensure the ventilation openings are clear of dust and debris to prevent overheating.
- Storage: If storing the monitor for an extended period, unplug it and store it in a cool, dry place, preferably in its original packaging.
7. Troubleshooting
If you encounter issues with your monitor, refer to the following common problems and solutions:
| Problem | Possible Cause | Solution |
|---|---|---|
| No image on screen | Power cable disconnected, video cable loose/disconnected, incorrect input source selected. | Check power connection. Ensure video cable (HDMI/DP/Type-C) is securely connected. Select correct input source via OSD menu. |
| Image flickering or unstable | Loose video cable, incorrect resolution/refresh rate, interference. | Ensure video cable is secure. Adjust resolution/refresh rate in your computer's display settings. Move away from other electronic devices. |
| No sound from speakers | Volume too low, audio cable not connected (if applicable), monitor muted, incorrect audio output selected on PC. | Increase monitor volume via OSD. Check PC audio settings. Ensure Type-C or HDMI cable carries audio. |
| 75Hz not working via Type-C | Type-C connection limitation. | The monitor does not support 75Hz refresh rate via Type-C. Use HDMI or DisplayPort for 75Hz. |
| Monitor makes noise when charging via Type-C | Electrical interference or power delivery issue. | If possible, use a separate power adapter for your laptop/device instead of relying on the monitor's Type-C power delivery. If the issue persists, contact support. |
8. Specifications
| Feature | Specification |
|---|---|
| Brand | INNOCN |
| Model | WF29-PRO |
| Screen Size | 29 inches |
| Aspect Ratio | 21:9 |
| Resolution | 2560 x 1080 pixels (WFHD) |
| Panel Type | ADS Panel (IPS-like) |
| Brightness | 350 cd/m² |
| Contrast Ratio | 1000:1 |
| Color Gamut | 93% DCI-P3 |
| Refresh Rate | 75 Hz |
| Response Time | 5ms (OD) |
| Viewing Angle | 178° (H/V) |
| Inputs | HDMI (2.0/1.4), DisplayPort, USB Type-C (65W PD) |
| Features | HDR, Blue Light Filter, PIP/PBP, Pivot, Built-in Speakers |
| VESA Compatibility | 100x100mm |
| Dimensions (with stand) | Approx. 688.6mm (W) x 543.3mm (H) x 218.9mm (D) |
| Weight (with stand) | 8.3 kg |

Image 8.1: Monitor dimensions and weight.
9. Warranty and Support
INNOCN provides a 12-month warranty period for this product. If you encounter any issues or have questions regarding your monitor, please contact INNOCN customer support. Please refer to your purchase documentation for specific contact details or visit the official INNOCN website for support information.