
1. Introduction
This manual provides essential information for the safe and efficient installation, operation, and maintenance of your CT Copper Tailor 60-Inch Built-in Range Hood Insert. Please read these instructions thoroughly before installation and use, and retain them for future reference.
The CT Copper Tailor 60-Inch Built-in Range Hood Insert is designed to be integrated into a custom metal, wood hood, or kitchen cabinet. It features a powerful 1260 CFM motor, 4-speed exhaust fan, LED lighting, and dishwasher-safe baffle filters for effective kitchen ventilation.
2. Safety Information
- Electrical Safety: Ensure the power supply matches the unit's requirements (120 volts). All electrical wiring must be performed by a qualified electrician in accordance with local codes and standards.
- Automatic Shut-Off: The built-in hood vent insert includes a safety feature that automatically shuts off power if the temperature becomes too high.
- Certifications: This product is ETL Listed, conforms to UL 507, and is Certified to CSA standards, ensuring compliance with safety regulations.
- Ventilation: This is a ducted range hood. Ensure proper ductwork installation for efficient and safe operation.
- Installation: Professional installation is recommended to ensure correct setup and adherence to all safety guidelines.
3. Package Contents
Verify that all components are present before beginning installation:
- CT Copper Tailor 60-Inch Built-in Range Hood Insert
- Grease Filters (Baffle Type)
- Prong Plug
- Mounting Screws
- User Manual (this document)
4. Specifications
| Feature | Specification |
|---|---|
| Model Number | VHvent60 |
| Product Dimensions (L x W x H) | 58-3/8 in x 18 in x 17-3/5 in (148.2 cm x 45.7 cm x 44.7 cm) |
| Material | Commercial Grade 304 Stainless Steel |
| Air Flow Capacity | Max 1260 CFM |
| Number of Speeds | 4 |
| Noise Level | 70 dB |
| Ventilation Type | Ducted (8-inch round duct) |
| Lighting | LED Lights |
| Controls | Push Button |
| Voltage | 120 Volts |
| Wattage | 252 Watts |
| Filter Type | Baffle, Dishwasher-Safe |
| Special Features | Auto Fan Shut-Off, Built-In Oil Collector |
| Certifications | ETL Listed, UL 507, CSA Certified |
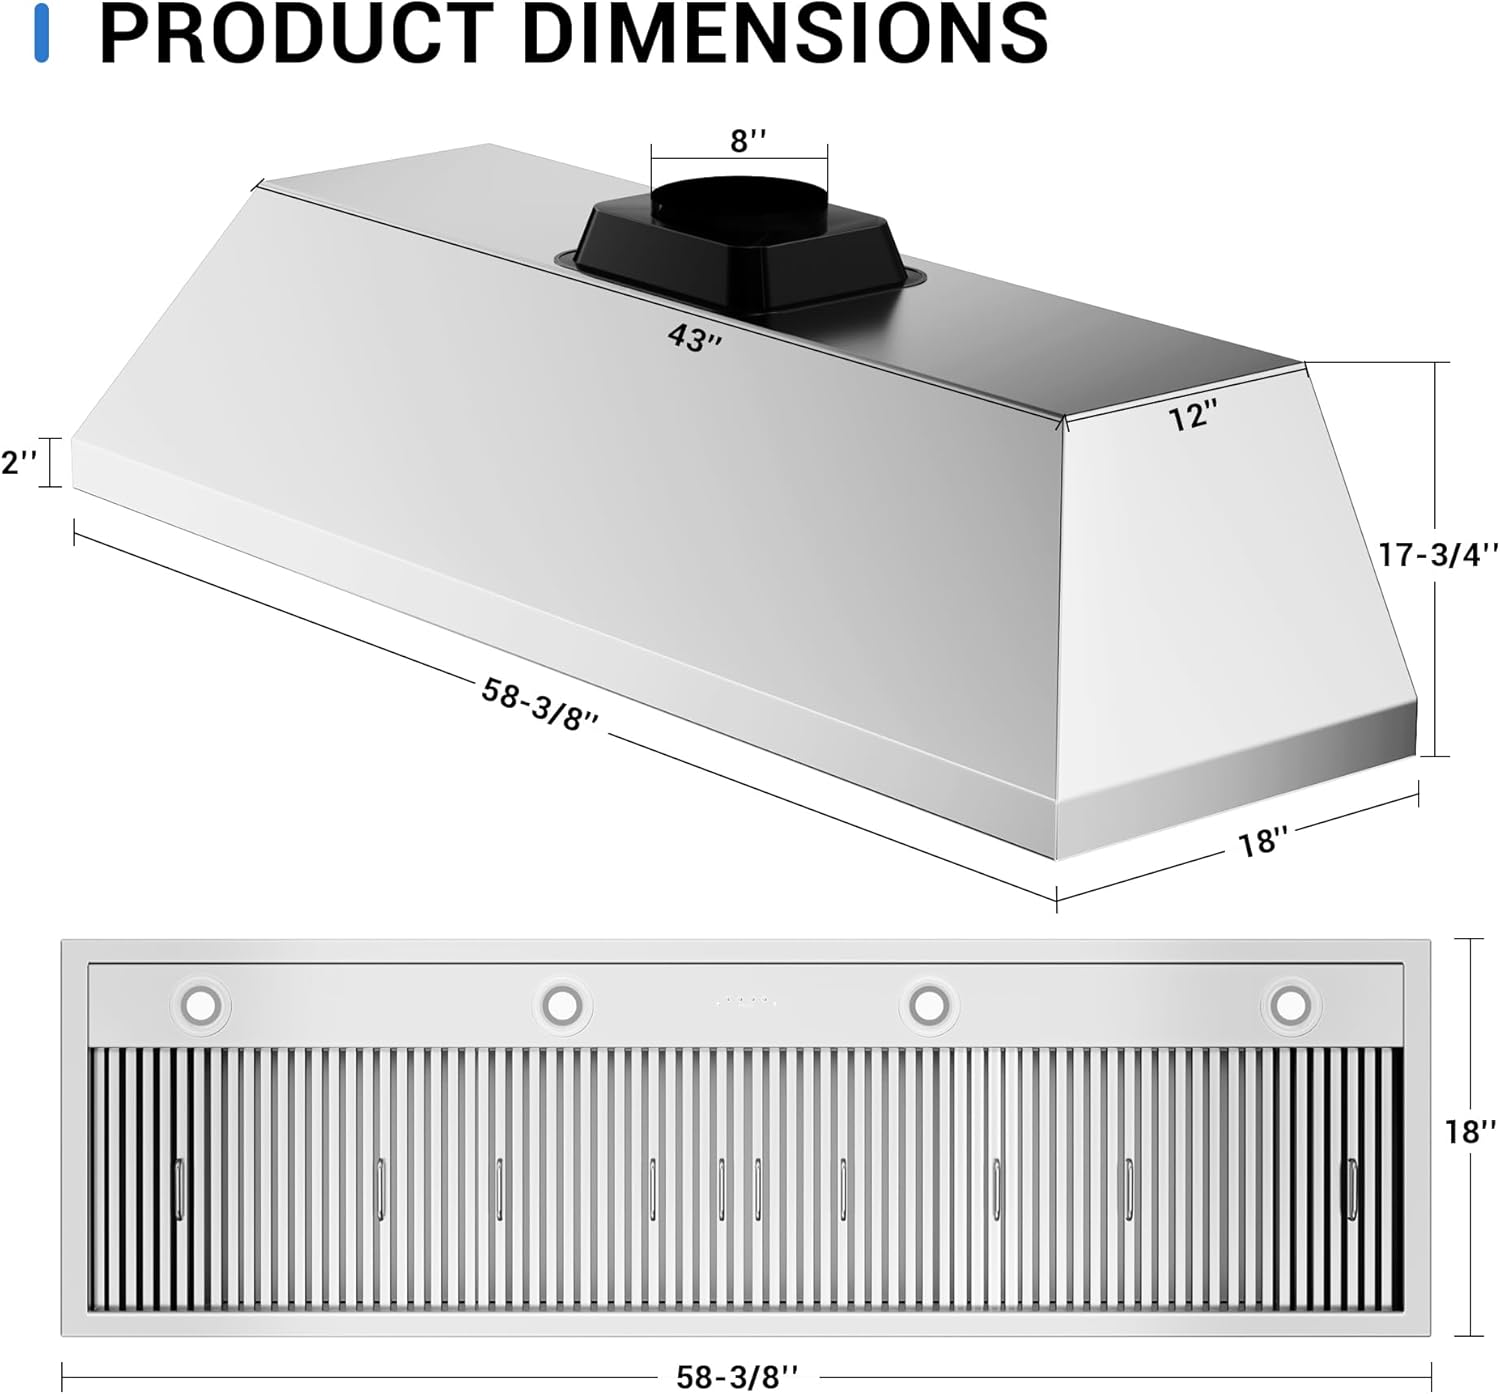
Figure 4.1: Product Dimensions Overview. This image displays the overall dimensions of the range hood insert, including its length of 58-3/8 inches, width of 18 inches, and height of 17-3/4 inches, along with the 8-inch duct opening.

Figure 4.2: Detailed Dimensions Diagram. This technical drawing provides precise measurements in both inches and millimeters for various parts of the range hood insert, including the top width (43 inches), bottom width (58-3/8 inches), depth (18 inches), and height (15-5/8 inches).
5. Setup and Installation
The CT Copper Tailor 60-Inch Range Hood Insert is designed for built-in applications within custom metal, wood hoods, or kitchen cabinets. Due to the nature of built-in appliance installation and electrical requirements, professional installation is strongly recommended.
5.1 Pre-Installation Checks
- Verify Dimensions: Ensure the custom hood or cabinet opening matches the product dimensions (58-3/8 in x 18 in x 17-3/5 in).
- Ductwork: Confirm that an 8-inch round duct is available and properly routed for external ventilation.
- Electrical Supply: A dedicated 120-volt electrical circuit is required.
- Unpack and Inspect: Carefully unpack all components and inspect for any shipping damage. Report any damage immediately.
5.2 Installation Steps (General Guidance)
- Prepare Opening: Ensure the custom hood or cabinet opening is precisely sized and reinforced to support the weight of the insert.
- Mounting: Secure the range hood insert into the prepared opening using the provided mounting screws. Ensure it is level and firmly attached.
- Duct Connection: Connect the 8-inch round duct to the exhaust outlet on the top of the range hood insert. Seal all connections to prevent air leaks.
- Electrical Connection: Connect the prong plug to a grounded 120-volt outlet. If direct wiring is required, consult a qualified electrician.
- Install Baffle Filters: Insert the baffle filters into their designated slots.
- Test Operation: Turn on the power and test all functions (fan speeds, lights) to ensure proper operation.

Figure 5.1: Internal Components. This image provides a view of the internal structure of the range hood insert, highlighting the motor, the arrangement of the baffle filters, and the electrical wiring connections.

Figure 5.2: Front View of Insert. This image shows the front perspective of the range hood insert, featuring the LED lights and the array of baffle filters, as it would appear when installed.
6. Operating Instructions
The range hood insert features intuitive push-button controls for fan speed and lighting.

Figure 6.1: Push Button Controls. This image highlights the control panel with clearly labeled buttons for On/Off, Increase Value, Decrease Value, and Light functions.
6.1 Fan Operation
- Power On/Off: Press the On/Off button to activate or deactivate the fan.
- Adjust Speed: Use the Increase Value and Decrease Value buttons to cycle through the 4 fan speeds (Low, Mid, Mid High, High). Select the appropriate speed based on cooking intensity.

Figure 6.2: 4-Speed Exhaust Fan. This graphic illustrates the four available fan speeds (Low, Mid, Mid High, High) and suggests their application for different cooking scenarios, from simmering to high-heat frying.
6.2 Lighting Operation
- Turn Lights On/Off: Press the Light button to turn the LED lights on or off.

Figure 6.3: Key Features Overview. This image provides a visual summary of the range hood insert's main features, including energy-efficient LED lights, push-button controls, dishwasher-safe baffle filters, and durable 304 stainless steel construction.
Video 6.1: CT Copper Tailor 60-inch Range Hood Insert in Operation. This video demonstrates the range hood insert's functionality, including the activation of warm white LED lights and the powerful exhaust fan removing smoke and odors from the cooking area.
7. Maintenance
Regular maintenance ensures optimal performance and longevity of your range hood insert.
7.1 Cleaning Baffle Filters
The stainless steel baffle filters are designed to trap grease and oil effectively and are dishwasher-safe for easy cleaning.
- Remove Filters: Carefully unlatch and remove the baffle filters from the hood insert.
- Dishwasher Cleaning: Place the filters in a dishwasher and run a normal cycle.
- Manual Cleaning: Alternatively, wash filters by hand using hot water and a degreasing detergent. Scrub with a non-abrasive brush if necessary.
- Dry and Reinstall: Ensure filters are completely dry before reinstalling them into the hood insert.

Figure 7.1: Effortless Cleaning of Baffle Filters. This image demonstrates the ease of cleaning the baffle filters, showing them both in a dishwasher and being hand-washed in a sink, emphasizing their removable and dishwasher-safe design.
7.2 Exterior Cleaning
- Wipe the stainless steel surfaces with a soft cloth and a mild, non-abrasive stainless steel cleaner.
- Avoid abrasive cleaners or scouring pads, which can scratch the finish.
8. Troubleshooting
Refer to the following table for common issues and their potential solutions. If the problem persists, contact customer support.
| Problem | Possible Cause | Solution |
|---|---|---|
| Fan does not turn on or lights do not work. | No power supply; loose electrical connection; tripped circuit breaker. | Check if the unit is properly plugged in. Verify the circuit breaker is not tripped. If issues persist, consult an electrician. |
| Fan operates but suction is weak. | Clogged baffle filters; obstructed ductwork; incorrect fan speed setting. | Clean the baffle filters (refer to Section 7.1). Check ductwork for obstructions. Ensure fan is set to a higher speed. |
| Excessive noise during operation. | Loose components; ductwork issues; motor imbalance. | Ensure all mounting screws are tight. Check ductwork for proper installation and sealing. If noise persists, contact customer support. |
| Fan speeds do not change. | Control panel malfunction; temporary electrical glitch. | Try resetting the unit by turning off the electrical breaker for a few minutes, then turning it back on. If the problem continues, contact customer support. |
9. Warranty and Support
9.1 Product Warranty
The CT Copper Tailor 60-Inch Built-in Range Hood Insert comes with an industry-leading one-year parts warranty from the date of purchase. This warranty covers defects in materials and workmanship under normal use.
Please retain your proof of purchase for warranty claims. The warranty does not cover damage resulting from improper installation, misuse, abuse, accident, or unauthorized repairs.
9.2 Customer Support
For technical assistance, warranty claims, or any questions regarding your CT Copper Tailor range hood insert, please contact our customer support team. Refer to the contact information provided with your purchase documentation or visit the official CT Copper Tailor website for support details.
Online Resources: For additional information and support, you may visit the CT Copper Tailor Store on Amazon.